Trailblazer Socks – free pattern and tutorial
The pattern for these socks came long before the name. In fact, the pattern was in my head and on my needles at the end of the summer, but still I dragged my feet over getting the written pattern finished as the socks were nameless, and somehow, I couldn’t finish it without a name. They were nearly called the “Winter Haven KAL 2025 Socks”, but that wasn’t what I wanted. I wanted something that would reflect how the pattern forges its way down the sock, the stitches in the centre of the pattern block following a line down to the toes and standing out from the rest. I thought about “wandering” and “wondering” and “meandering”, but they weren’t quite right.
In the end, about to give up and call them the “Winter Haven KAL 2025 Socks” after all, I suddenly remembered a picture that my Mum had in the dining room of the house where I grew up. It was just a small photo of some footprints in the snow but I had bought it to give to my Mum because it made me think of her. The words beneath the photo read, “Do not follow where the path may lead … go instead where there is no path and leave a trail”. This was my Mum all over, she was never one to follow the path and I knew that from a very early age!
I found the picture at the back of a bookcase shelf; I’ll have put it there when we cleared out the house after my Dad died and I had forgotten about it until now. The photo is faded, the colours washed out, but the words are still boldly printed and I knew exactly what I wanted to call these socks.
Trailblazer Socks.
I think it’s the perfect name for anyone who knits socks as we have stepped away from the well-worn path of shop-bought socks to blaze our own trails of colours and patterns, knitting for anyone we choose to and in the process, developing our knitting skills and talents and somehow, magically, gaining a confidence for anything in life that we want to turn our hand to.
We are all trail blazers.
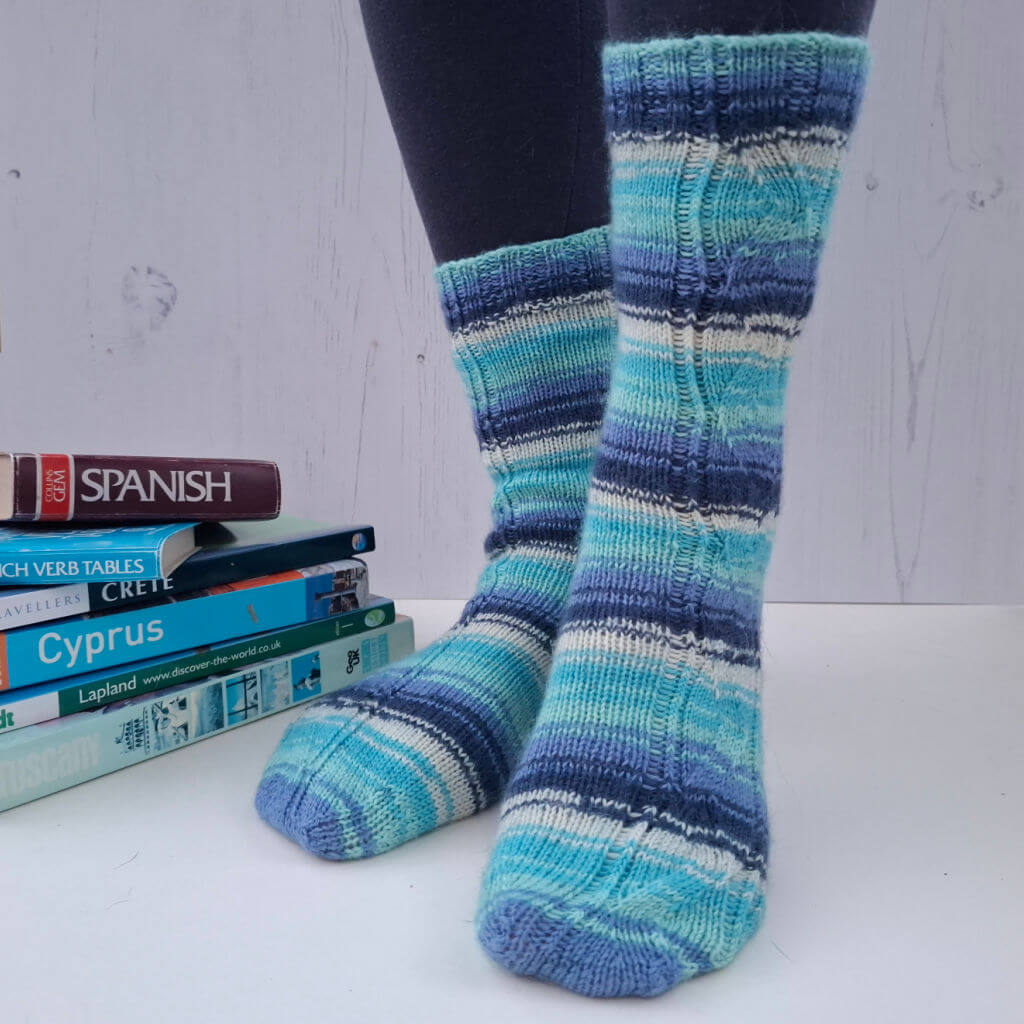
You’ll be pleased to know that the pattern is not difficult and you don’t need to learn a whole raft of new skills to create a pair of Trailblazer Socks for yourself. There are knit and purl stitches, and a couple of lifted increases to make the stitches shift from one side to another – you may already be familiar with these but if not, they are not difficult to learn and once you get going, you’ll find the pattern is easy to memorise so that you can get on with blazing a trail down your socks rather than having to keep checking the pattern!
I’ve included a photo tutorial for the increases further down in the pattern text, and you can also download a PDF copy of the pattern if you would like to do that – the link is a bit further down the page.
I couldn’t decided which of the Winwick Mum colourways I liked best for these socks – Winter Icicle or Spring Green – so in the end, I knitted them in both colours!


They look good in the green, don’t they?
The pattern runs down the front of the foot over to one side and repeats on the back of the sock so depending on which way round you wear your socks, the pattern is either to the outside at the front and the inside at the back, or the other way around 🙂

Now, onto the pattern. My favourite thing to do when I’m designing socks is to try to come up with something that looks very complicated but is actually much easier to knit. I am all about showing off our knitting skills and when someone looks at your socks and admires them, I want them to see you as the sock superstar that you are, creating magic with your pointy sticks!
This is a close up of the pattern of the Trailblazer Socks …
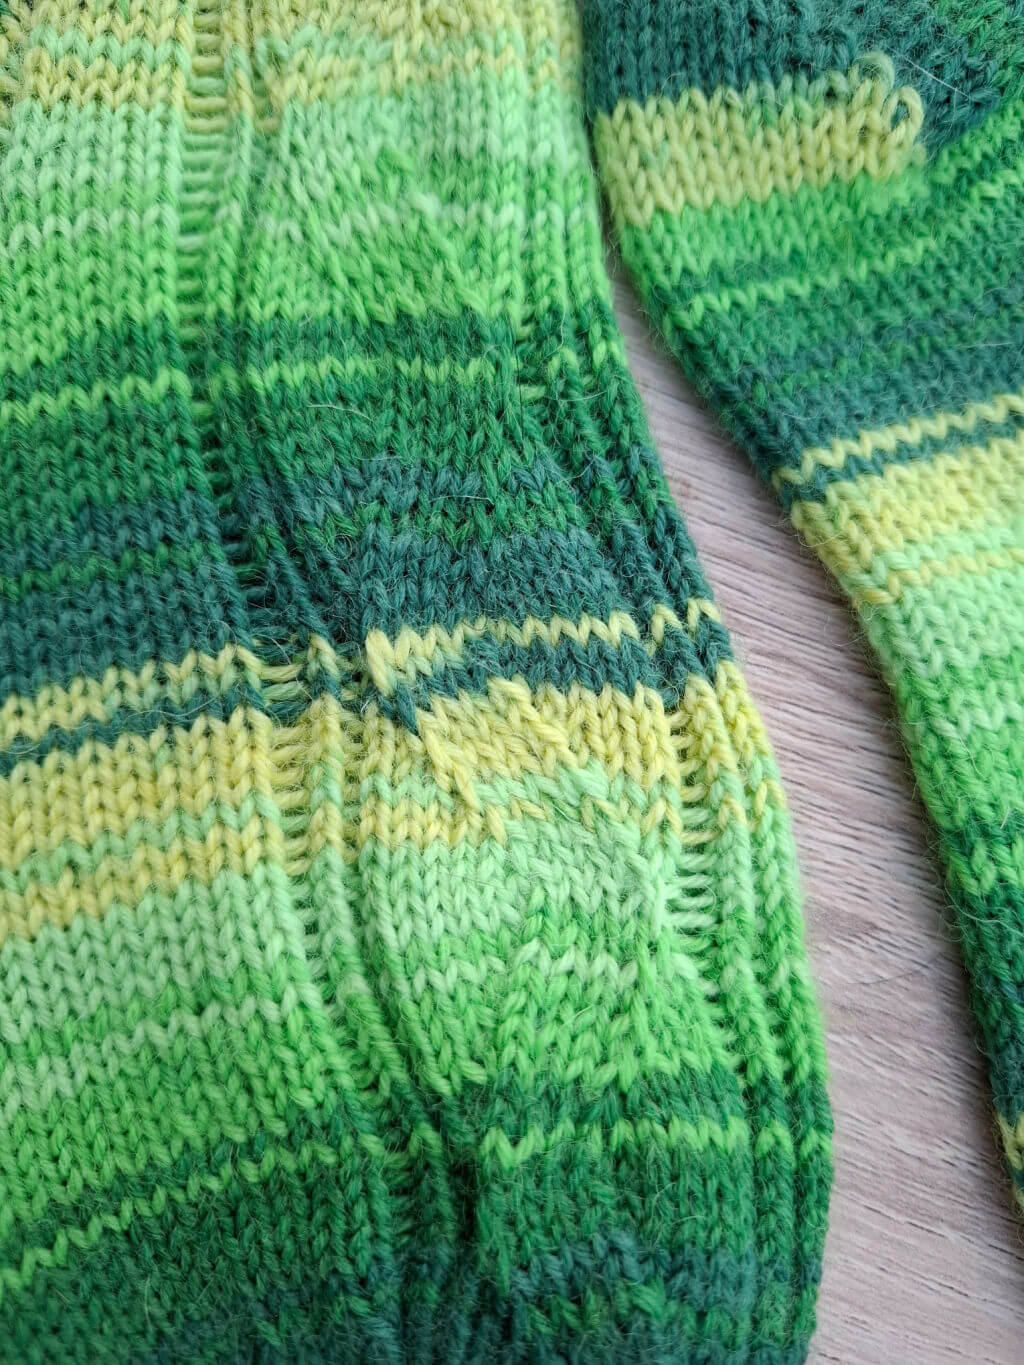
It’s got a bit of a look of the Sanctuary Socks pattern about it, hasn’t it, with the way the pattern zig zags down the sock – there are absolutely no cables involved in this pattern, though, so if you like the look of the pattern but haven’t fancied tackling the cables, this one could be right up your street! 🙂
What I love about this pattern is the way the colours in the zig zag keep on going even though the background appears to move. I like that they don’t break up the stripes in anyway; they seem to sit on the top – striped yarn can be quite a challenge for a designer at times but when you get a pattern that the yarn likes, you really know that it likes it!


I’ve created two versions of the cuff for these socks which you can see below …


Why two versions? Because I can! 🙂 You can choose whichever one you like as I’ve given the instructions for both, and even if you choose to knit the same colours as me, you can still swap the cuffs around to suit yourself.
The heel is a heel flap and gusset-type heel which you’ll be really familiar with if you’ve knitted any of my sock patterns before. I like this heel type, I think it fits well (if you’ve got a wider heel, you can substitute this heel stitch heel for my Ribbed Heel Flap which you’ll find in the Patchwork Socks pattern here), and I think it’s a good one for beginners too – other people might recommend other types of heel as being the easier as this one involves picking up stitches, but I think that going to all the effort of knitting a heel (especially for the first time) requires a heel that fits properly and I haven’t found one that I like to wear better than this one so far.
That brings me neatly to telling you that if you’re a beginner and you love these socks – go for it! The pattern is based on my Basic 4ply Socks pattern and you can get help with knitting it through the Winwick Mum Sockalong tutorials. All I’ve done is added in an extra pattern on the front and back of the sock, and as I’m all about creating fearless sock knitters, don’t let that put you off!
If you’ve knitted basic socks before and are looking for a next step pattern – this one is perfect (she says, modestly 😉 )! You’ll already be familiar with the sock anatomy and shape so you’re just moving the stitches about in a different way and I know that if you can already knit a pair of socks then you can do this. If you’re an experienced sock knitter, you’ll take to this pattern like a duck to water – take it from someone who knitted two pairs in quick succession because she couldn’t decide on the colours! 🤣
Are we ready to start? I’ve written out the pattern below for you and you’ll find the photo tutorial on the increases below. No over-thinking allowed, just follow the pattern and it will all make sense! If you’re brand new to charts, try following it whilst you read the written instructions so that you can see how it works, and perhaps have a quick look at my Easy Lace Socks tutorial as there’s information on chart reading for beginners there.
If you would like a PDF copy of the pattern to work from, you can download that HERE.
** If you downloaded a copy before 4pm on 09.01.25, please download another as there has been an update! **
Trailblazer Socks
Size
To fit ball of foot circumference: 8 [8½:9:9½] ins; 20 [22:23:24] cm
Tension
30 sts to 4 ins (10 cm) in stocking stitch (worked in the round) on 2.5mm needles or size required for gauge.
Yarn
1 x 100g West Yorkshire Spinners Signature 4ply in Winter Icicle (cuff version 1); OR
1 x 100g West Yorkshire Spinners Signature 4ply in Spring Green (cuff version 2)
Materials
2.5mm needles – short circular needle, DPNs (double pointed needles) or 80 cm circular for magic loop
1 set DPNs size 3.0mm (optional for a looser cuff)
1 set DPNs size 2.5mm (not required for magic loop)
Stitch holder (optional)
Stitch markers
Wool needle
Abbreviations
cm Centimetres
DPNs Double pointed needles
in(s) Inch(es)
K Knit
Ktbl Knit through back loop of stitch
K2tog Knit two stitches together
LLI Left Lifted Increase: Insert the left-hand needle into the left leg of the stitch two rows below the stitch just knitted on right-hand needle. Lift this loop onto the left-hand needle and knit into the back of the stitch.
RLI Right Lifted Increase: Insert the right-hand needle into the right leg of the stitch directly below the next stitch on left-hand needle. Lift this loop onto the left-hand needle and knit it.
P Purl
Ptbl Purl through back loop of stitch
P2tog Purl two stitches together
Sl1 Slip 1 stitch purlwise holding yarn to the back of your work
SSK Slip the first stitch on the left hand needle knitwise onto the right hand needle, slip the second stitch on the left hand needle purlwise onto the right hand needle, slip both stitches back onto the left hand needle and knit together through back loop
St(s) Stitch(es)
( ) Repeat instructions inside brackets for a short repeat
[ ] Repeat instructions within brackets for a longer/more complex repeat
Pattern Notes
- These socks are knitted on 2.5mm needles, not 3.25mm as stated on the ball band. This will produce a different tension but will ensure a firmer, more hard-wearing fabric for your socks. The ideal tension for these socks is 30 stitches to 10 cm (4 inches) so use whatever size needles are required to reach that tension and do check that your knitted fabric is firm but not stiff.
- It is often easier to cast on using DPNs before changing to the short circular needle. If you want to use magic loop you will be able to cast on with the larger circular needle if you prefer to do so, but remember not to pull your cast on stitches too tight. If you use DPNs, you might find it easiest to cast on and work 2 rows before dividing the stitches across the needles.
- When working from a chart you will read all rounds from right to left.
Pattern
Cuff – version 1

Using Winter Icicle, cast on 60 [64:68:72] sts using 3.0mm double pointed needles. The pattern has been written for a cast on with straight needles; if you wish to join into the round straight away, work row 1 twice and omit row 2.
Left leg
60 sts
Row 1: *P1, (K2, P2) twice, K2, P1, Ktbl, P1, K4, P2, K4, P1, Ktbl, P1, K2, P1, repeat from * to end.
Row 2: Work all knit and purl stitches as they present themselves, working Ptbl into the Ktbl of previous row, turn.
64 sts
Row 1: *K1, (P2, K2) 3 times, P1, Ktbl, P1, K4, P2, K4, P1, Ktbl, P1, K2, P1, repeat from * to end.
Row 2: Work all knit and purl stitches as they present themselves, working Ptbl into the Ktbl of previous row, turn.
68 sts
Row 1: *P1, (K2, P2) 3 times, K2, P1, Ktbl, P1, K4, P2, K4, P1, Ktbl, P1, K2, P1, repeat from * to end.
Row 2: Work all knit and purl stitches as they present themselves, working Ptbl into the Ktbl of previous row, turn.
72 sts
Row 1: *K1, (P2, K2) 4 times, P1, Ktbl, P1, K4, P2, K4, P1, Ktbl, P1, K2, P1, repeat from * to end.
Row 2: Work all knit and purl stitches as they present themselves, working Ptbl into the Ktbl of previous row, turn.
Change to a 2.5mm short circular needle, magic loop or divide the stitches across DPNs and join into a circle, place marker. You will sew up the small gap where you knitted the first two rows later.
Continue in rib as set for row 1 for 14 more rounds.
Right leg
60 sts
Row 1: *P1, K2, P1, Ktbl, P1, K4, P2, K4, P1, Ktbl, P1, (K2, P2) twice, K2, P1, repeat from * to end.
Row 2: Work all knit and purl stitches as they present themselves, working Ptbl into the Ktbl of previous row, turn.
64 sts
Row 1: *P1, K2, P1, Ktbl, P1, K4, P2, K4, P1, Ktbl, P1, (K2, P2) 3 times, K1, repeat from * to end.
Row 2: Work all knit and purl stitches as they present themselves, working Ptbl into the Ktbl of previous row, turn.
68 sts
Row 1: *P1, K2, P1, Ktbl, P1, K4, P2, K4, P1, Ktbl, P1, (K2, P2) 3 times, K2, P1, repeat from * to end.
Row 2: Work all knit and purl stitches as they present themselves, working Ptbl into the Ktbl of previous row, turn.
72 sts
Row 1: *P1, K2, P1, Ktbl, P1, K4, P2, K4, P1, Ktbl, P1, (K2, P2) 4 times, K1, repeat from * to end.
Row 2: Work all knit and purl stitches as they present themselves, working Ptbl into the Ktbl of previous row, turn.
Change to a 2.5mm short circular needle, magic loop or divide the stitches across DPNs and join into a circle, place marker. You will sew up the small gap where you knitted the first two rows later.
Continue in rib as set for row 1 for 14 more rounds.
Cuff – version 2

Using Spring Green, cast on 60 [64:68:72] sts using 3.0mm double pointed needles. The pattern has been written for a cast on with straight needles; if you wish to join into the round straight away, work row 1 twice and omit row 2.
Left leg
60 sts
Row 1: *P1, (K2, P2) twice, K2, P1, Ktbl, P1, K4, (P1, K2) twice, P1, Ktbl, P1, K2, P1, repeat from * to end.
Row 2: Work all knit and purl stitches as they present themselves, working Ptbl into the Ktbl of previous row, turn.
64 sts
Row 1: *K1, (P2, K2) 3 times, P1, Ktbl, P1, K4, (P1, K2) twice, P1, Ktbl, P1, K2, P1, repeat from * to end.
Row 2: Work all knit and purl stitches as they present themselves, working Ptbl into the Ktbl of previous row, turn.
68 sts
Row 1: *P1, (K2, P2) 3 times, K2, P1, Ktbl, P1, K4, (P1, K2) twice, P1, Ktbl, P1, K2, P1, repeat from * to end.
Row 2: Work all knit and purl stitches as they present themselves, working Ptbl into the Ktbl of previous row, turn.
72 sts
Row 1: *K1, (P2, K2) 4 times, P1, Ktbl, P1, K4, (P1, K2) twice, P1, Ktbl, P1, K2, P1, repeat from * to end.
Row 2: Work all knit and purl stitches as they present themselves, working Ptbl into the Ktbl of previous row, turn.
Change to a 2.5mm short circular needle, magic loop or divide the stitches across DPNs and join into a circle, place marker. You will sew up the small gap where you knitted the first two rows later.
Continue in rib as set for row 1 for 14 more rounds.
Right leg
60 sts
Row 1: *P1, [K2, P1, Ktbl, P1, (K2, P2) twice] twice, K2, P1, repeat from * to end.
Row 2: Work all knit and purl stitches as they present themselves, working Ptbl into the Ktbl of previous row, turn.
64 sts
Row 1: *P1, [K2, P1, Ktbl, P1, (K2, P2) twice] twice, K2, P2, K1, repeat from * to end.
Row 2: Work all knit and purl stitches as they present themselves, working Ptbl into the Ktbl of previous row, turn.
68sts
Row 1: *P1, [K2, P1, Ktbl, P1, (K2, P2) twice] twice, K2, P2, K2, P1, repeat from * to end.
Row 2: Work all knit and purl stitches as they present themselves, working Ptbl into the Ktbl of previous row, turn.
72 sts
Row 1: *P1, [K2, P1, Ktbl, P1, (K2, P2) twice] twice, (K2, P2) twice, K1, repeat from * to end.
Row 2: Work all knit and purl stitches as they present themselves, working Ptbl into the Ktbl of previous row, turn.
Change to a 2.5mm short circular needle, magic loop or divide the stitches across DPNs and join into a circle, place marker. You will sew up the small gap where you knitted the first two rows later.
Continue in rib as set for row 1 for 14 more rounds.
We’re just going to pause here for a minute whilst I show you how to do the lifted increases for the next section. They’re called lifted increases as you’re lifting the stitch from the round (or two rounds) below to create the increase stitch so that you get a smooth increase and nobody except you will know that you’ve increased anything!
The two increases are LLI – the Left Lifted Increase and RLI – the Right Lifted Increase and I’m sure you’re going to have no problems with them! What I will say, though, and I’ll remind you of this again later, is that it looks like the stitch names are the wrong way round when you get to the chart. They’re not – it’s all to do with the way the stitch leans – and once you get used to doing them, you won’t think about the name but just the way your knitting is going and it will all make sense 🙂
LLI (Left Lifted Increase)
1 Insert the left-hand needle into the left leg of the stitch two rows below the stitch just knitted on right-hand needle.
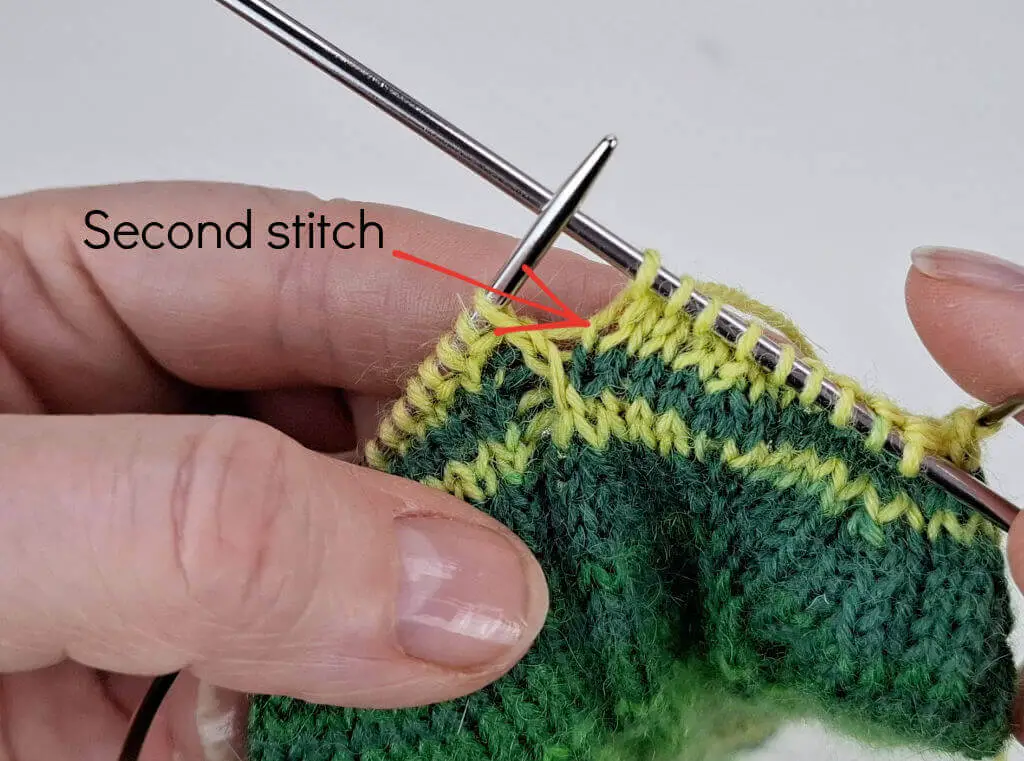
2 Lift this loop onto the left-hand needle and knit it.
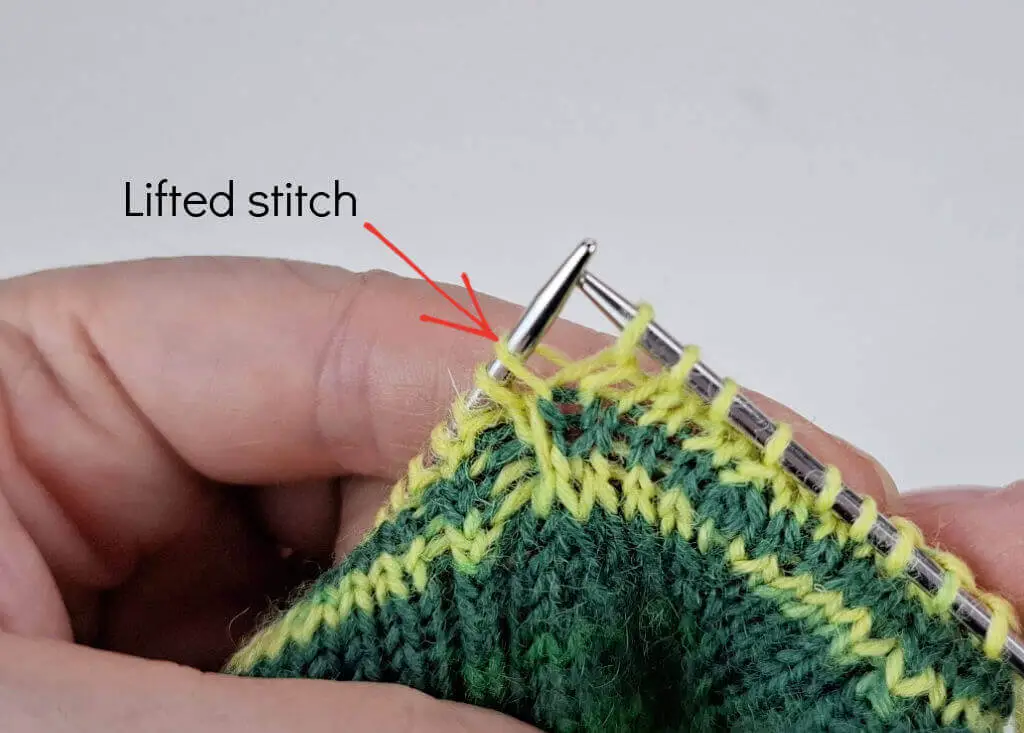
RLI (Right Lifted Increase)
1 Insert the right-hand needle into the right leg of the stitch directly below the next stitch on left-hand needle.
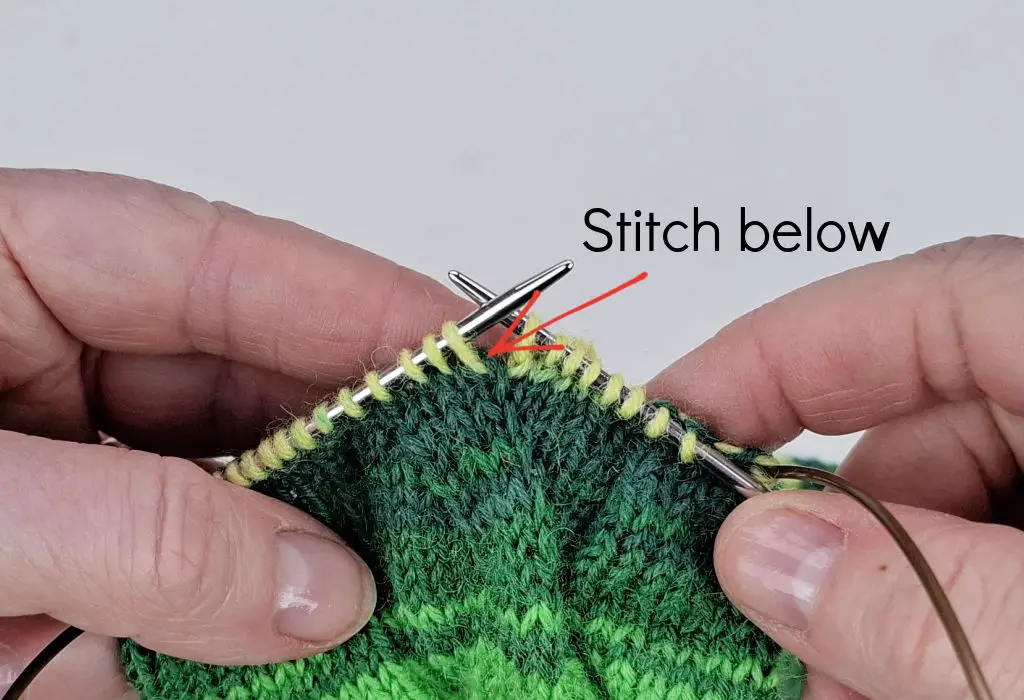
2 Lift this loop onto the left-hand needle and knit it.
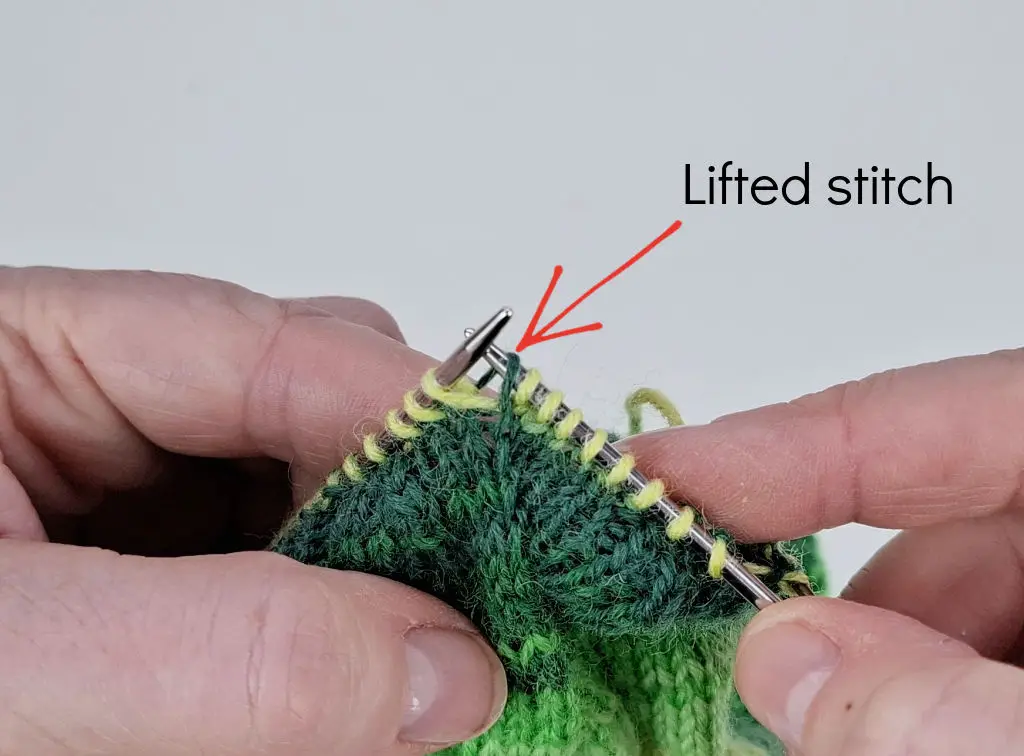
They’re really quite straightforward stitches to work and once you get going, you’ll see how they change the direction of your knitting like magic!
Leg – both versions
Here’s the pattern section again so you can see what you’re going to be knitting. Don’t forget that this pattern is on both the front and the back of the sock and this is written into the instructions.

Using either the chart or the written instructions and starting at round 1, continue to work each round in pattern for desired length from cast on edge, finishing on either round 12 or round 24.
Left leg
Written instructions
Pattern panel
Round 1: P1, Ktbl, P1, RLI, K2, SSK, K5, P1, Ktbl, P1, K3. (19 sts)
Round 2: P1, Ktbl, P1, K10, P1, Ktbl, P1, K3.
Round 3: P1, Ktbl, P1, K1, RLI, K2, SSK, K4, P1, Ktbl, P1, K3.
Round 4: Repeat Round 2.
Round 5: P1, Ktbl, P1, K2, RLI, K2, SSK, K3, P1, Ktbl, P1, K3.
Round 6: Repeat Round 2.
Round 7: P1, Ktbl, P1, K3, RLI, K2, SSK, K2, P1, Ktbl, P1, K3.
Round 8: Repeat Round 2.
Round 9: P1, Ktbl, P1, K4, RLI, K2, SSK, K1, P1, Ktbl, P1, K3.
Round 10: Repeat Round 2.
Round 11: P1, Ktbl, P1, K5, RLI, K2, SSK, P1, Ktbl, P1, K3.
Round 12: Repeat Round 2.
Round 13: P1, Ktbl, P1, K5, K2tog, K2, LLI, P1, Ktbl, P1, K3.
Round 14: Repeat Round 2.
Round 15: P1, Ktbl, P1, K4, K2tog, K2, LLI, K1, P1, Ktbl, P1, K3.
Round 16: Repeat Round 2.
Round 17: P1, Ktbl, P1, K3, K2tog, K2, LLI, K2, P1, Ktbl, P1, K3.
Round 18: Repeat Round 2.
Round 19: P1, Ktbl, P1, K2, K2tog, K2, LLI, K3, P1, Ktbl, P1, K3.
Round 20: Repeat Round 2.
Round 21: P1, Ktbl, P1, K1, K2tog, K2, LLI, K4, P1, Ktbl, P1, K3.
Round 22: Repeat Round 2.
Round 23: P1, Ktbl, P1, K2tog, K2, LLI, K5, P1, Ktbl, P1, K3.
Round 24: Repeat Round 2.
All sizes
Round 1: *K11 (13:15:17), work 19sts of pattern panel starting at Round 1 repeat from *. 60 [64:68:72] sts
Round 2 and following rounds: K11 (13:15:17), work 19sts of pattern panel from Round 2 onwards, repeat from *.
Rounds 1-24 set pattern and position of pattern panel on front and back of sock and should be repeated.
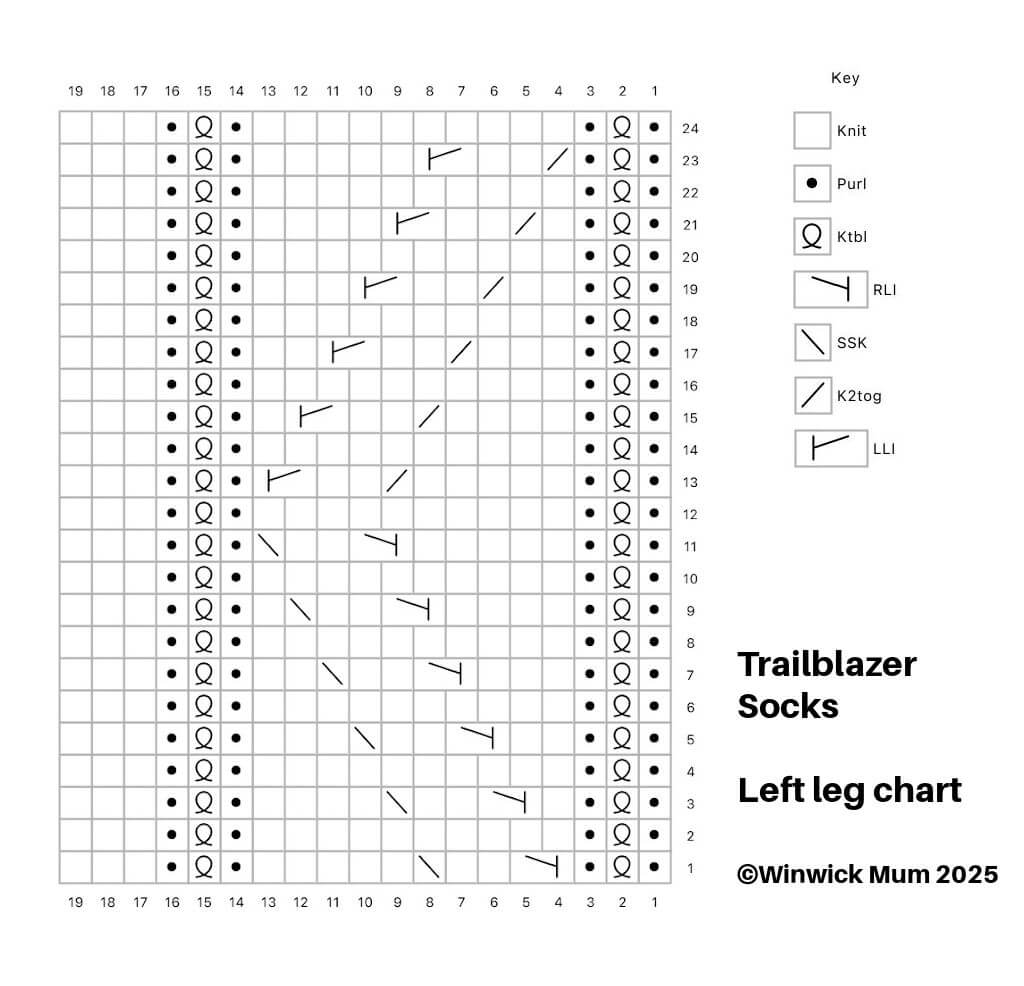
Chart instructions
Round 1: *K11 (13:15:17), work 19sts of pattern panel starting at Round 1, repeat from *. 60 [64:68:72] sts
Round 2 and following rounds: *K11 (13:15:17), work 19sts of pattern panel from Round 2 onwards, repeat from *.
Rounds 1-24 set pattern and position of pattern panel on front and back of sock and should be repeated.
Note – don’t worry that the symbols for the chart seem to be the wrong way round – they’re right! Just follow the instructions for the increases and your sock will be fine!
Right leg
Written instructions
Pattern panel
Round 1: K3, P1, Ktbl, P1, K5, K2tog, K2, LLI, P1, Ktbl, P1. (19 sts)
Round 2: K3, P1, Ktbl, P1, K10, P1, Ktbl, P1.
Round 3: K3, P1, Ktbl, P1, K4, K2tog, K2, LLI, K1, P1, Ktbl, P1.
Round 4: Repeat Round 2.
Round 5: K3, P1, Ktbl, P1, K3, K2tog, K2, LLI, K2, P1, Ktbl, P1.
Round 6: Repeat Round 2.
Round 7: K3, P1, Ktbl, P1, K2, K2tog, K2, LLI, K3, P1, Ktbl, P1.
Round 8: Repeat Round 2.
Round 9: K3, P1, Ktbl, P1, K1, K2tog, K2, LLI, K4, P1, Ktbl, P1.
Round 10: Repeat Round 2.
Round 11: K3, P1, Ktbl, P1, K2tog, K2, LLI, K5, P1, Ktbl, P1.
Round 12: Repeat Round 2.
Round 13: K3, P1, Ktbl, P1, RLI, K2, SSK, K5, P1, Ktbl, P1.
Round 14: Repeat Round 2.
Round 15: K3, P1, Ktbl, P1, K1, RLI, K2, SSK, K4, P1, Ktbl, P1.
Round 16: Repeat Round 2.
Round 17: K3, P1, Ktbl, P1, K2, RLI, K2, SSK, K3, P1, Ktbl, P1.
Round 18: Repeat Round 2.
Round 19: K3, P1, Ktbl, P1, K3, RLI, K2, SSK, K2, P1, Ktbl, P1.
Round 20: Repeat Round 2.
Round 21: K3, P1, Ktbl, P1, K4, RLI, K2, SSK, K1, P1, Ktbl, P1.
Round 22: Repeat Round 2.
Round 23: K3, P1, Ktbl, P1, K5, RLI, K2, SSK, P1, Ktbl, P1.
Round 24: Repeat Round 2.
All sizes
Round 1: *Work 19sts of pattern panel starting at Round 1, K11 (13:15:17), repeat from *. 60 [64:68:72] sts
Round 2 and following rounds: *Work 19sts of pattern panel from Round 2 onwards, K11 (13:15:17), repeat from *.
Rounds 1-24 set pattern and position of pattern panel on front and back of sock and should be repeated.
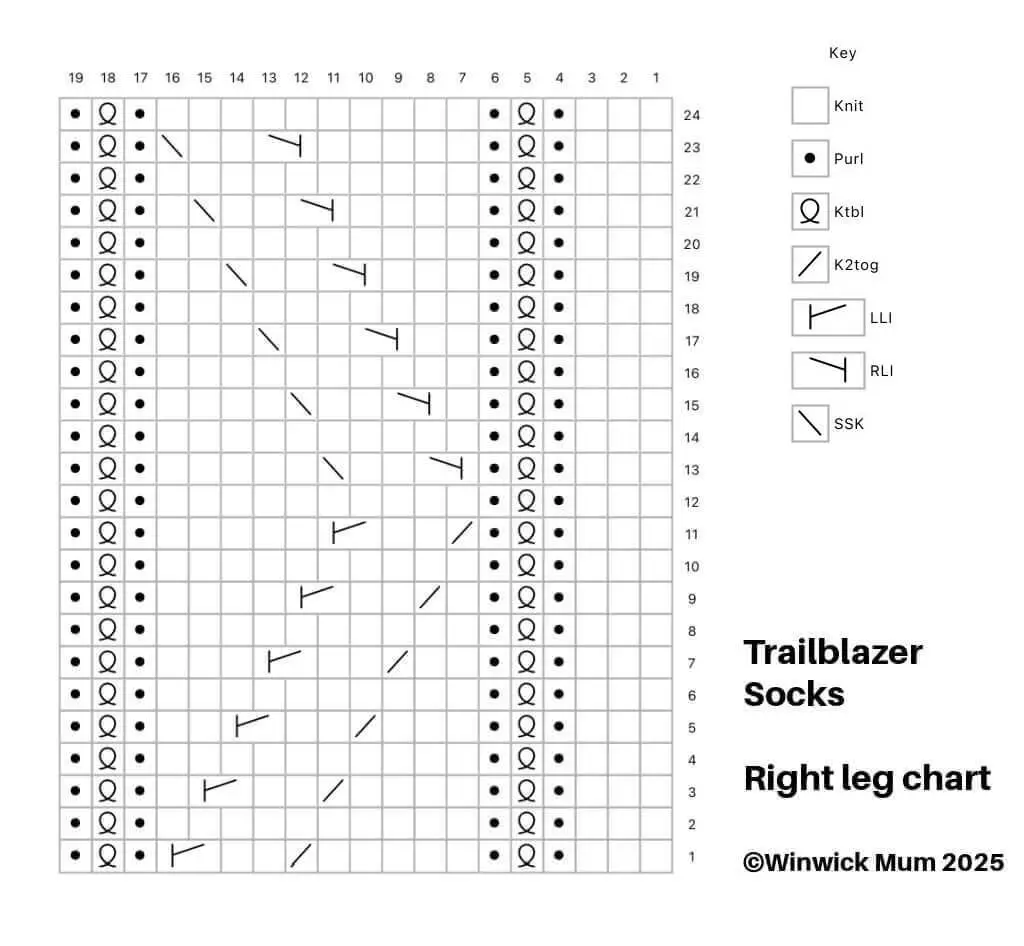
Chart instructions
Round 1: *Work 19sts of pattern panel starting at Round 1, K11 (13:15:17), repeat from *. 60 [64:68:72] sts
Round 2 and following rounds: *Work 19sts of pattern panel from Round 2 onwards, K11 (13:15:17), repeat from *.
Rounds 1-24 set pattern and position of pattern panel on front and back of sock and should be repeated.
Note – don’t worry that the symbols for the chart seem to be the wrong way round – they’re right! Just follow the instructions for the increases and your sock will be fine!
Heel Flap
Change to 2.5mm DPNs if you are using a short circular needle. There is no need to use DPNs if you are using magic loop. You may prefer to place the spare stitches from the top of the foot onto a stitch holder if you are using a short circular or DPNs whilst you work the heel.
Row 1: K2, (Sl1, K1) to end until there are 30 [32:34:36] sts on your needle, turn.
Row 2: Sl1, P to end, turn.
Row 3: (Sl1, K1) to end, turn.
Repeat rows 2 and 3 until heel measures 2 [2:2½:3] ins; 5 [5:6.5:7.5] cm or desired length, finishing on row 3.
Turn heel
Row 1: Sl1, P16 [17:18:19], P2tog, P1, turn.
Row 2: Sl1, K5, SSK, K1, turn.
Row 3: Sl1, P6, P2tog, P1, turn.
Row 4: Sl1, K7, SSK, K1, turn.
Continue in this way, adding one stitch between slip stitch and SSK or P2tog on each row (ie, Row 5: Sl1, P8, P2tog, P1, turn; Row 6: Sl1, K9, SSK, K1, turn; etc) until all of the heel sts are used. Depending on how many stitches are in your heel flap, you may find that the K1 and P1 stitch is not required at the end of the last two rows.
Knit across heel stitches if required to bring you to the left hand side of the heel ready to pick up 1 st for every 2 rows of heel flap knitted. Remember that if you made the heel flap bigger, you will need to pick up more stitches. Once you have picked up the stitches, place marker to indicate new beginning of round. Knit across the top of the foot in pattern as set, starting at pattern panel round 13 or 1, place marker, then pick up 1 st for every 2 rows knitted up the other side of the heel. Knit across the top of the heel and then shape gusset as follows.
Note: If you are using DPNs and/or have placed your stitches on a stitch holder, you can arrange the needles as follows: Needle 1 for stitches across heel, Needle 2 for picked-up stitches down side of foot, Needle 3 for stitches across top of foot (knit stitches off stitch holder if required), Needle 4 for picked-up stitches on other side of foot. You may find that stitch markers are not required at first.
Shape gusset
Round 1: K to 3 sts before the marker, K2tog, K1, slip marker, work to next marker in pattern as set, slip marker, K1, SSK, K to marker.
Round 2: Slip marker, work to next marker in pattern as set, slip marker, knit to 3 sts before marker.
Round 3: K2tog, K1, slip marker, work to next marker in pattern as set, slip marker, K1, SSK, K to marker.
Repeat rounds 2 and 3 to shape the gusset. Continue in this way, decreasing by two stitches at the gusset on every other round until there are 60 [64:68:72] sts on the needle.
Once you have reached the required number of stitches, continue to knit each round in pattern as set until you reach 2 ins; 5 cm before the desired length ready to start the toes. Don’t be afraid to try your sock on before decreasing for the toes!
Toes
Note: At some point whilst decreasing for the toes, if you are using a short circular needle you may need to change back to DPNs or use the magic loop method as the number of stitches becomes too small for the circular. It’s up to you when you choose to do that, and how you distribute the stitches across the needles; just keep following the pattern as set below.
Create the toes as follows:
Round 1: K1, SSK, K24 [26:28:30] sts, K2tog, K1, place marker (if required), K1, SSK, K24 [26:28:30] sts, K2tog, K1. 56 [60:64:68] sts.
Round 2: Knit one round, slipping markers as you come to them.
Round 3: K1, SSK, K to 3 sts before marker, K2tog, K1, slip marker, K1, SSK, K to 3 sts before marker, K2tog, K1. 52 [56:60:64] sts.
Repeat rounds 2 and 3 until you have 28 [28:32:32] sts left and divide these between two needles so that front and back of socks match.
Graft toes using Kitchener stitch, weave in all ends and sew up the small gap at the cuff where you cast on.
If you can use Ravelry and you’d like to, you can link your socks to the project page so that others can admire them, and if you would like to share them other social media platforms you can use the hashtags #WinwickMumSocks and #WinterHavenKAL.
I’m really looking forward to seeing how your Trailblazer Socks turn out!
This pattern is free on this blog and will always remain so, but if you have enjoyed using it and would like to buy me a brew, it will be much appreciated! You can find the donation button on the sidebar on the left hand side. Thank you! xx
This pattern copyright © 2025 Winwick Mum. All rights reserved.
Not to be included in any collection or used for profit without written consent of Winwick Mum.









Love these! I’d already picked Spring Green out of my stash for the KAL so I’m all set to make a new pair of socks for Lewis as he’d asked for the green yarn…he only wears ‘Mum knit socks’ now apart from black trainer socks which my eyesight won’t let me knit!
I’ve got a half knitted pair of socks on the go for me but they don’t meet the criteria so they’ll go in the WIP pile for the moment 🥰
Thank you for the pattetn-can’t wait to start!!
He sounds like a very well brought up son who knows his onions when it comes to socks! 🤣 I think it’s always fine to start a new pair for a KAL … and you’ll probably have them finished quite quickly so you can go back to the WIP! 🙂 xx
Looks great 😊 thank you!! I’m ready!! 👏🏻
That’s fantastic! 🙂 xx
Thank You Christine for another lovely pattern. I will be having a go at this in the future as I have a pair on the go at present. xx
Brilliant! I hope you enjoy it when you get round to knitting the socks! 🙂 xx
Thank you! Good luck with the Winter Haven KAL. Hopefully I will have time to join in next year but I will be watching 😉 X
Thank you! 🙂 xx
I am going to make these in some Brightside, I have in my stash. I have 76g left, and if I knit them shorter I should be ok.
I have also the Black Sheep Ruby socks to make. I have frogged these 3 times because I couldn’t get them over my ankle, so I am trying again – it must be the heel turn that is wrong.
Have you checked that your colourwork floats are OK and not too tight? If you think it’s the heel turn and you’ve made your usual size, have you made the heel flap the usual length and only decreased every other round on the gusset? The Ruby Socks pattern is based on the Basic 4ply Socks pattern so if you’ve made that before and it fits you, the only difference is the sheep so maybe they are all being naughty sheep! 🙂 xx
Thank you, I’m all sorted and ready to start 😊
That’s wonderful! I hope you enjoy the KAL! 🙂 xx
Thank you for a lovely new pattern Christine, I’ve downloaded it ready for my next pair – after I’ve finished the boxy ribs that are currently on the needles and will be my Winter Haven KAL project. As my sock stash increases I realised I no longer wear many of my old ‘bought’ socks so had a clear out yesterday spurred on by a charity bag through the door. I’m really glad of my woolly socks with the weather we’re having right now – although we don’t have any snow in North Lincs the temperature hasn’t got above freezing for a few days now. Time for being cosy and getting some knitting done – what’s not to like xx
Oh my, now I have a dilema!! I was all ready to go with the Easy Lace Socks in a purple/dark green mix yarn. BUT NOW, I just love this new design – big question – do I go for an easy life making a design I made a few times before? Or change to a lighter yarn colourway to show up the “twisty bit” and challenge my ageing brain with something completely new? ! What the heck – don’t we just love a new challenge!! Ok, pattern printed, pink mix yarn, needles and special sock project bag ready and waiting to go!!
That sounds perfect! I hope you enjoy knitting them! 🙂 xx
It’s perfect sock knitting weather, isn’t it? And who wants thin shop-bought socks when you can have lovely hand knit woolly ones?! 🙂 xx
These are beautiful socks! Thank you for the pattern Christine. I’m stash diving now to find a nice color. Every Thing else ist ready for my Winter Haven. ☺️
That’s wonderful! 🙂 xx
This pattern looks like the trail I leave when slipping and sliding on the snowy/icy sidewalk! How appropriate they should be knitted in Winter Icicle!
I hope not! I’ve just seen something on Instagram that said to walk like a penguin and then you’re less likely to slip … I don’t know if that’s true or not but it amused me! 🙂 xx
Looks fantastic. I think I might put both yarns in the project bag and whichever comes out will be first! Either vanilla or trailblazer!
Thank you, Christine. I can’t wait to get started!