Basic 6ply boot socks – free pattern and tutorial
One of the things about owning a dog is that you’re out every day, whatever the weather. I learned early on that walking in anything other than wellies or walking boots was a mistake (you try hurtling into the bushes after a mischievous hound wearing sandals!) and as the weather gets colder, you need thicker socks.
I’m quite fussy about my socks; I like thicker socks generally which is why I started making my own in the first place. I find that everyday bought socks are often too thin and because I like the way that hand-knitted socks fit my feet, it wasn’t long before I decided that I needed to adapt my Basic 4ply Socks pattern to thicker yarn.

I use 6ply which is between 4ply and DK (8ply) in weight and seems to be a yarn that’s pretty much just used for socks. It makes a lovely thick fabric, yet not so thick that it feels like a slipper. I’ve discovered that it’s best to use proper sock yarn as it will have some nylon in it which will help to hold the shape and make the socks more hard-wearing. I did have the bright idea once of using stash DK but I wasn’t as happy with the socks when I’d finished with them so now I stick to only using sock yarn. Feel free to experiment for yourself though!
I’ve also discovered that the thickness of yarns can vary from brand to brand and even sometimes within a brand. My own experience is that Regia yarn can be slightly thinner than, say, Trekking XXL or Opal. This sock pattern was written for the Regia yarn stated in the pattern and for these particular socks I’ve cast on 48 stitches. With another yarn, I would probably cast on 44 stitches for a pair of boot socks. It’s worth trying your socks on as soon as you can so that you can see if they are going to be the right size for you.
If you’ve seen my Basic 4ply Socks pattern, you’ll known that my preference is for a 30cm circular needle and there are a couple of tips on that tutorial page with regards to casting on with a tiny circular that you might want to take a look at if you’re going to be using one for the first time.
Right – ready to get going?
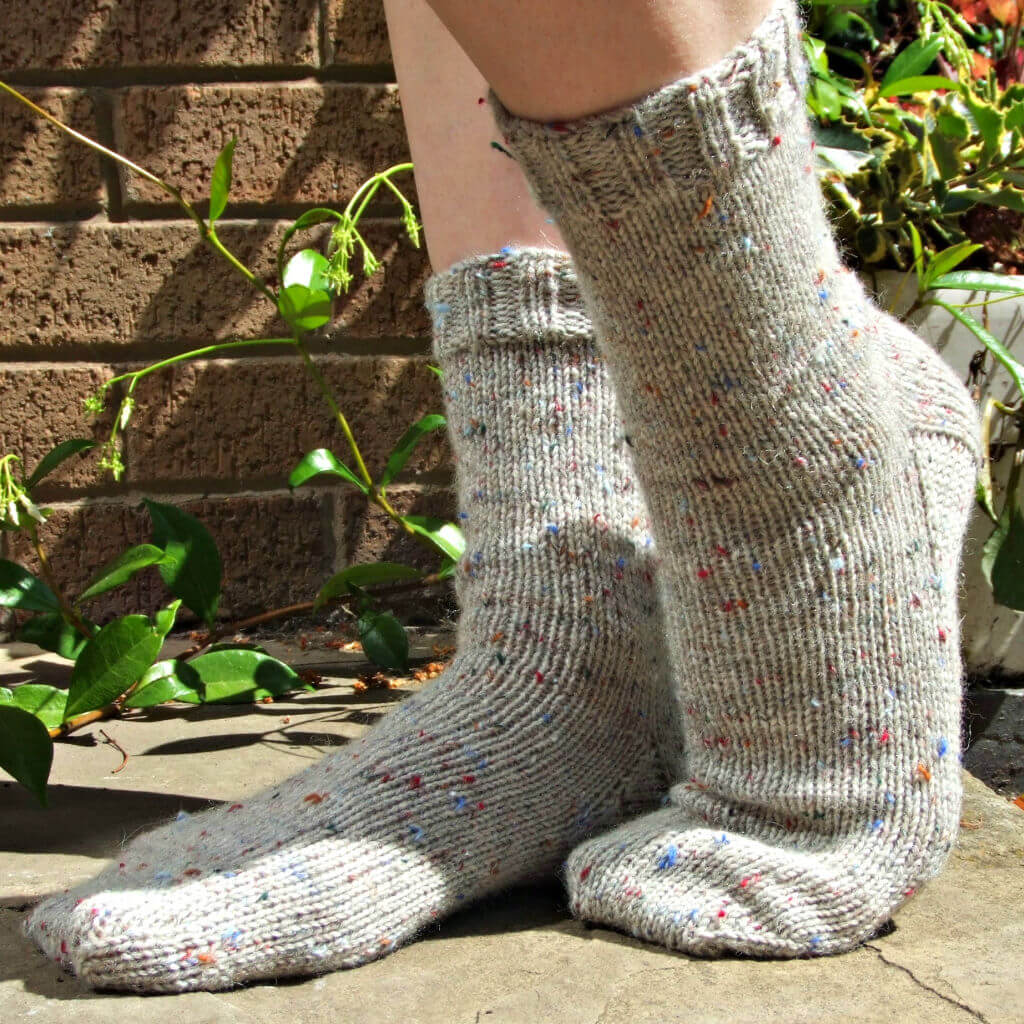
Basic socks in 6 ply yarn
(you can download a PDF copy of the pattern here)
These socks are constructed as top down socks with a gusset heel.The heel is knitted in heel stitch which creates a durable, cushioned heel. This pattern will create a medium-sized sock. If you want to make the pattern bigger or smaller, simply increase or decrease the number of cast-on stitches by 4, but remember that you will need to make adjustments when you turn the heel. If you need help working out how many to cast on, have a look at this tutorial from the Sockalong.
Materials
3.0mm needles – I use a 30cm circular needle but DPNs or magic loop will also work
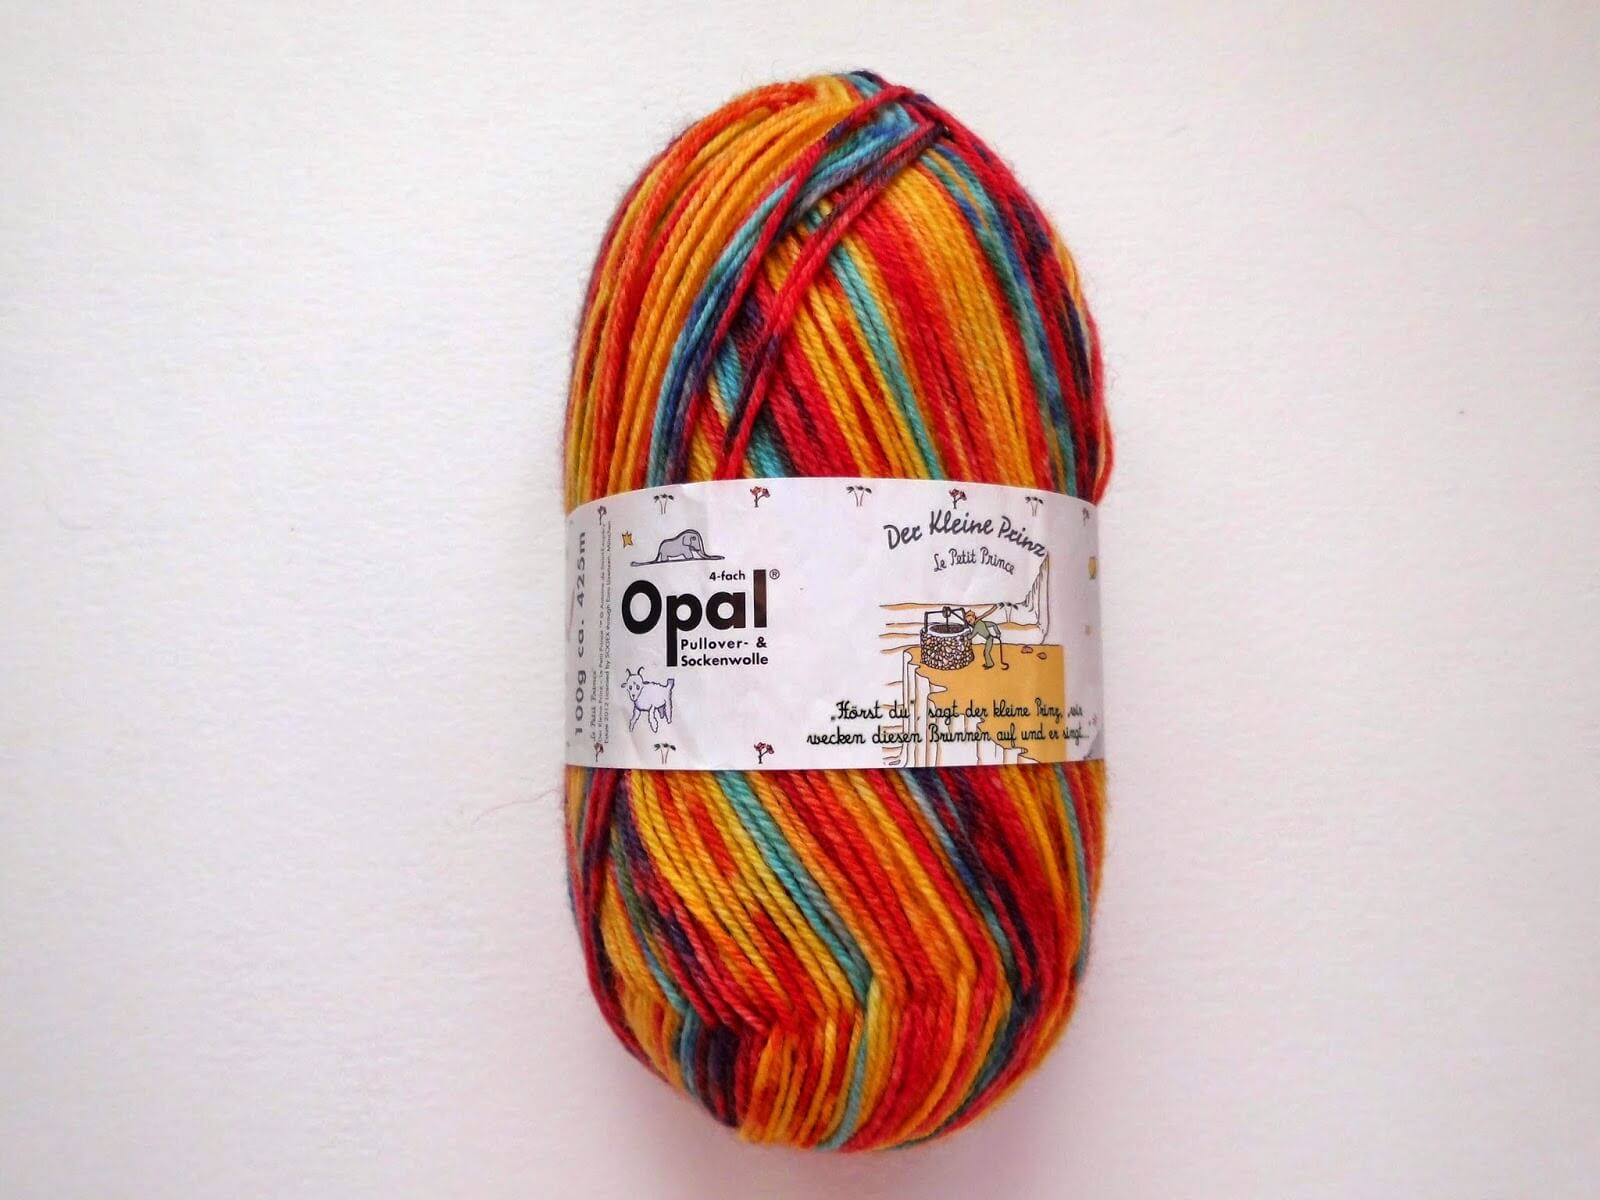
1 x 150g ball of 6ply sock yarn – yarn picture is Regia Classic Tweed 6ply in shade 90 (2021 update – now discontinued)
1 pair DPNs size 3.5mm (optional)
1 pair DPNs size 3.0mm (in addition to a circular needle)
stitch markers
wool needle
Note: I cast on using DPNs then change to my circular needle – it’s not easy to cast on using the circular as it’s too small. If you want to use magic loop you will be able to cast on with the larger circular needle. If you use DPNs, you might find it easiest to cast on and work 2 rows before dividing the stitches across the needles.
To adjust the size for this sock, just add or remove stitches in blocks of 4 from the cast on total. For example, if knitting a man’s sock I would cast on 52 or 56 stitches. Remember that you will need to make adjustments when turning the heel if you use extra stitches.
Gauge
24 sts and 36 rows to 4 inches
Pattern
Cast on 48 stitches using 3.5mm needle (this is optional – I find that casting on with a larger needle gives a looser edge for getting your foot in and out of the sock but it’s fine to cast on with the needle size you intend to use).
Row 1: K2, P2, repeat to end, turn
Row 2: K2, P2, repeat to end
Change to 3.0mm needles. At this point, change to a small circular, magic loop or divide the stitches evenly across three or four DPNs according to preference and join into a circle, place marker.
Continue in K2, P2 rib for 10 more rounds or until desired length of rib (I knit 12 rounds of rib).
Continue to knit each round until desired length before start of heel (for me, this is 64 rounds in total including the rib).
Heel Flap
If you are knitting with a 30cm circular needles, you will find it easier to change to 3.0mm DPNs. At this point, I tuck the ends of my needle down inside my sock so that it doesn’t get in the way. If you are using DPNs or magic loop, you don’t need to change needles.
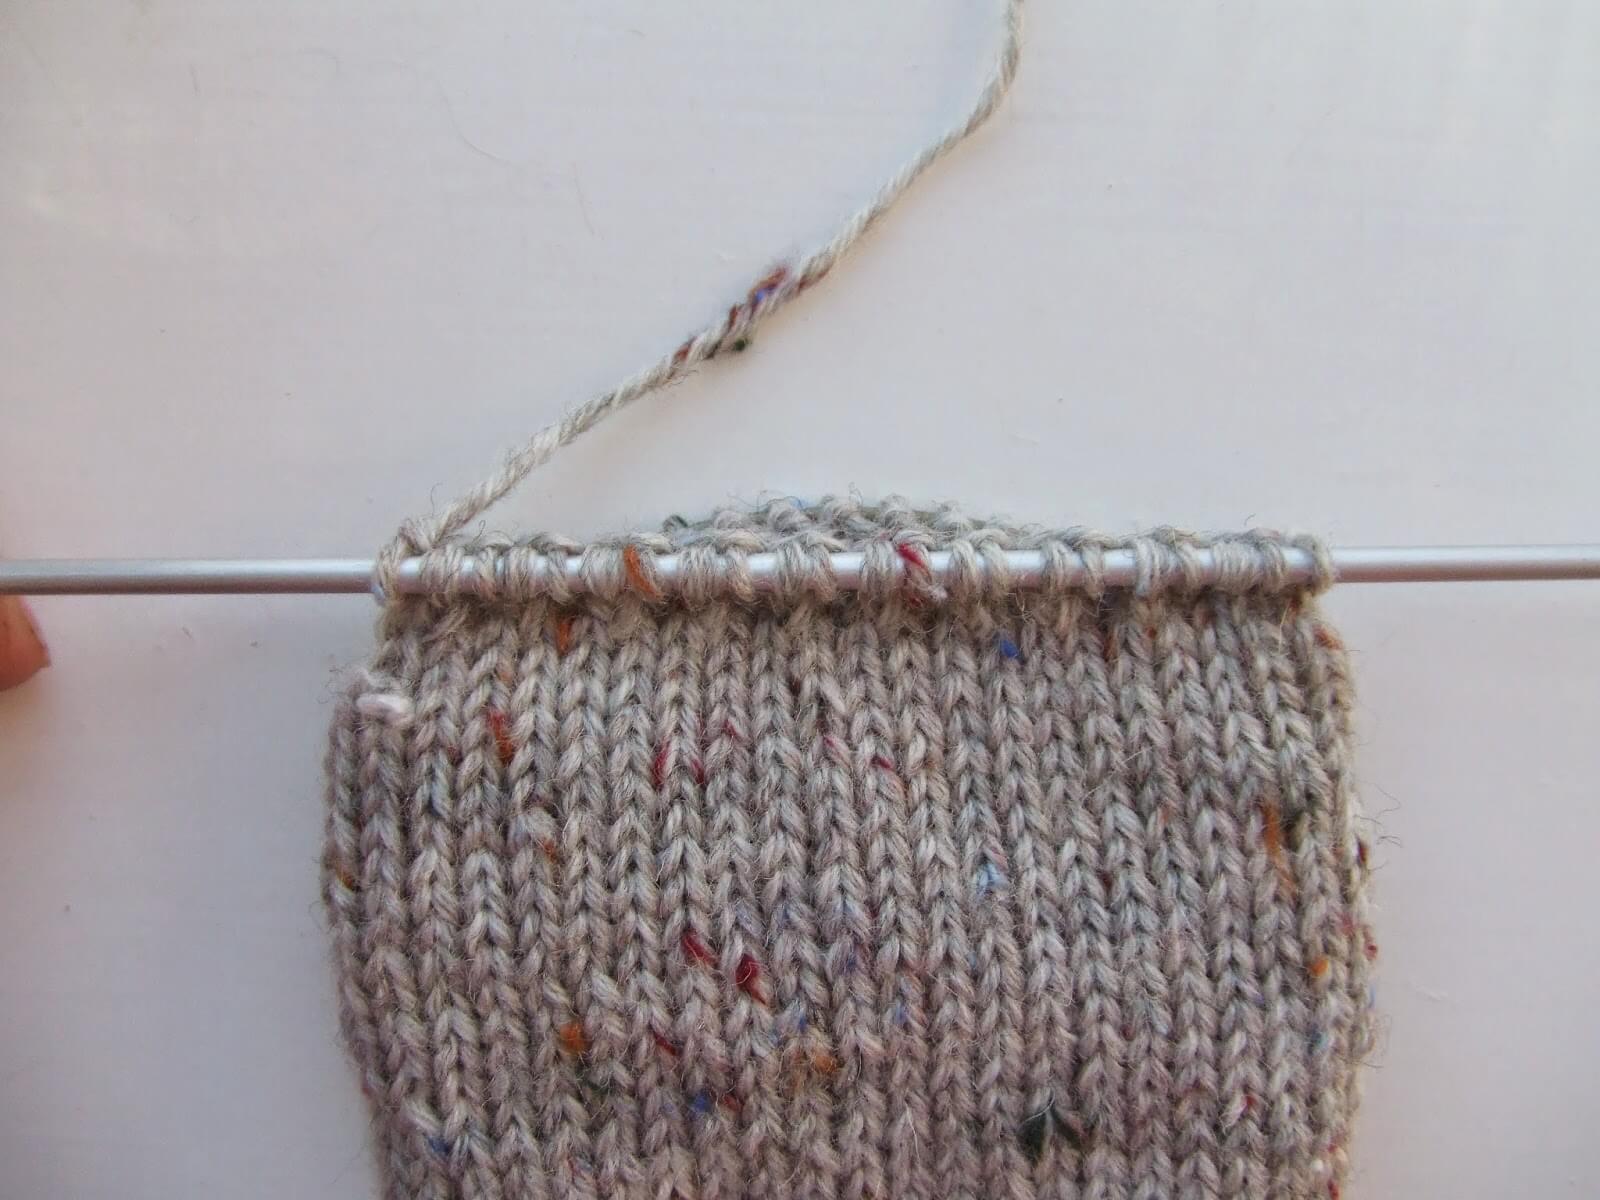
You are going to create the heel flap from half the number of stitches that you cast on, so if you have cast on more or less than 48 stitches, remember to adjust the number of stitches when you start the heel flap.
Row 1: K2, *Sl1, K1* until you have 24 stitches on your needle, turn.
Row 2: Sl1, P to end, turn.
Row 3: *Sl1, K1* to end, turn.
Repeat rows 2 and 3 until heel measures approximately 2 inches, finishing on row 3 (approx 21 rows for my socks). If you want to make the heel flap longer, continuing knitting rows 2 and 3 until you reach the desired length, but remember that you will need to pick up more stitches to create the gusset.
The fabric will be different on both sides: a ridged stitch on the right side …
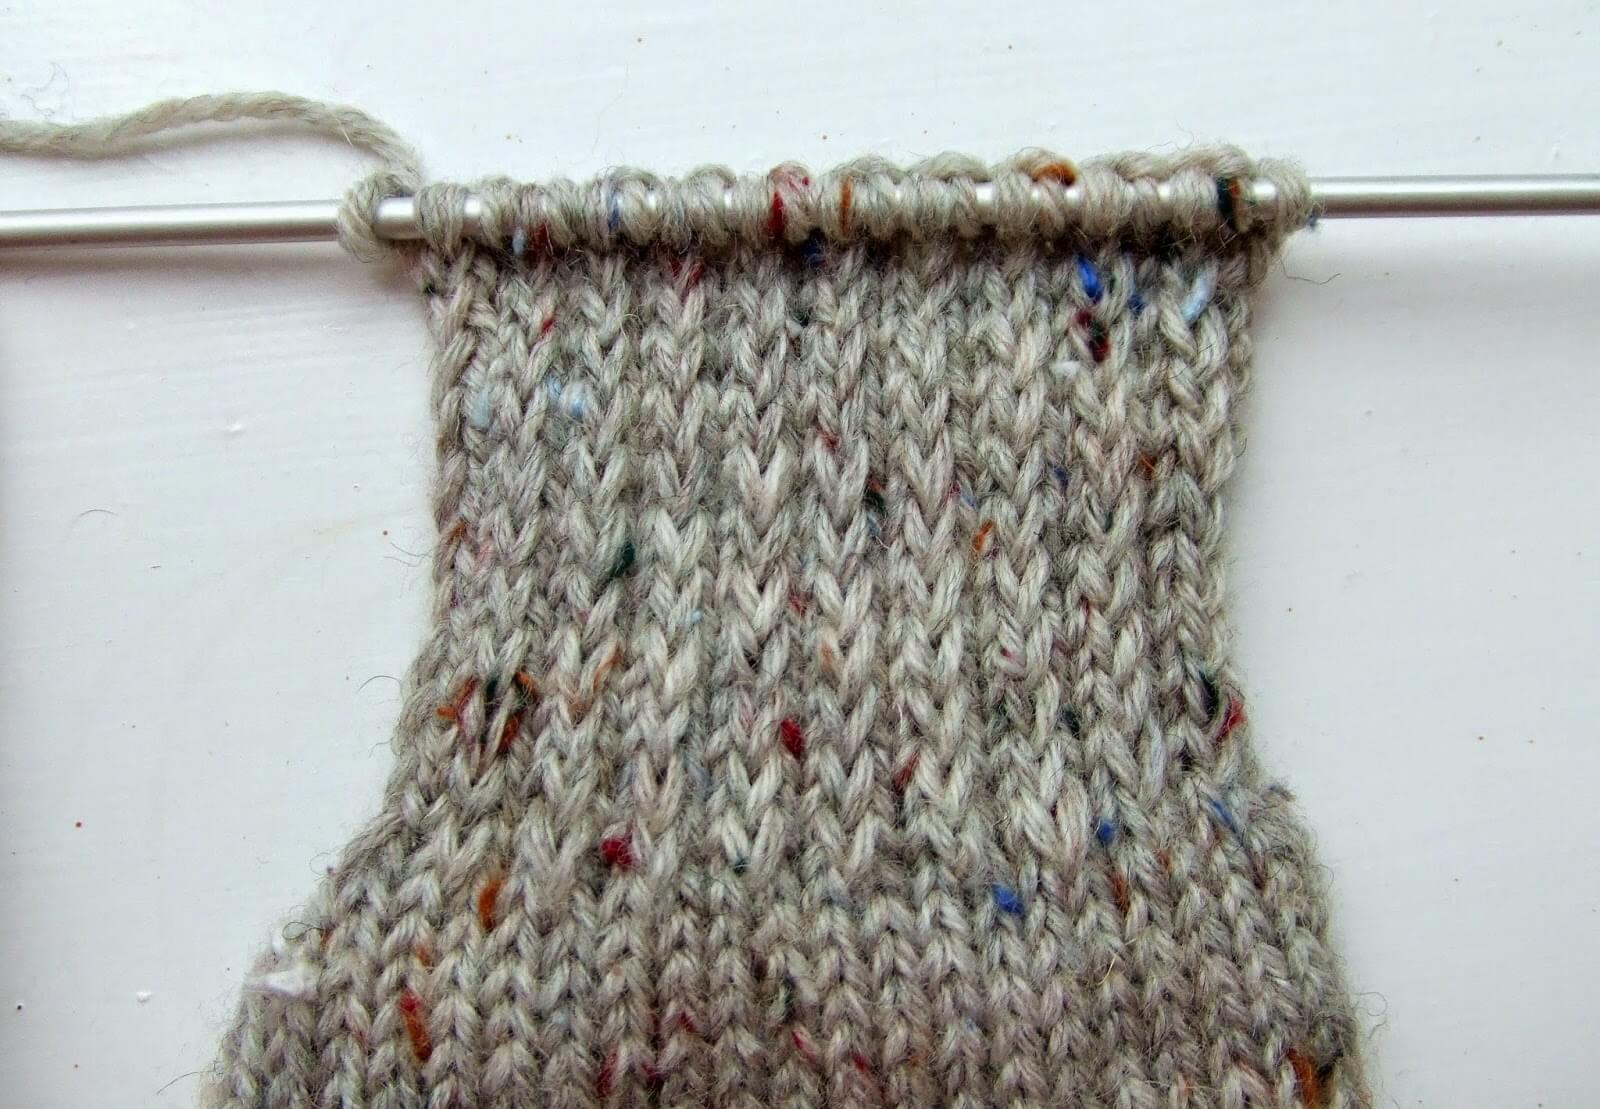
and a slipped stitch on the wrong side. This gives the cushioned heel.
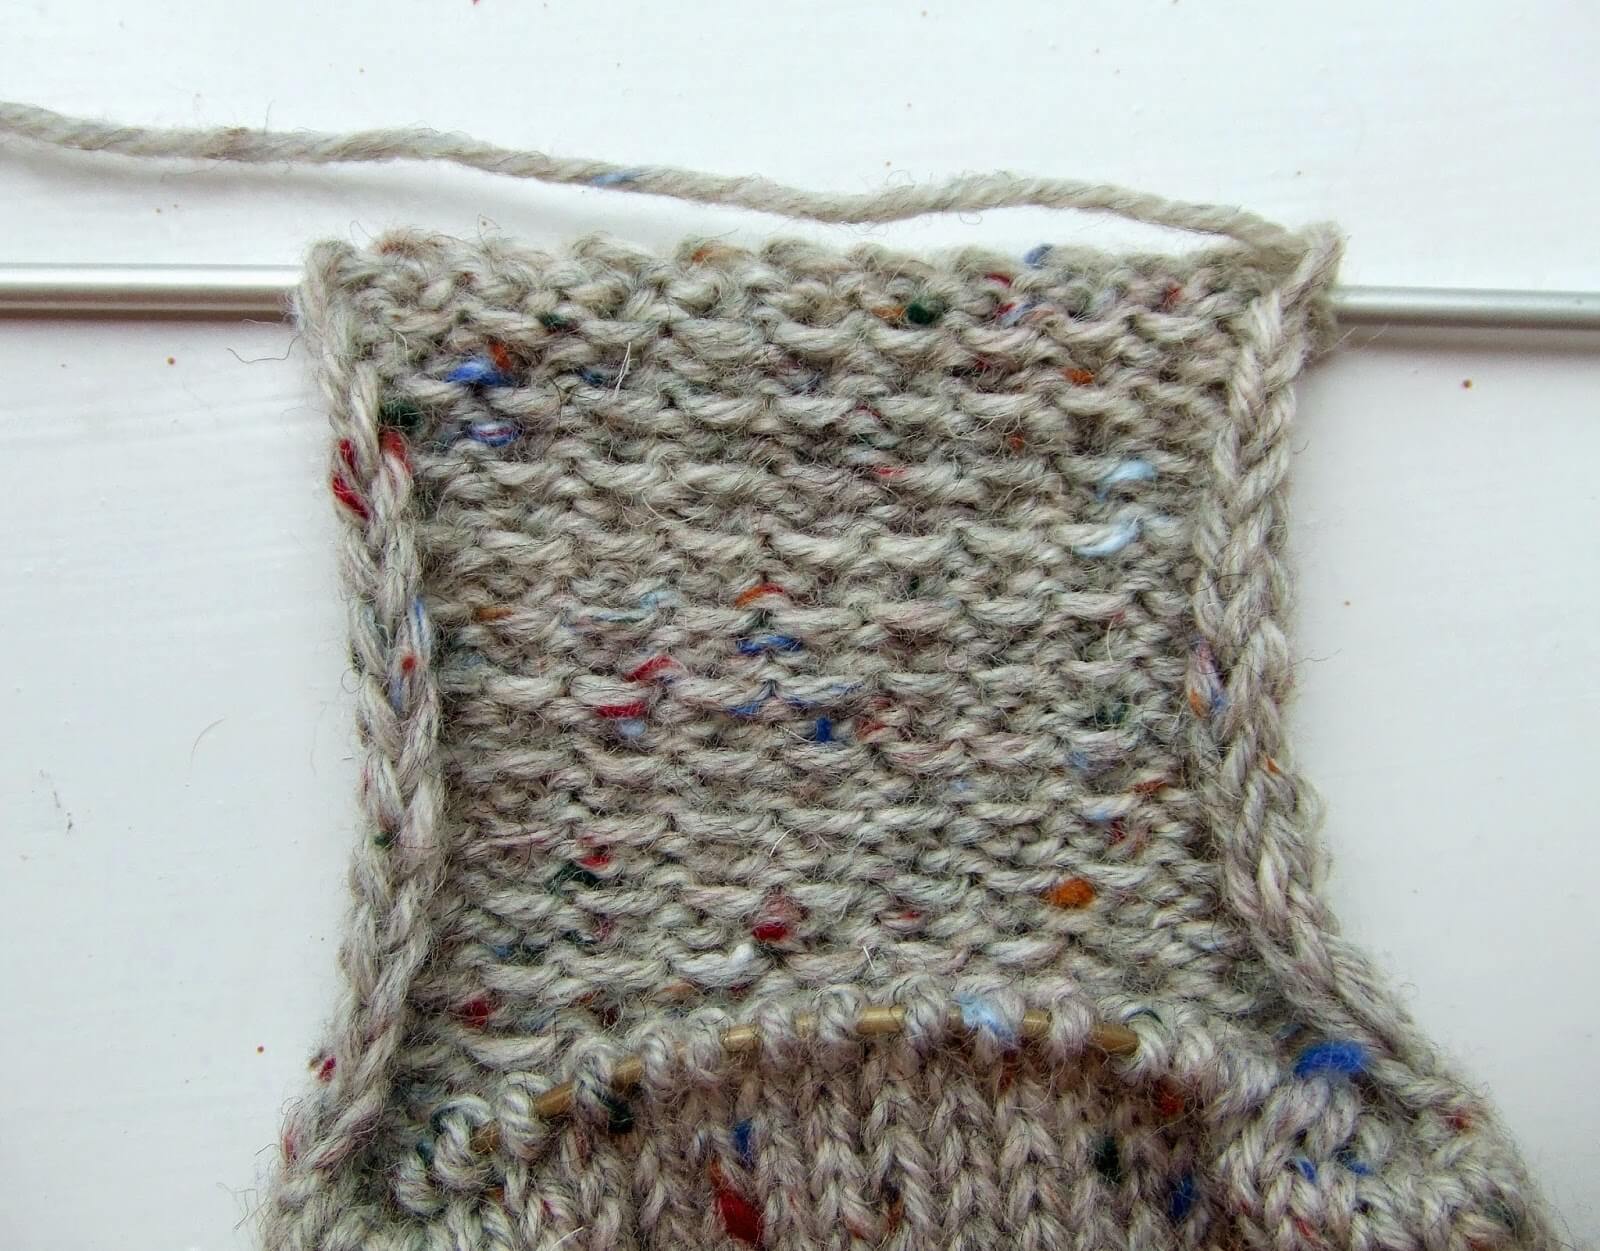
Turn heel
*For a larger or smaller sock, you will need to alter the number of purl stitches in the first row of the heel (marked in bold below), increasing by 1 stitch for each block of 4 stitches extra that you cast on, or decreasing by 1 stitch for each block of 4 stitches less than 48 stitches. For example, if you cast on 52 stitches, your first row would be Sl1, P14, P2tog, P1, turn*
Row 1: Sl1, P13, P2tog, P1, turn.
Row 2: Sl1, K5, SSK, K1, turn.
Row 3: Sl1, P6, P2tog, P1, turn
Row 4: Sl1, K7, SSK, K1, turn
Create the SSK stitch by slipping the first stitch on the left hand needle knitwise onto the right hand needle, then the second stitch on the left hand needle purlwise onto the right hand needle, transfer them both back to the left hand needle and knit them together through the back of the stitches.
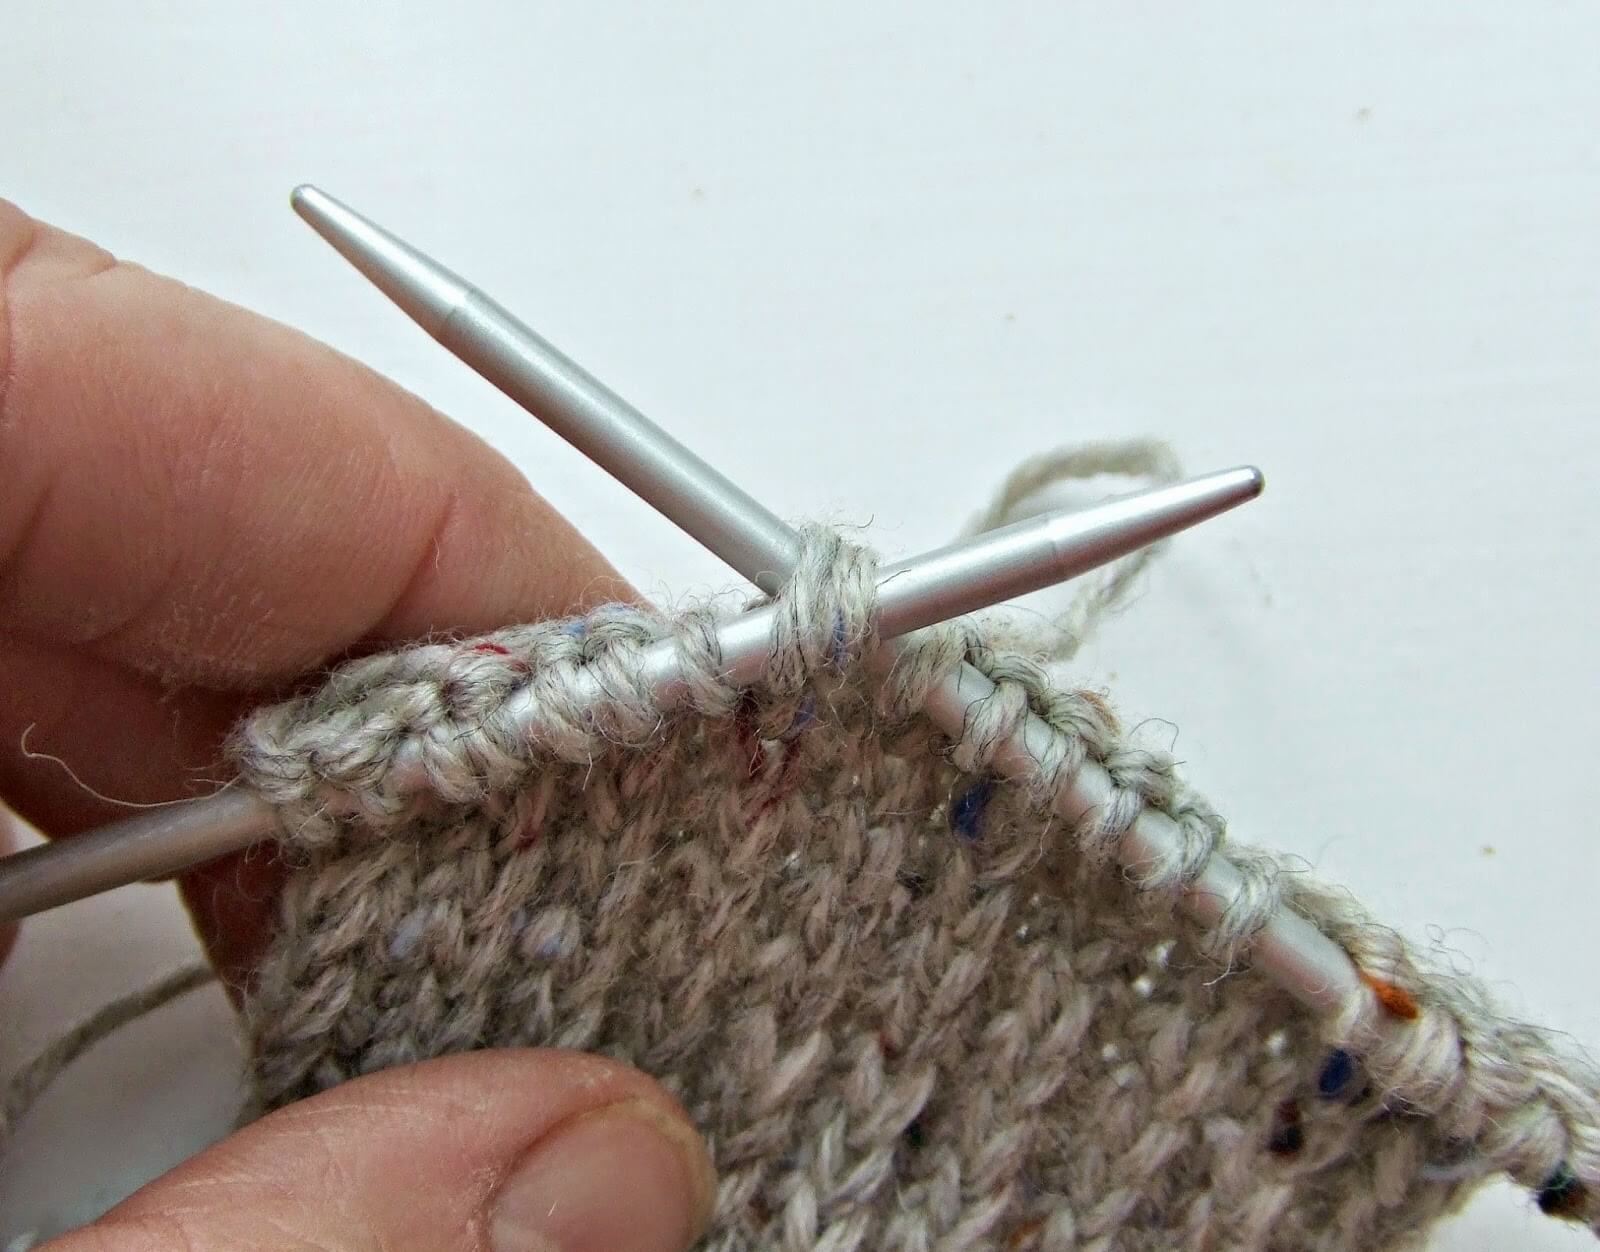
You can always tell where you’re up to as there will be a gap between the last stitch worked on the previous row and the stitches that are still be included in the heel.
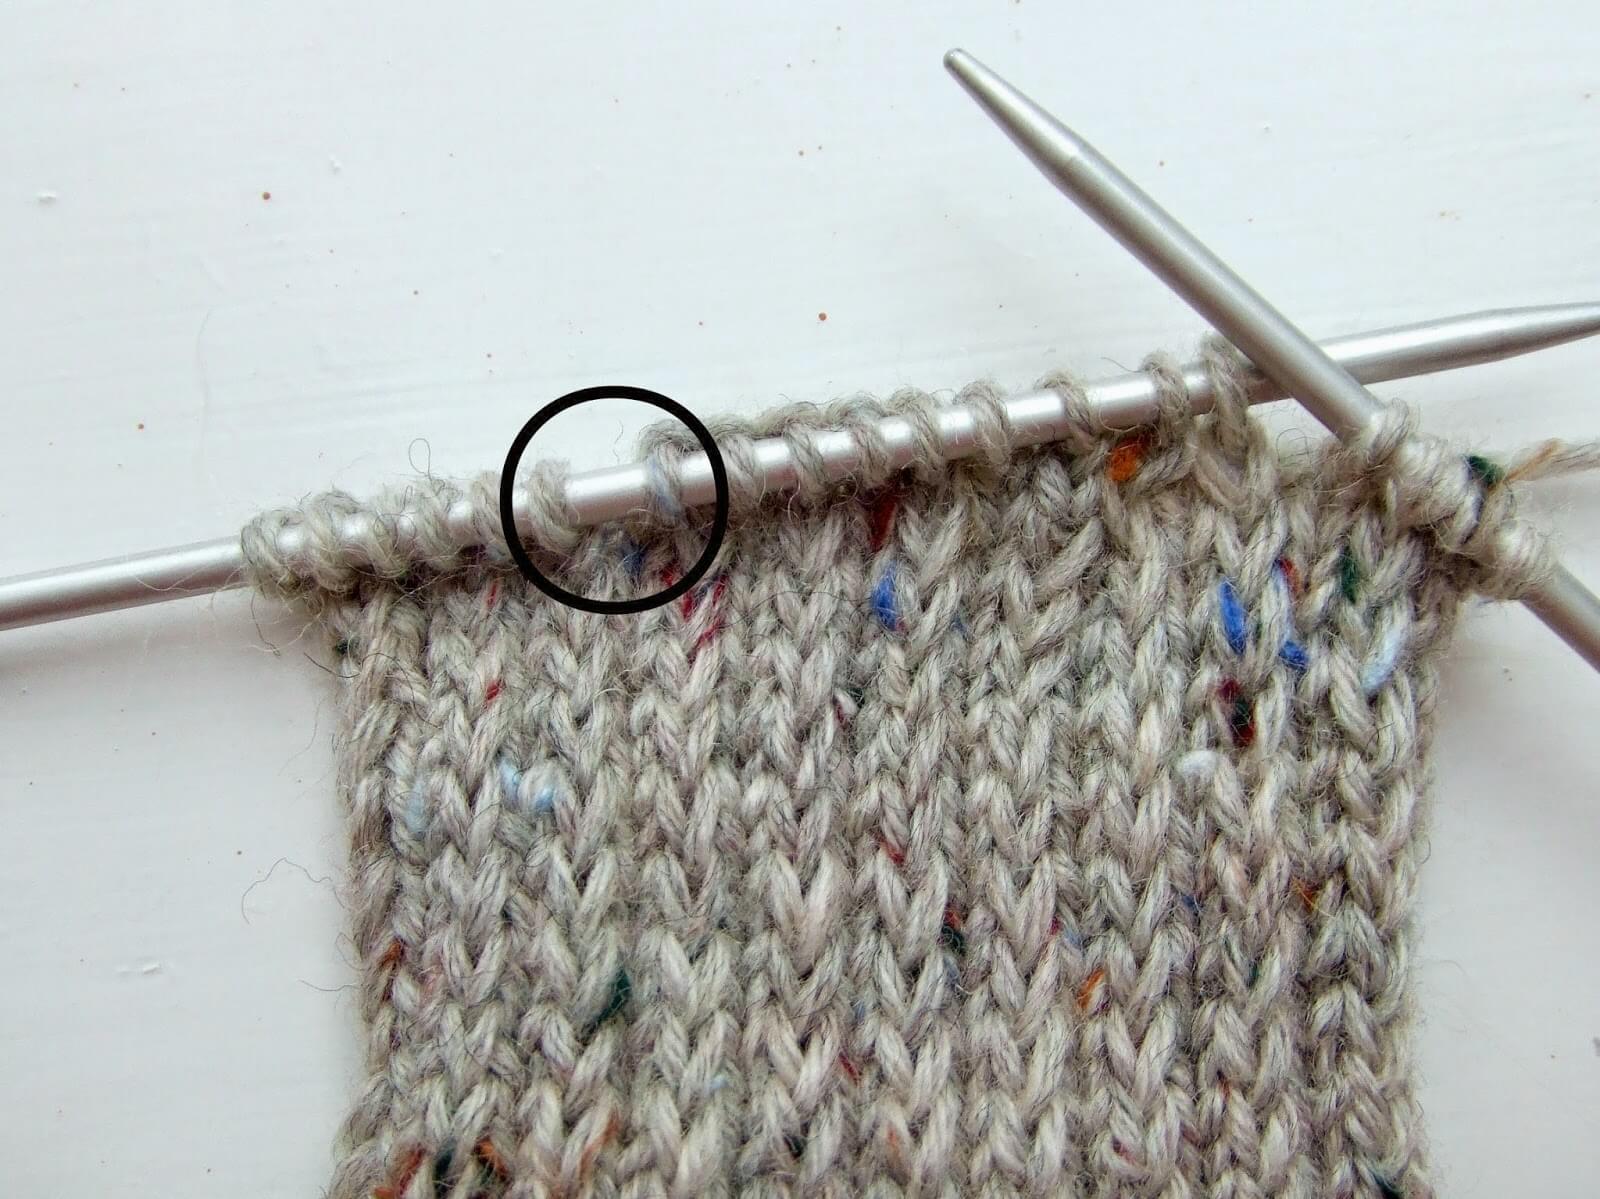
Continue in this way, increasing one stitch between slip stitch and SSK or P2tog on each row until all of the heel stitches are used.
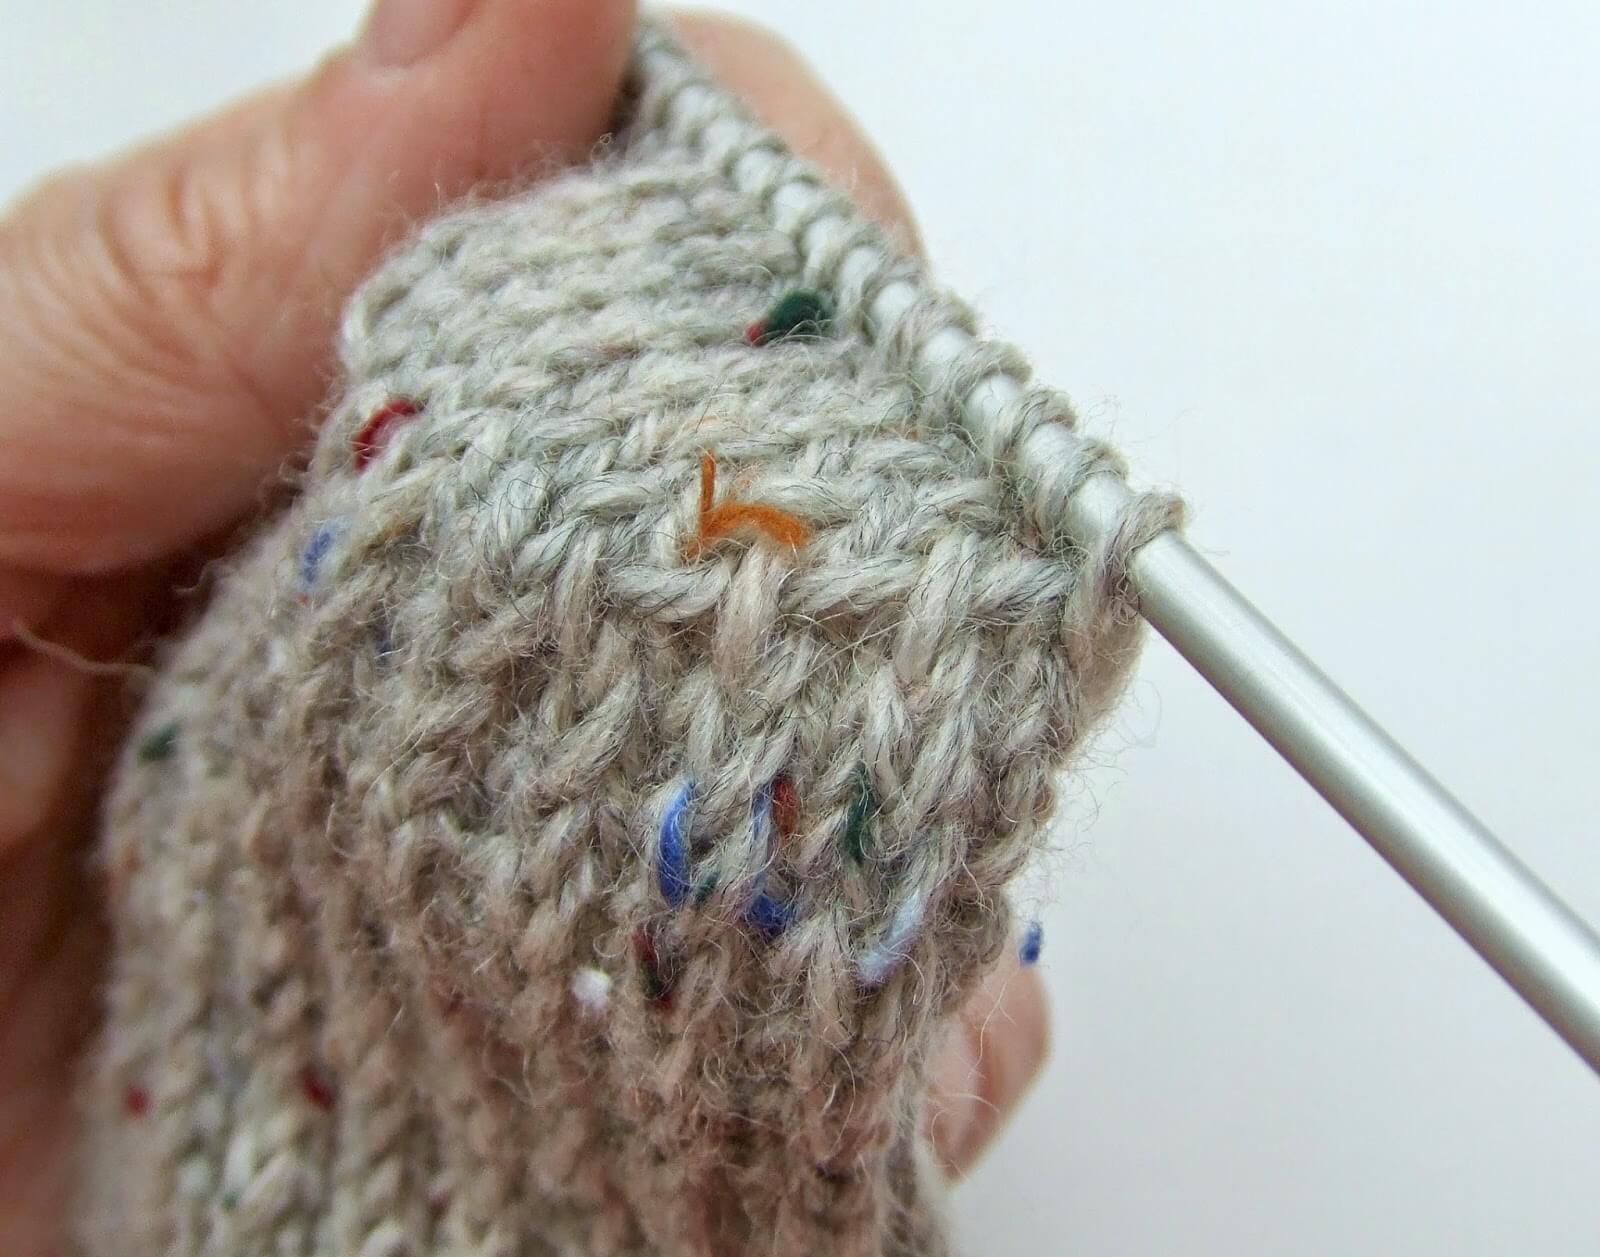
This is what the heel looks like on the SSK side (left)
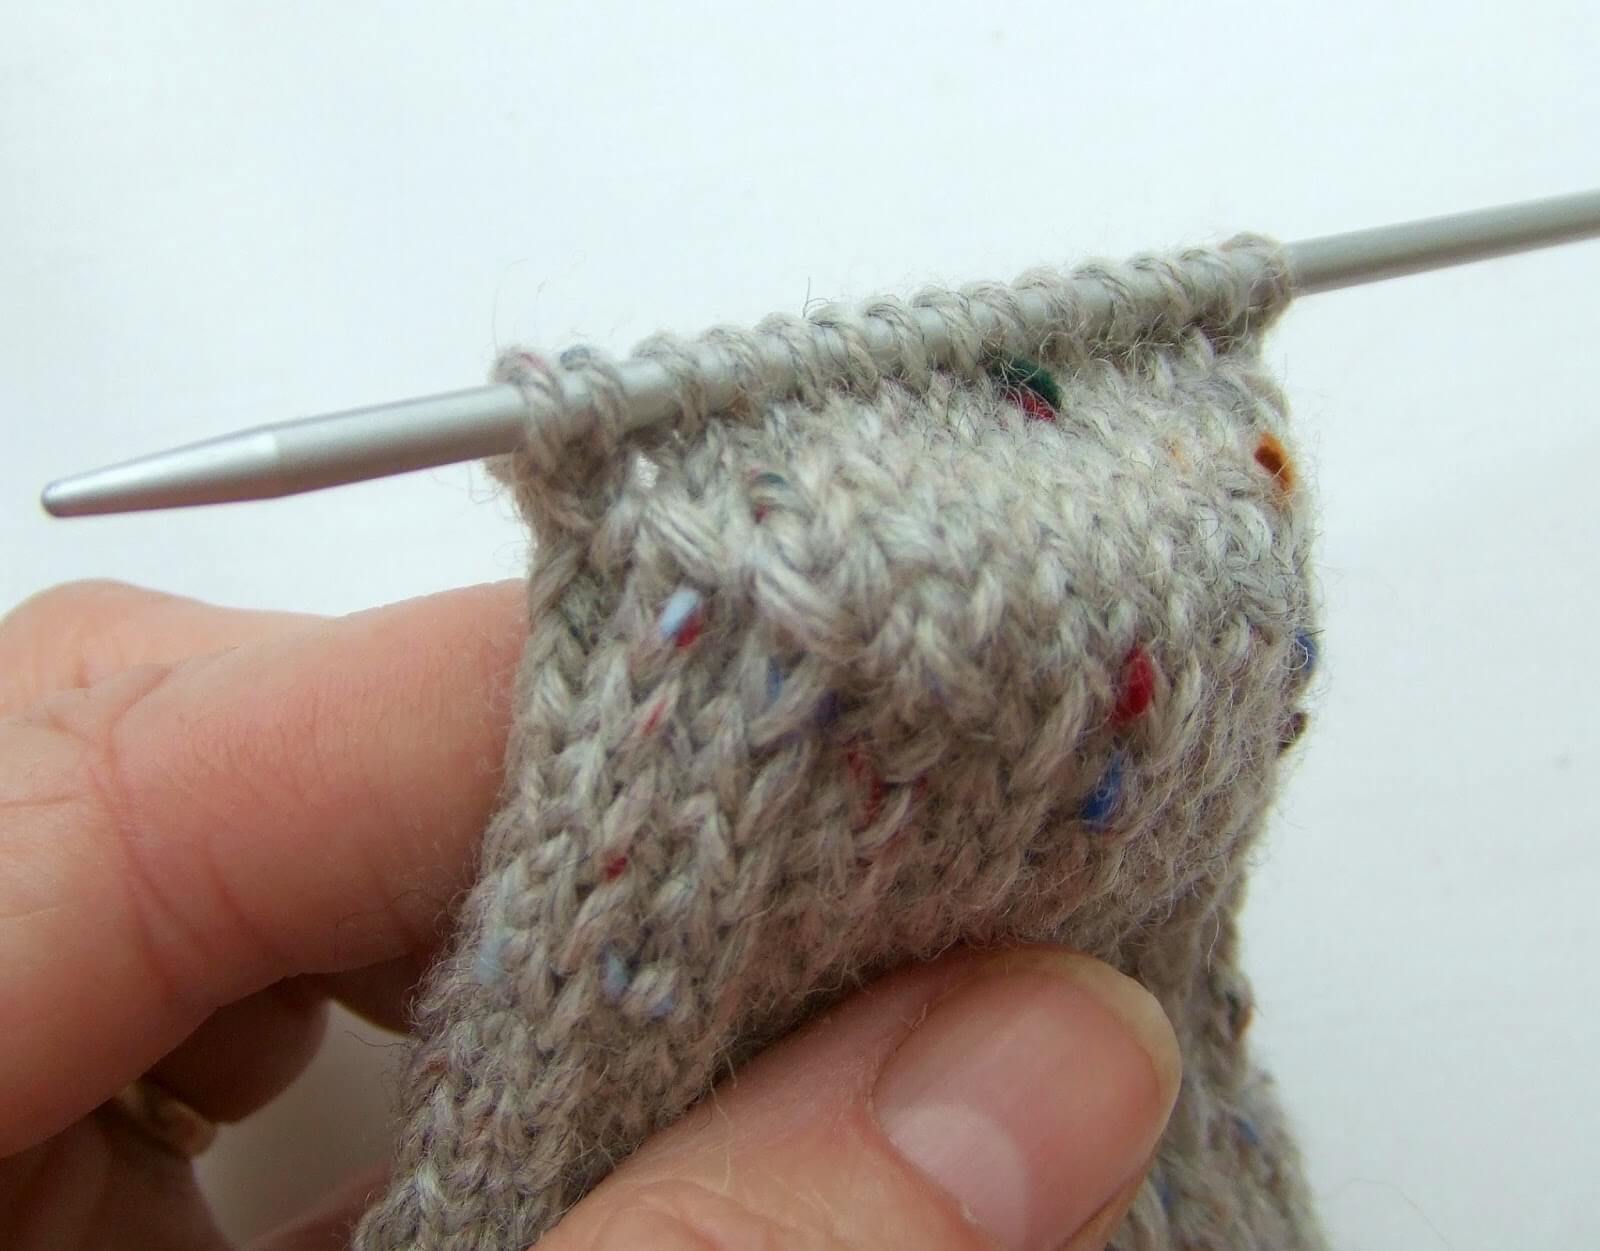
and the P2tog side (right):
Knit across heel stitches if required to bring you to the left hand side of the heel ready to pick up 13 stitches. Remember that if you made the heel flap bigger, you will need to pick up more stitches. When you pick up the stitches, you will notice that you have a line of bigger stitches at each edge of the heel flap. This is created by the slip stitch at the start of each row and will make it easier to pick up the stitches.
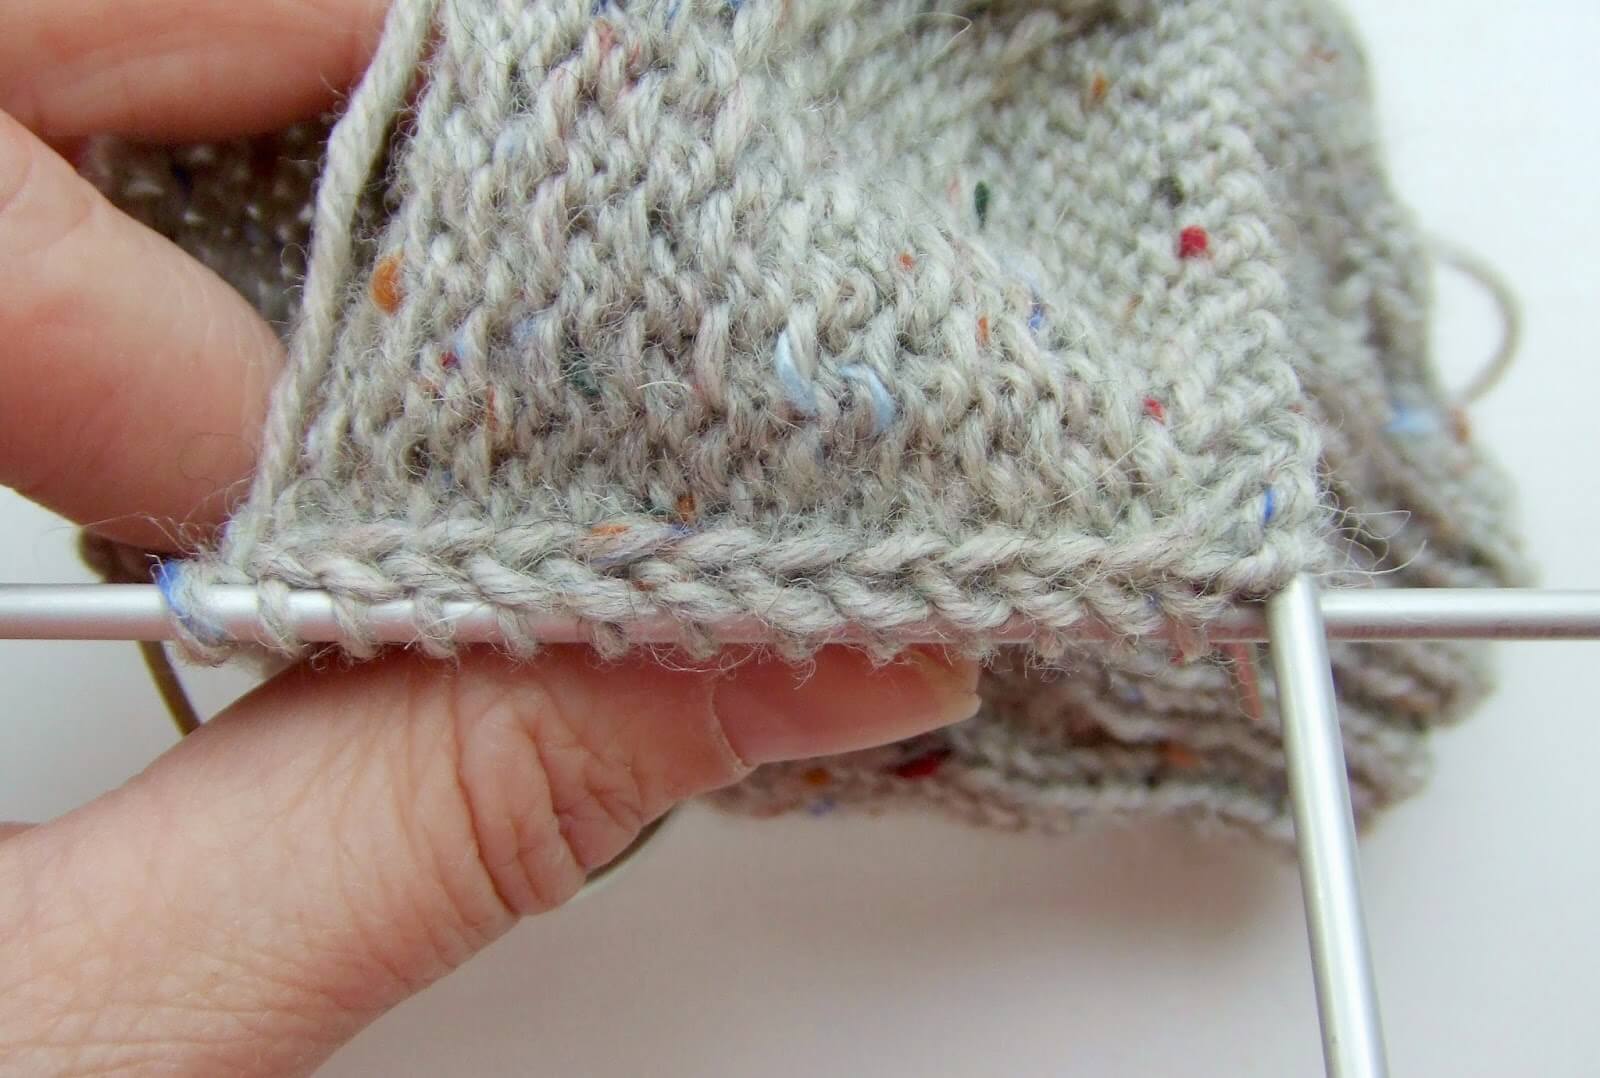
Pick up the stitch in the inside of each slipped stitch (shown where the needle is inserted into the stitch on the picture).

This will give you a nice neat line once you have picked up all of your stitches.
Once you have picked up the stitches, place marker. Knit across the top of the foot (I usually knit back onto my circular needle at this point), place marker, then pick up 13 stitches (or more if required) up the other side of the heel. Knit across the top of the heel and then shape gusset as below.
Shape gusset
Round 1: K to 3 sts before the marker, K2tog, K1, slip marker, knit to next marker, slip marker, K1, SSK, K to marker.
Round 2: Slip marker, knit to next next marker, slip marker, knit to 3 sts before marker.
Round 3: K2tog, K1, slip marker, knit to next marker, slip marker, K1, SSK, K to marker.
Repeat rounds 2 and 3 to shape the gusset and continue in this way, decreasing by two stitches at the gusset on every other row until there are 48 stitches on the needle.
Once you have 48 stitches again, continue to knit each round until you reach approximately 3cm before the desired length ready to start the toes. For my size 5 feet, this is about 46 rounds. Don’t be afraid to try your sock on before decreasing for the toes!
Toes
At some point whilst decreasing for the toes, if you are using a small circular you will need to change back to DPNs as the number of stitches becomes too small for the circular. It’s up to you when you choose to do that, and how you distribute the stitches across the needles; just keep following the pattern as set below. Create the toes as follows:
Round 1:K1, SSK, K18 sts, K2tog, K1, place marker, K1, SSK, K18 sts, K2tog, K1.
Round 2: Knit one round, slipping markers as you come to them.
Round 3:K1, SSK, K to 3 sts before marker, K2tog, K1, slip marker, K1, SSK, K to 3 sts before marker, K2tog, K1.
Repeat rounds 2 and 3 until you have 28 stitches left and divide these between two needles so that front and back of socks match.

Graft toes using Kitchener stitch. If you’ve used my Basic 4ply Socks pattern, you’ll have seen these instructions before but if not, then hopefully this will take some of the confusion of it! Just take it slowly and graft each toe in one go (don’t start and then leave it half-way through or disaster is guaranteed!). Cut a long length of yarn and thread it onto a wool needle. I’m giving you right-handed instructions here.
1 Hold the two DPNs with your left hand. Insert the wool needle purl-wise into the first stitch on the front DPN and pull the yarn through. Don’t take the stitch off the DPN.
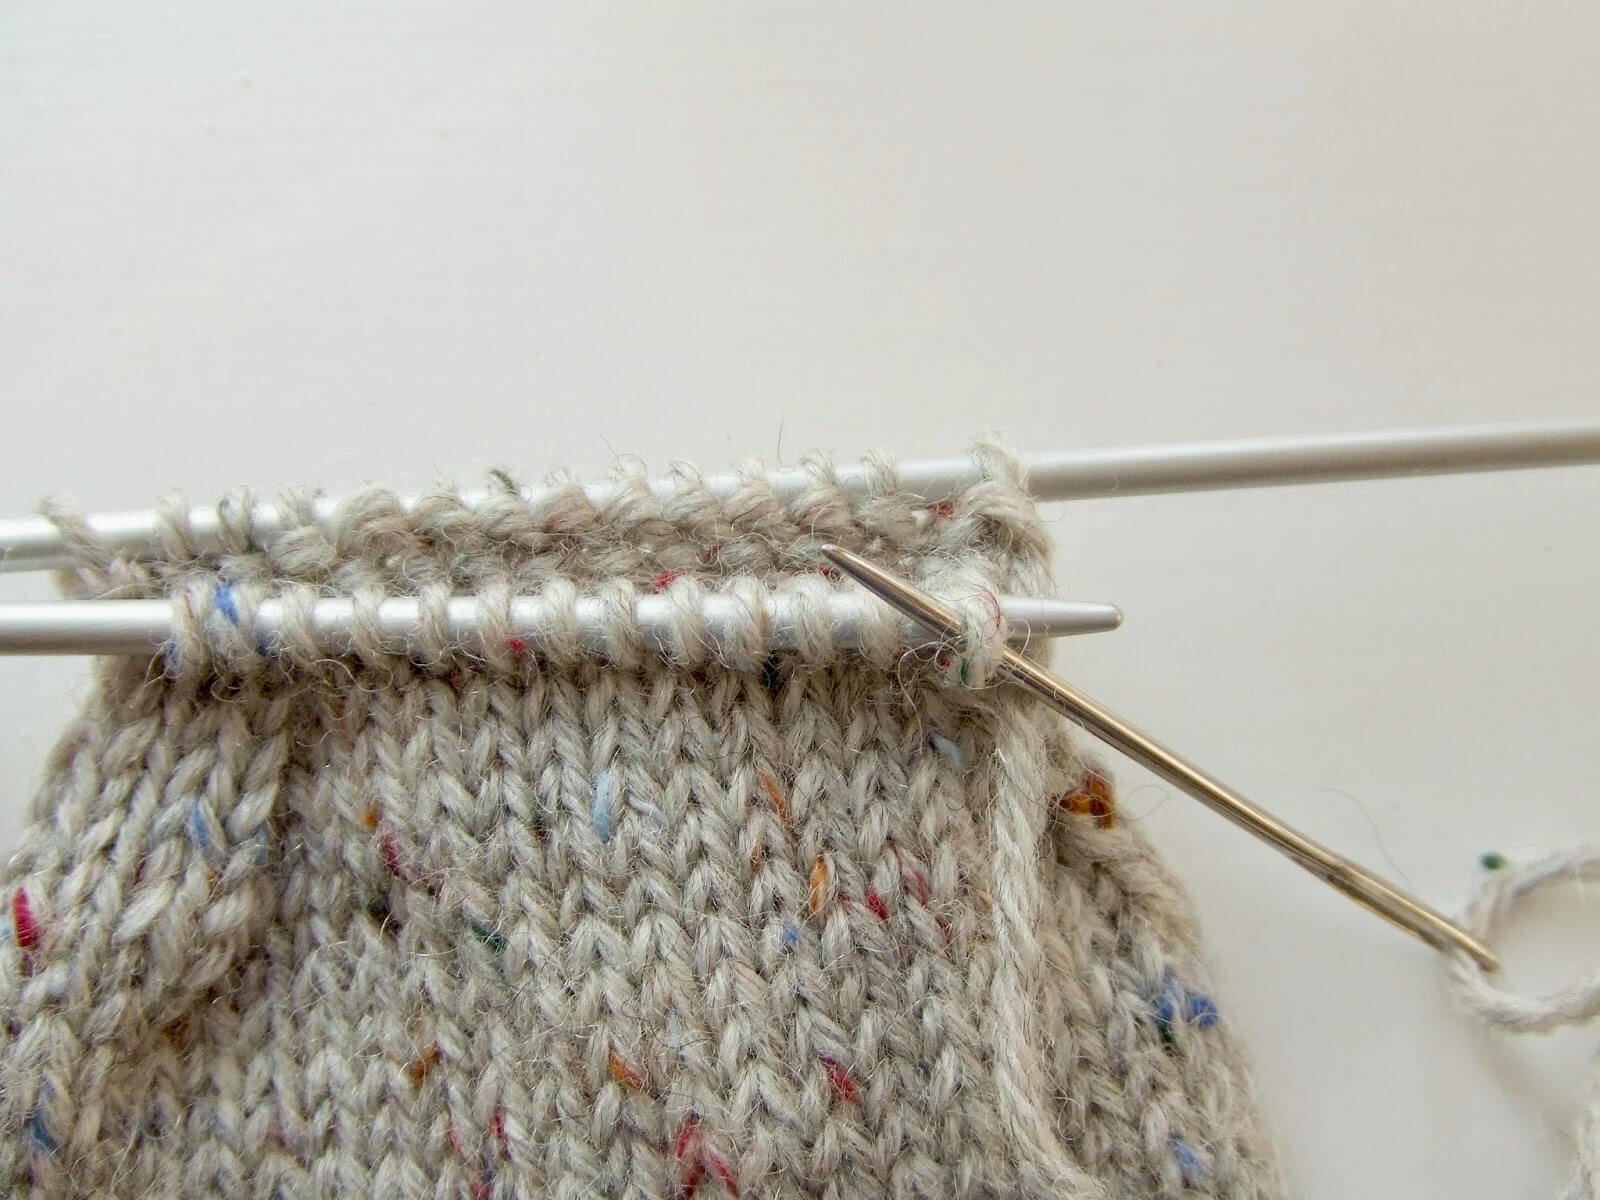
Next, insert the wool needle knit-wise into the first stitch on the back DPN. Don’t take the stitch off.
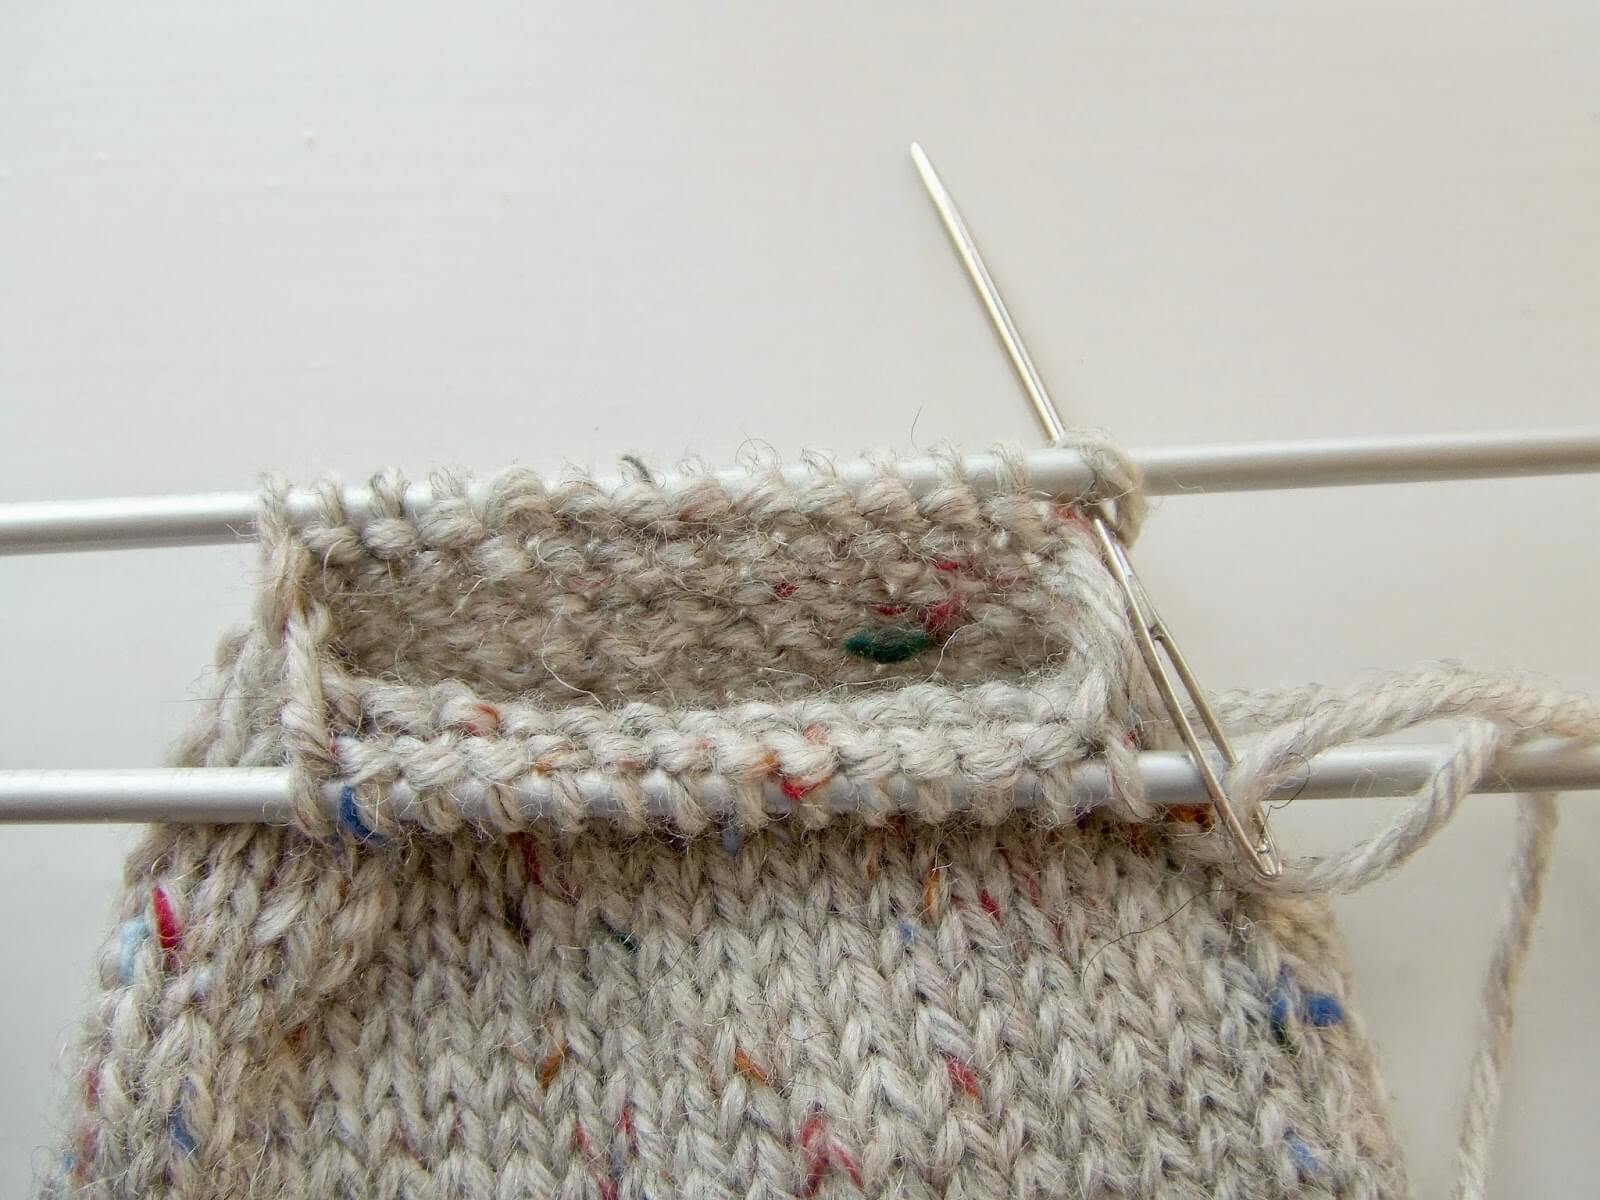
2 Insert the wool needle knit-wise into the first stitch on the front DPN and slip it off. (No, you haven’t gone mad, I realised that I hadn’t taken photos of this particular step so these are pictures from my basic sock tutorial!)

Insert the wool needle purl-wise into the second stitch on the front DPN and don’t slip it off.

3 Insert the wool needle purl-wise into the first stitch on the back DPN and slip it off.

Insert the wool needle knit-wise into the second stitch on the back DPN and don’t slip it off.

4 Repeat 2 and 3 until you get to the last two stitches on the DPNs. You will already have taken the yarn through the front stitch so after you have taken the yarn through the back stitch, you can slip both stitches off the DPN. The single yarn thread through the first stitch will be strong enough to hold it and it will sit flatter when you weave the end back into your sock.

And there’s your sock! Make another one to match and you’re good to go.
If you’d a free Kitchener Stitch Guide to download and keep in your project bag, you can get one by signing up to my newsletter list here!
This pattern is also listed on Ravelry so if you have enjoyed using it then please consider linking to the pattern so that I can see your socks – I always love to see people’s socks!
This sock pattern is free and will always remain so, but if you have enjoyed using it and would like to buy me a brew, it will be much appreciated! You can find the donation button on the sidebar on the left hand side. Thank you! xx
This pattern copyright © 2015 Winwick Mum. All rights reserved.
Not to be included in any collection or used for profit without written consent of Winwick Mum.
This pattern is based on my Basic 4ply Socks pattern, which means that you can find photo and video help in the Winwick Mum Sockalong tutorials. You can find out more here:
If you can already knit socks but would like to stay in touch, click the link below to join the Winwick Mum mailing list to hear about the latest blog posts, pattern updates, tutorials and more … but no spam, I promise!






You have made a wonderful tutorial for knitting socks. It must have taken you hours – you did a great job! I made one pair of socks with Regia and I was not fond of that yarn. Maybe it's just me. The pair I just finished, I used worsted weight and cast on 40 stitches. Maybe I need to look for some 6 ply yarn and try your pattern. It looks like it would be fun and enjoyable to knit. Thanks again 🙂
Thank you, I'm glad you like it! Yes, it does take a long time to create the tutorial but I can still remember how confusing it all seemed to me in the beginning and if I can make life easier for just one person then that makes me happy 🙂 xx
Ooo cosy. Think I need to have a go….although I have 2 lots of 4ply waiting …, so maybe next winter. Xx
I think it's always handy to have a thicker pattern that you can use if you want to. Looking forward to seeing the photos of your 4ply socks! xx
I love the idea, but just cannot seem to get to grips with sock making. Love the tutorial, and thank you for taking the time to put it together. I probably should just go for another attempt.
Yes, try again! Actually, I think sock-making is a bit like skiing; you either love it or you don't – but once the sock bug has got you, it doesn't let go! 🙂 xx
You made a wonderful tutorial. And you are right it does seem very hard at first but after the first pair you are hooked.Love your blog. Enjoy your day
Thank you, Wendymel, you've made my day with your comments! I've been to visit your blog too and it's fascinating – there might be some things there that I can use with small daughter so I'm very glad I found you! xx
Wonderful, thanks for sharing it 🙂
Lluisa xx
You're very welcome xx
Oh wowee, you must be a mind reader! I decided yesterday to finish off my SECOND SOCK which incidentally is in the maroon and pink of your first photographed sock! It has been on the go for 2 years I think. I can't remember how I did the first heel and am a bit of a numpty about all the picking up and turning etc. I also like you use small needles rather than DP ones but had to resort to DP ones for the picking up of stitches bit as I couldn't convert my normal pattern to that for mini circulars. Oh dear I have got myself into such a mess I decided this morning to unpick up to where I've picked up the side of heel piece and have now put it down as it's so hard to convert without doing a bit of writing down.
Sorry if this sounds gobbledegook as I know it is.
The good part is, I was going to come to have a look at your blog (I look but don't always comment) and ask you the question how I converted – and there is this post
It will have to be later when I have a really good look at it as I've got to take Mum to Sainsburys as she's recently given up her car.
Thanks for this post and I hope I shall be able to use this as a model for the two more 6 ply sock wool I have.
I must have known! Good luck with finishing your sock – the pink stripe ones are my favourites – and with the new ones that you're going to finish in record time 😉 xx
I've just finished my first pair of 6ply socks using your pattern – thank you!
I'm going to start another pair & do them toe up so I can finish the whole ball, I haven't a clue what I'm doing- wish me luck!
Fantastic, Vicki! I'm glad your socks worked out, and good luck with your toe ups, I'm sure they'll be great! xx
thicker socks for cowboy boots?
boot socks
Yes, these would probably work very well for cowboy boots. They're not quite as thick as DK (8ply) socks but thicker than sport weight. If you wanted to change the cuffs for your rollerblades that wouldn't be a problem xx
Hi there why I cannot download the pattern.
Yesterday I was chating whit some friends and they share with me this blog I am learning to knit socks thanks for sharing.
Hi! I've checked the link and it wasn't working for some reason so I've updated it and you should be able to download the pattern now. Good luck with your socks! xx
Thank you very pleased of your quick answer I will start today .
Thank you for this. While I have knit piles of socks, I have only ever used fingering/sock weight. My son has wanted a pair of boot socks for 3 years and I bought a skein of 6ply Regia maybe 2 years ago. Finally am knitting them to put away for his December birthday. Since he wears a size 13US shoe, I hope I will have enough yarn. At least now I know how many stitches to cast on, needle size, etc. The rest is how I always knit my basic sock pattern. Thanks again.
You're very welcome! If you need to check the number of stitches to cast on, there's a tutorial here: winwickmum.blogspot.co.uk/2015/04/sockalong-tension-squares.html which should help xx
You are so kind to have gone to the trouble to do this for other sock knitters! I usually knit 4 ply and it has become something of an obsession. Have just ordered some 6 ply so your pattern was just what I was looking for. Thank you very much.
Pat (South Cheshire)
You're very welcome, Pat! 6ply makes a nice pair of thicker socks, and there's a new 8ply (DK) version on the blog too which you'll find in the free patterns if you want to make even thicker socks xx
Hi, Just looking for a little bit of advice. I am trying to knit my first pair of socks ever and having bought the book and seen the basic dk boot sock would you please advice which is the best of the two to start with. I am a complete novice. Thanks
Hello! It's lovely to see you, and thanks for buying the book! If you've never knitted a sock before, you might want to start with the 4ply sock as all of the tutorials are written for that weight of yarn (I'm thinking about the number of stitches for casting on, the heel flap and gusset in particular). Having said that, some people do prefer to start with thicker yarn and the 6ply sock is idea for that – it's constructed in exactly the same way as the 4ply sock so you can still use the tutorials but you have to take the changes in stitch numbers into account. There's a pattern for 8ply (DK) yarn on the blog if you want something even thicker (it was written later which is why it's not in the book) – the tutorials will work with any weight of yarn, you just have to alter the stitch numbers as you go along. Does that help? xx
Hello Winwick mum! I have almost finished making my first pair of socks using your great tutorial. I used Head over Heels yarn and they look really good.
I can't believe how many sock yarns there are to choose from! I'm wondering whether to make my next pair with 3 ply sock yarn. Do you think 3 ply ones will be good for eveyday and be wearable with most shoes? Thanks again, Julie
Hi Julie, I've never tried making socks with 3ply yarn – I guess that as long as there's either nylon in the yarn or it's a blend of strong fibres such as Blue-faced Leicester, Wensleydale, Hebridean, mohair etc then they should be OK- I don't see why not! I wear my 4ply socks all the time and I like that they're a bit thicker than shop-bought socks but 3ply might be a similar thickness to those. You'd be able to work out the number of stitches you need with the stitch calculation in the tension tutorial and use the Sockalong tutorials if you needed them – I'll be really interested to see how they turn out! xx
Thank you for your prompt reply. I will try 3 ply as I can't wear most of my shoes with the 4 ply socks. I notice that the 3 ply sock yarns mostly suggest needle size 2.5mm (or even bigger) which is the same as I used for the 4 ply socks. This puzzles me as won't the knit be rather loose? I want to understand this before buying my yarn. Regards, Julie
Hi Julie, I'd be inclined to go down at least one needle size as the fabric for sock yarn needs to be a bit firmer than it does for other garments; that's the reason that I use 2.5mm needles whatever the ball band suggests for 4ply, so you'll probably find you'll get a better fabric from 2.25mm or even 2.0mm needles xx
Thanks
Hi there. Stuck at home with Covid and wishing I could make our yearly trip to the UK.
In the meantime I have learned to knit socks. Thank you for your generosity in providing patterns, tutorials and advice. Cheers. Judy from Vancouver Canada
I’m sorry to hear that you’re poorly and hope you are better soon. Hopefully it won’t be long before you are up and about again and getting ready to holiday over here again – wearing your brand new socks! 🙂 xx
Thank you so much for the simple and explicit instructions for Kitchener Stitch. I have found myself in a horrendous muddle trying to follow other instructions, but this handy sheet is wonderful. I shall have to knit some more socks to try it out.
I’m really glad it’s useful for you – and yes, you always need more pairs of socks! 🙂 xx
Thank you for this :), I’ve bought a cheap set of bamboo circular needles on Amazon, cut them down sanded them to a point cut the cable super glued it back on and now have the dinkiest set of sock circular needles, great for sleeve cuffs too, I’m off to start this pattern now 🙂 xx
Well, that’s an impressive bit of carpentry! I hope your socks turn out beautifully! 🙂 xx
Hi there! I’ve knit 58 pairs of your basic 4 ply & 8 ply socks for female friends & family ( & lots for me of course 😉) since January 2020 when you taught me how to knit socks. Thank you! I now have some 6 ply & want to knit some for men. I don’t know how many stitches to cast on for a mans UK size 11 shoe. The rest I can figure out, I just don’t know how many stitches to cast on. Can you help?
Hi Carol, you can easily work out how many to cast on using the Sock Stitch Calculation and that will help you to get the perfect fit. As for the length, there are lots of shoe websites online that have shoe length charts so you’ll be able to find out the right length to knit to, and then just work the toes as you would for any other sock 🙂 xx
Thank you very much for the info, very helpful!
I loved the 4ply socks but next I’m trying 6ply so they don’t take quite soooo long 😊
The Regia yarn you’ve used has a very generous meterage as it’s a large skein – do you know roughly the actual meterage used for a pair? Is there much left of the 375m of the Regia yarn? Thanks so much 😊
Hi! You will use more of the thicker yarn so they do usually come in bigger balls (skeins) than 4ply. The way it works out is that you have less stitches but because the yarn is thicker, you go through it more quickly so you need the extra meterage. I can’t tell you exactly how much you’ll use as of course it depends on the size of the feet you’re knitting for, but I would say that one ball is generally enough for one pair of socks for an average-sized foot. I know that’s not very helpful but as a guide, my foot is a UK size 5 and I had plenty left out of my ball. I would say the best thing to do if you’re worried about running out is to either knit one sock and weigh it as you go along so you’ve got an idea of how much you’re using, or divide your ball into two right from the beginning then you’ll know you’ve only got that much per sock and it will help you gauge how much you’re using 🙂