Aardvarkish Shawl – free pattern and tutorial
Happy Hallowe’en!
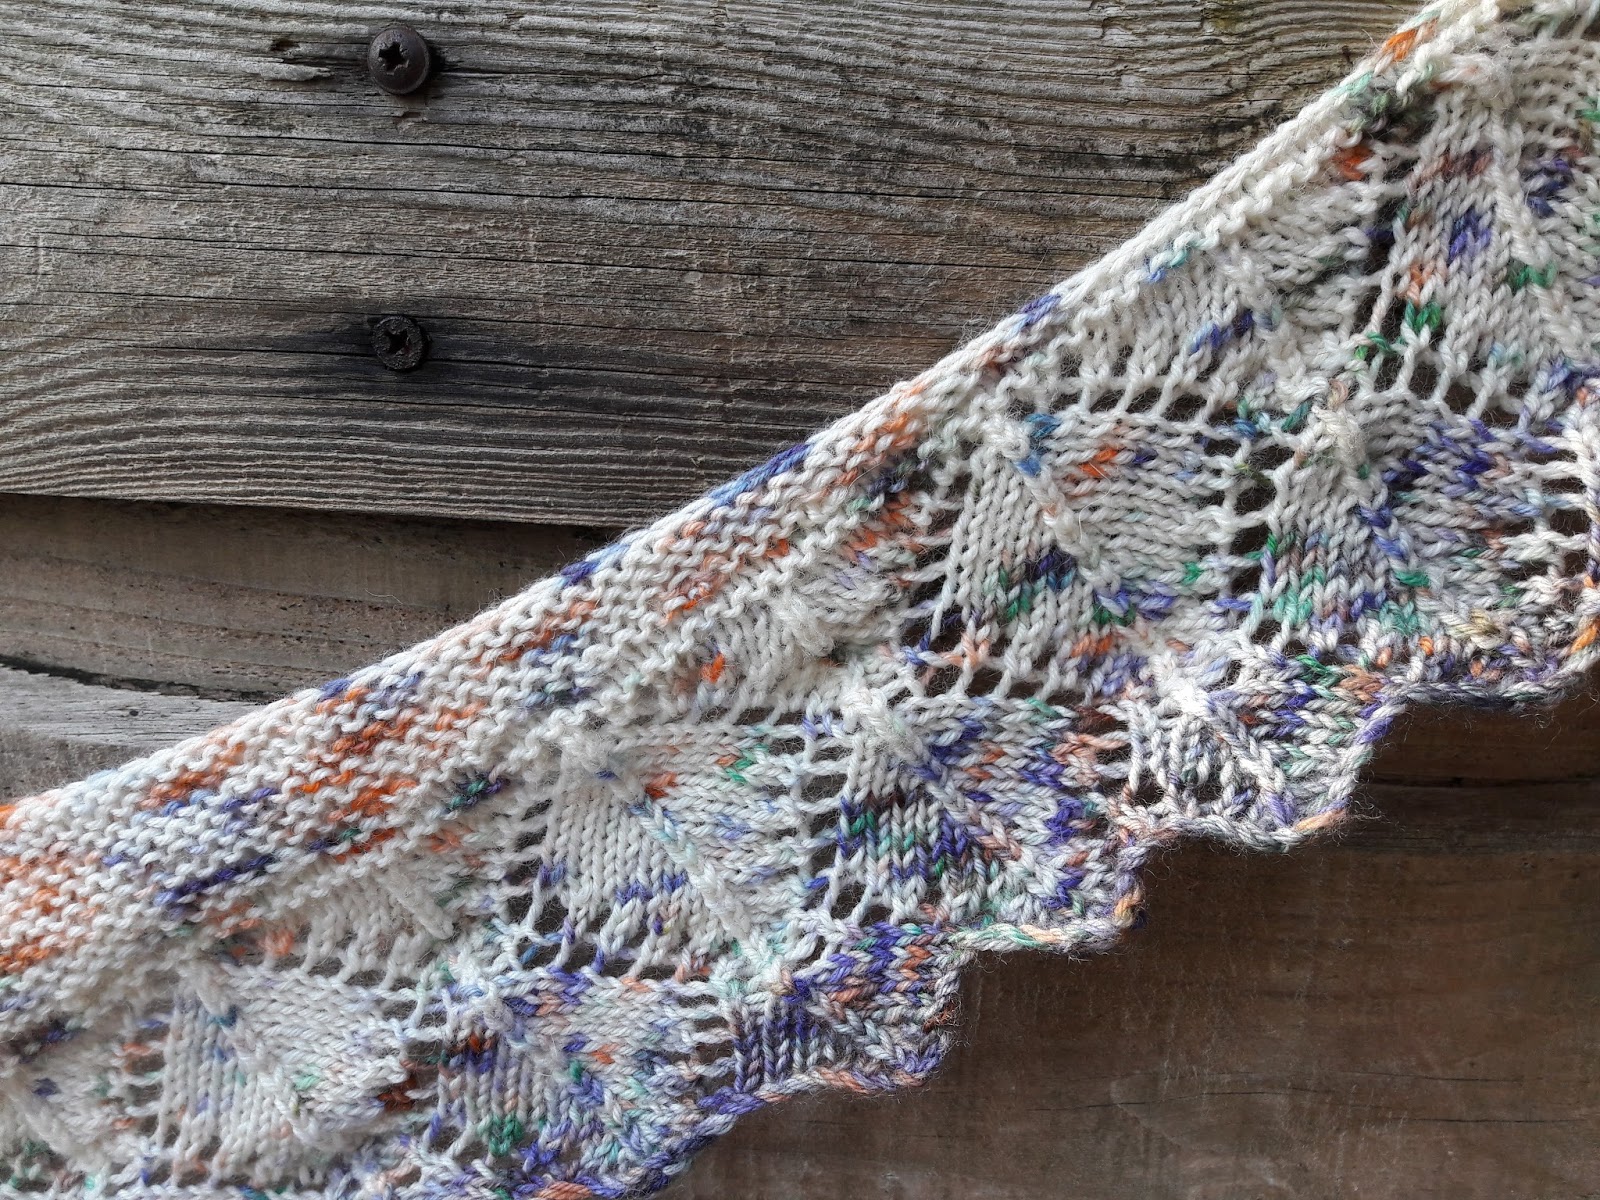
I’m definitely more in favour of treats than tricks so I thought I’d share this with you. If you were at Yarndale this year, you might have seen me wearing a new shawl that I hadn’t got round to writing the pattern up for … well, now I have!
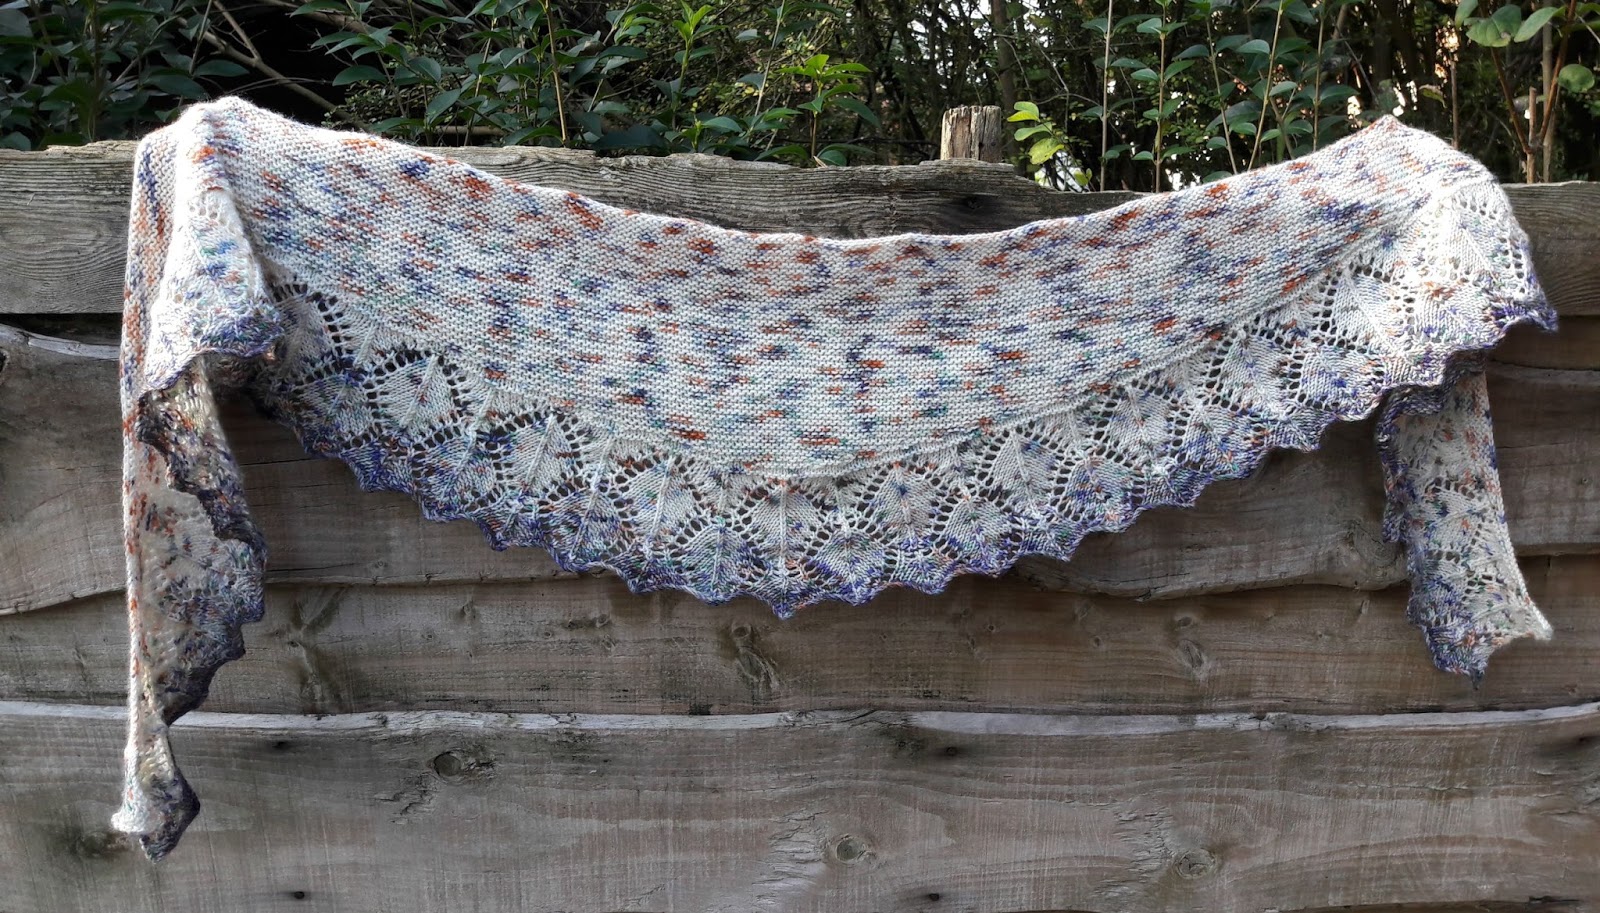
It’s knitted with a one-of-a-kind skein of yarn that was gifted to me by Vykky of West Green Loft Yarns shortly before Hallowe’en last year and is called – appropriately for the occasion – “Frankenstein”. It stayed in my stash for quite a while until I decided that it was time to wind it into a ball and turn it into some socks.
I thought it would make rather fabulous socks with the blue, green and orange flecks running through it and set about winding it into a ball …

Oh dear! If you’ve been reading my blog for any length of time, you’ll know that I’m rather obsessive about having my socks match and there was no way this yarn was going to do that! It was deep blue at one end and cream and orange at the other. My socks wouldn’t look as if they were even remotely related, never mind being fraternal twins from the same ball!
I needed another plan.

After designing my Couthie shawl, I fancied having a go at another one and I thought this yarn would work much better for that. I could see the darker blue as an edge along the bottom and I had a lovely time researching shawl patterns and trying out various ideas to get it to do just what I wanted. In the end, I chose to create a crescent shawl along the style of this one that I knitted last year. Instead of casting on just a couple of stitches and working longer and longer rows, this one works the other way around and you cast on a large number of stitches so the first section is long rows, and then you work short rows (just like the heel turn of a sock) to bring the edges of the shawl in to make the crescent shape. After the initial shock of how many stitches you have to cast on, it’s quite nice to know that you’re only ever going to reduce the number of stitches, not increase them!
So here it is … Aardvarkish!
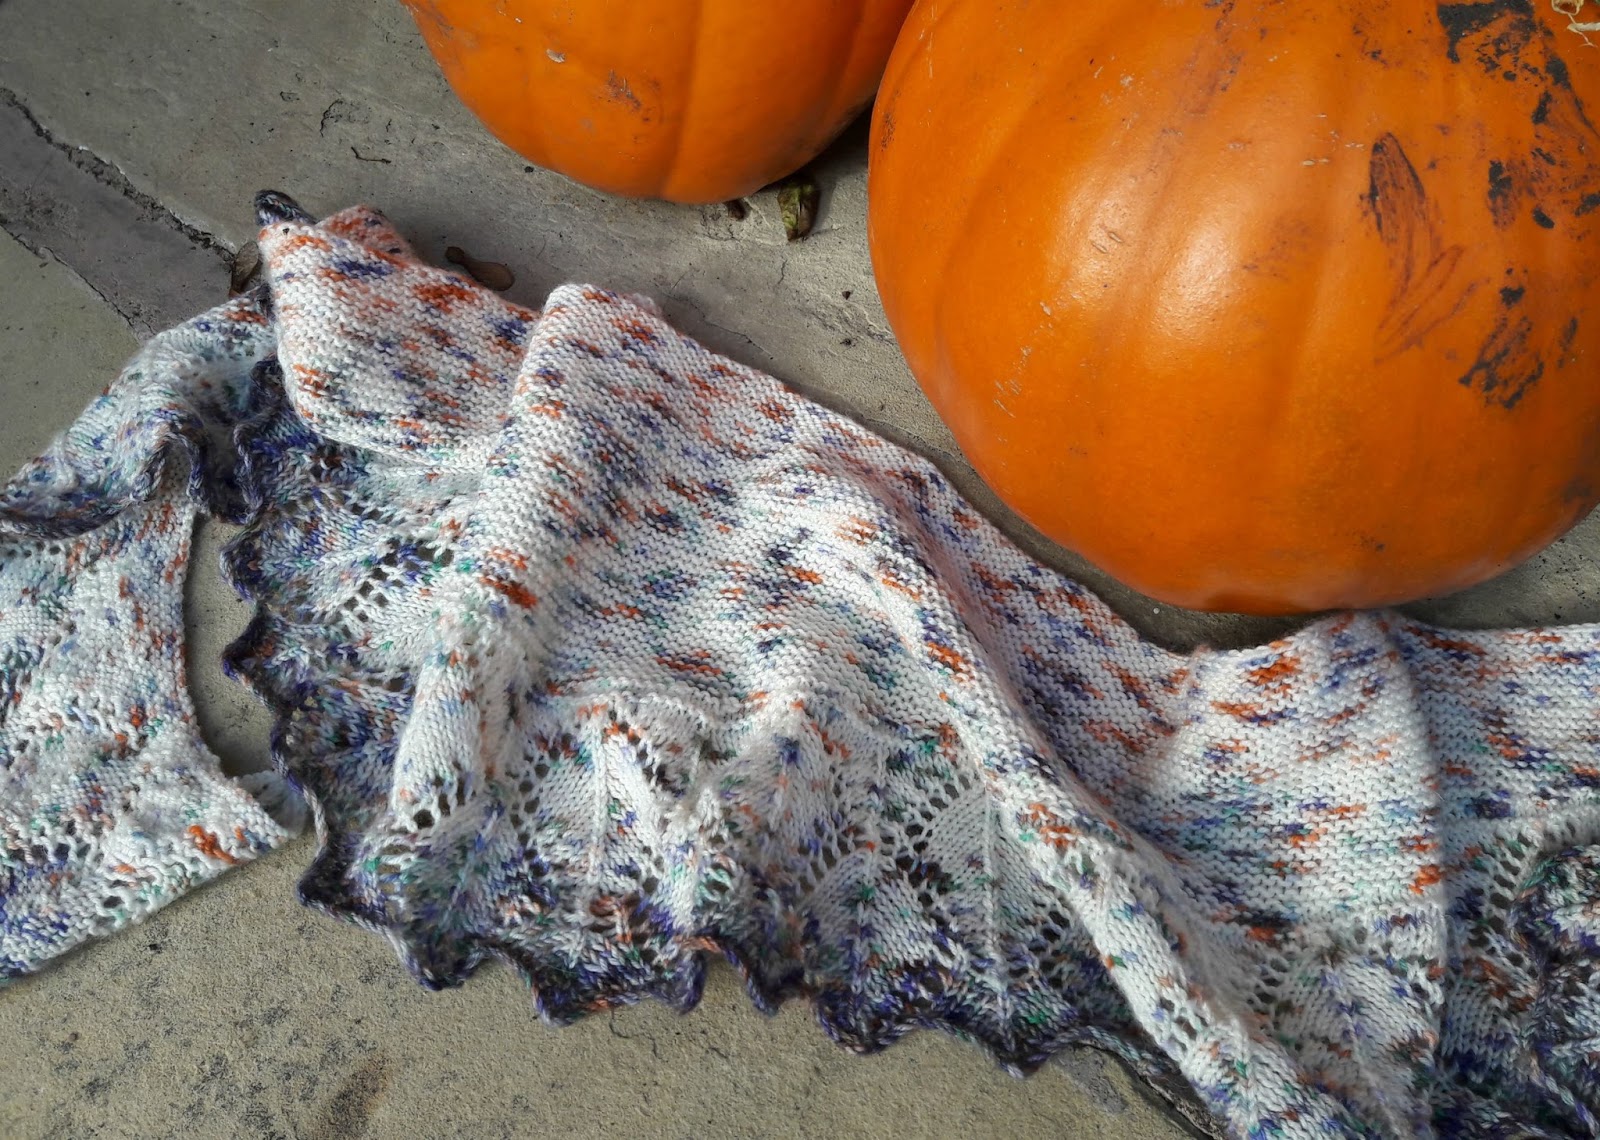
Why Aardvarkish? Well, I felt that yarn named after what is quite a sad story should have a pretty pattern to compensate for that, and I wasn’t going to call it “Frankenstein” because that makes it sound like a Hallowe’en costume! Instead, I thought about how it was a one-of-a-kind colour and that made it unique, just like the aardvark. I think this pattern would be perfect for any yarn, not just one-of-a-kind skeins, it’s easy to knit and it doesn’t matter if you run out of yarn so that will make every shawl knitted to this pattern different – one of a kind whatever yarn you use … or aardvarkish. 🙂
I haven’t written this as a photo-heavy tutorial as the pattern is easy to follow – you’ve probably already used all of these stitches in other patterns if you’ve been knitting for any length of time – although there are a couple of photos to illustrate something that’s new to a pattern that I’ve written. If you need help with yarn overs and reading a chart, check out my Easy Lace Socks tutorial, and the K2tog and SSK decreases are covered in the Sockalong tutorials.
Want to cast on?
Aardvarkish Shawl
You can download a PDF copy of the pattern HERE
Materials
4mm circular needle in 100cm length
1 x 100g ball or skein of 4ply yarn (yarn pictured is one-of-a-kind “Frankenstein” by West Green Loft Yarns) – my skein was 400m in length
stitch markers
wool needle
Gauge is not really an issue with this shawl as it can be made to any size and also with any weight of yarn.
Abbreviations
K Knit
P Purl
YO Yarn over needle
CDD Central double decrease, also known as S2kp2. Slip two stitches knitwise, knit 1 stitch, pass slipped stitch over knitted stitch
K2tog Knit two stitches together
SSK Slip the first stitch knitwise, the second stitch purlwise, slip both back onto left hand needle and knit through back loop
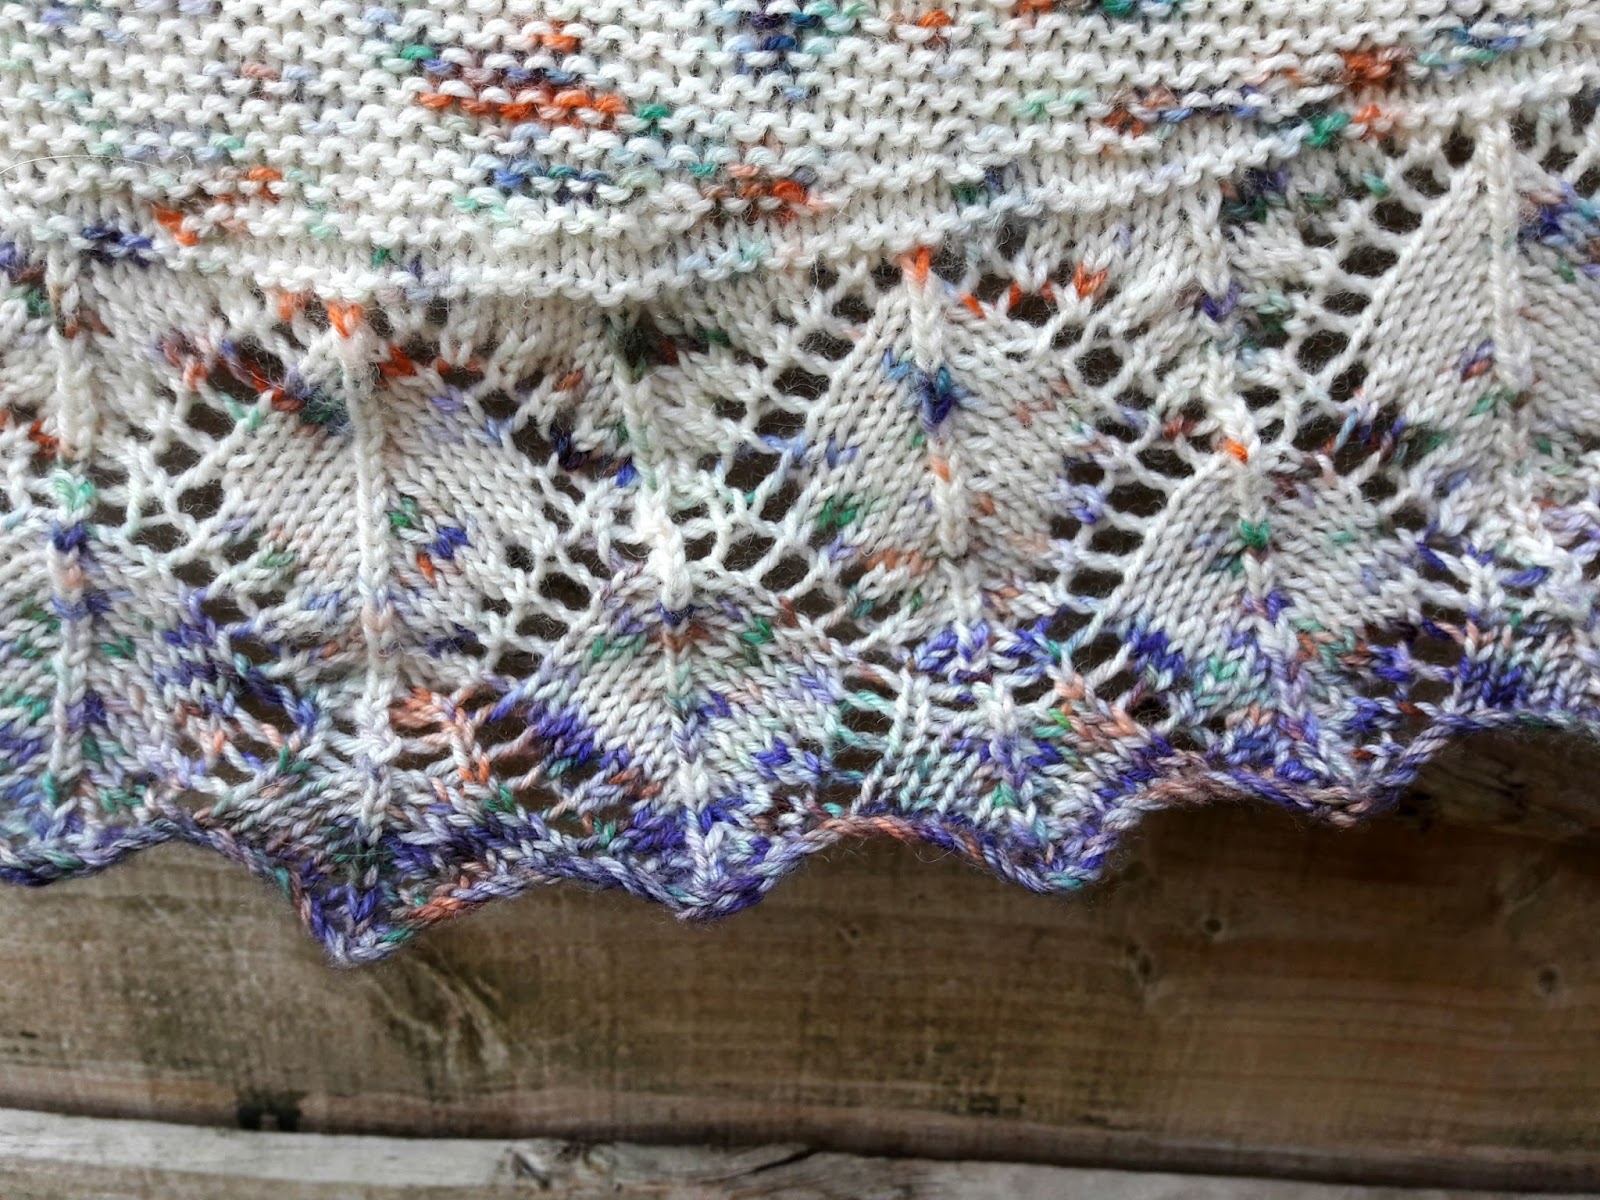
The central double decrease stitch is the raised stitch down the centre of the diamond pattern.
I chose this because I like the way it stands out, and it’s very easy to do.
1 Slip the first two stitches on your left hand needle onto your right hand needle.

2 Knit the next stitch
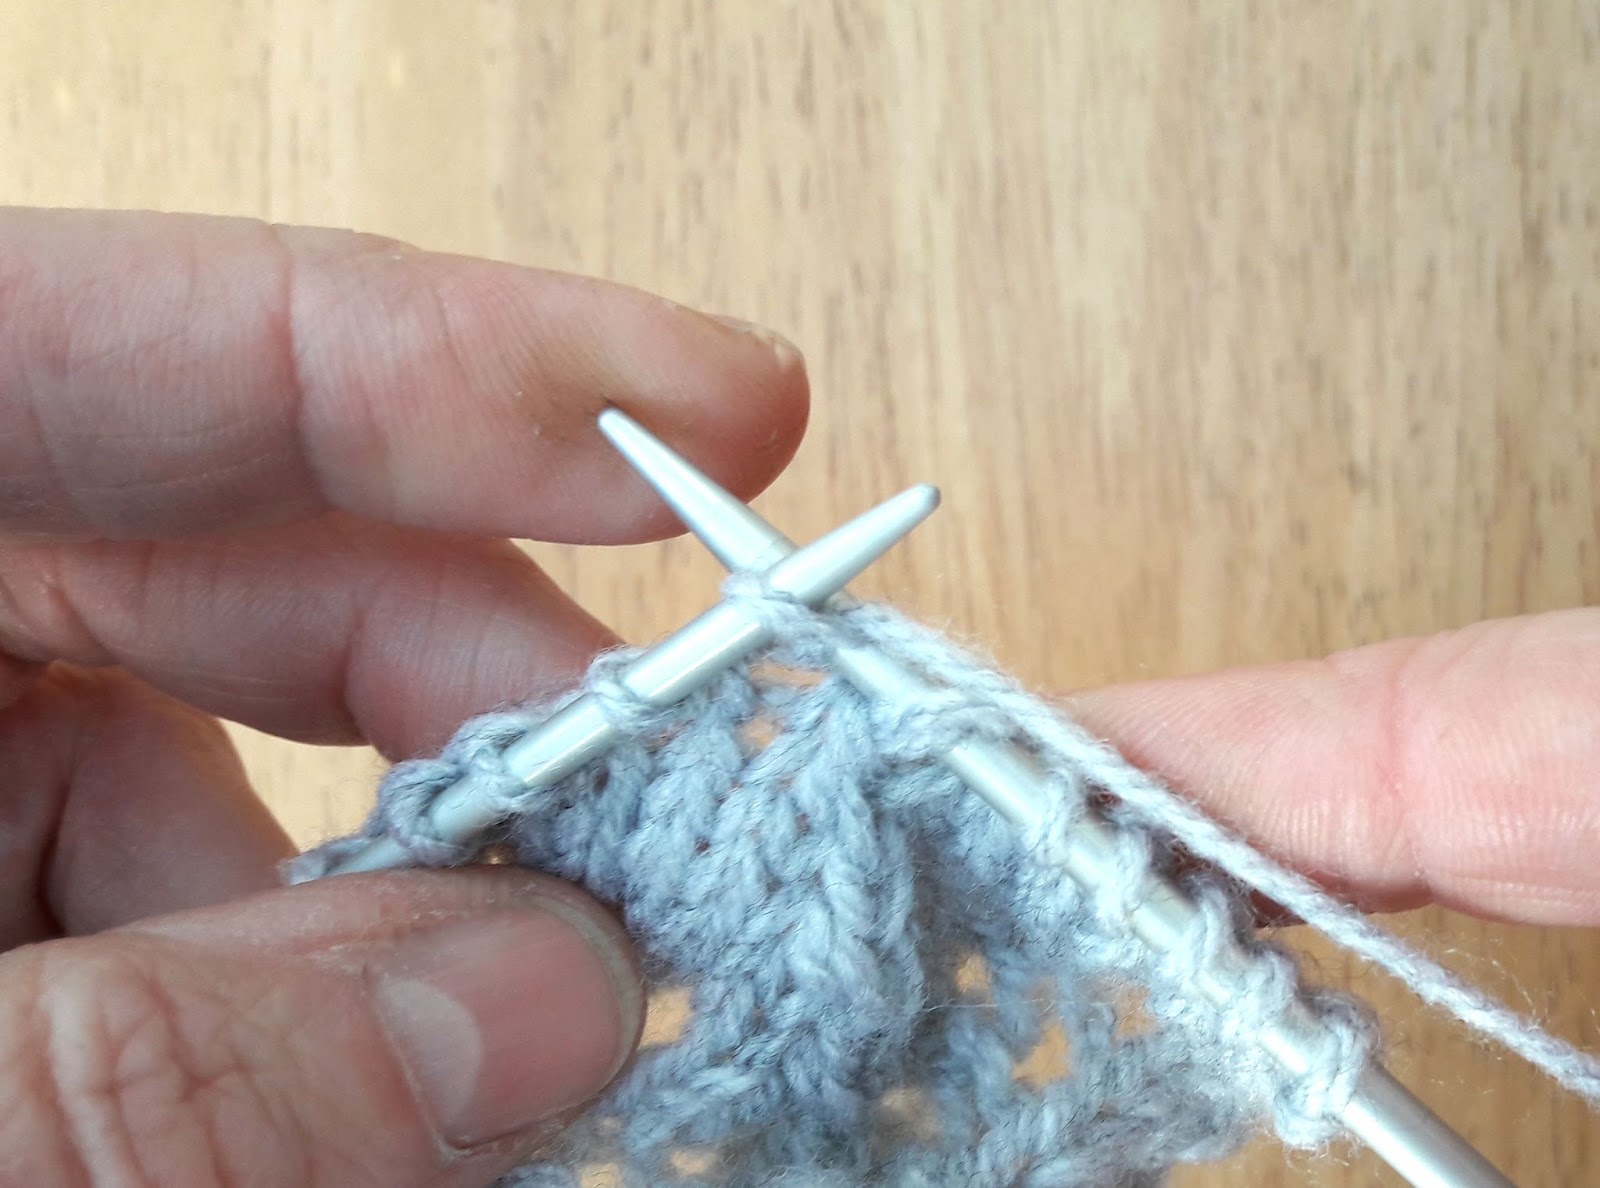
3 Pass the two slipped stitches on the right hand needle over the knitted stitch on the left hand needle.
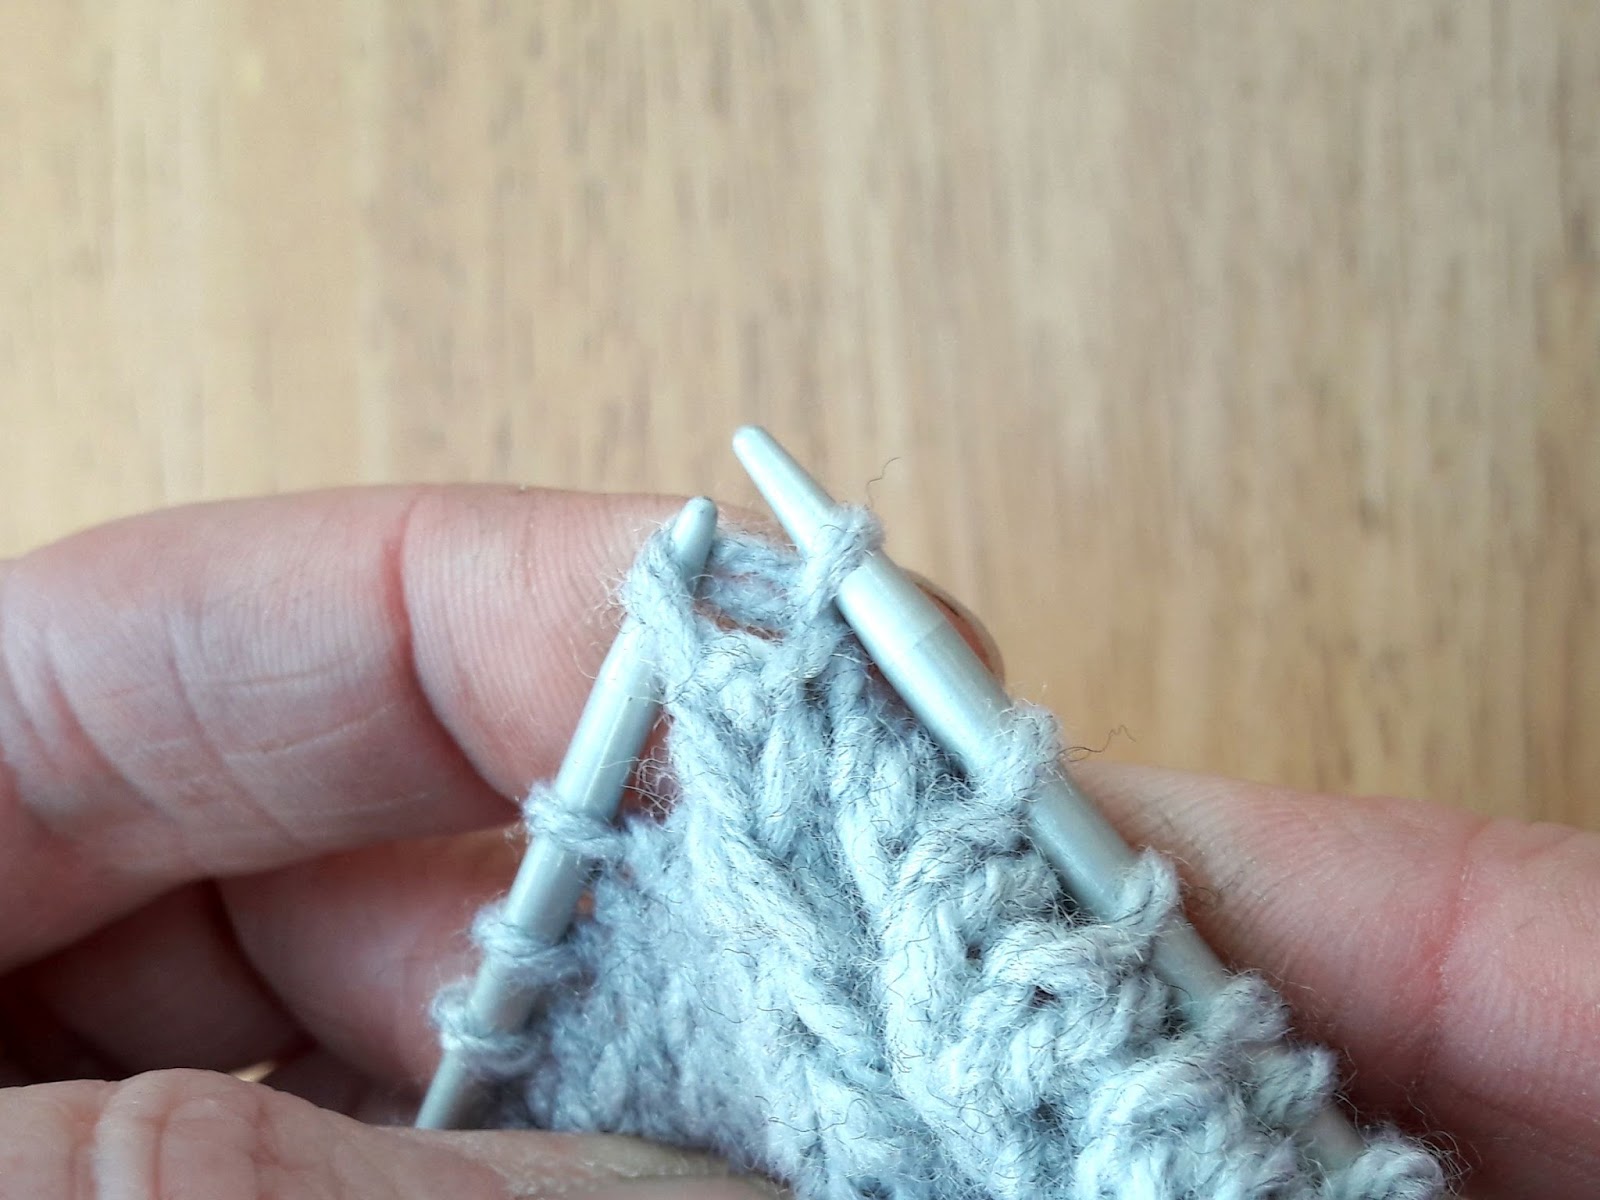
and that’s your central double decrease stitch created. Easy, eh?

Pattern
Cast on 411 stitches on 4mm needles and set up pattern as follows. You can choose not to place markers after each pattern repeat but it does help you see where you’re up to. You will find that you’ll need to move the stitch markers as you work the pattern to accommodate the number of stitches in each chart block.
Knit 16 stitches of Chart A, place marker. (16 stitches) Knit 18 stitches of Chart B, place marker. Repeat 20 more times, placing marker after each section of 18 stitches (394 stitches) Knit 17 stitches of Chart C (411 stitches)
Work 36 rows of pattern, following either the chart or the written instructions. It is strongly recommended that you use lifelines throughout the process of knitting this shawl. Written and charted instructions: Work rows 1 to 24 then rows 1 to 12 again, finishing on a wrong side row.
Chart A
Row 1: (RS): K, yo, K5, cdd, K5, yo, K1 yo. (16 sts)
Row 2 and all WS rows: Purl.
Row 3: K2, yo, K4, cdd, K4, (yo, K1) twice.
Row 5: K2tog, yo, K1, yo, K3, cdd, K3, yo, K1, yo, K2.
Row 7: K2tog, (K1, yo) twice, K2, cdd, K2, yo, K1, yo, K3.
Row 9: K2tog, K2, (yo, K1) twice, cdd, (K1, yo) twice, K4.
Row 11: K2tog, K3, yo, K1, yo, cdd, yo, K1, yo, k5.
Row 13: Repeat row 11.
Row 15: Repeat row 9.
Row 17: Repeat row 7.
Row 19: Repeat row 5.
Row 21: Repeat row 3.
Row 23: K, yo, K5, cdd, K7, yo.
Row 24: Purl
Repeat rows 1 – 12
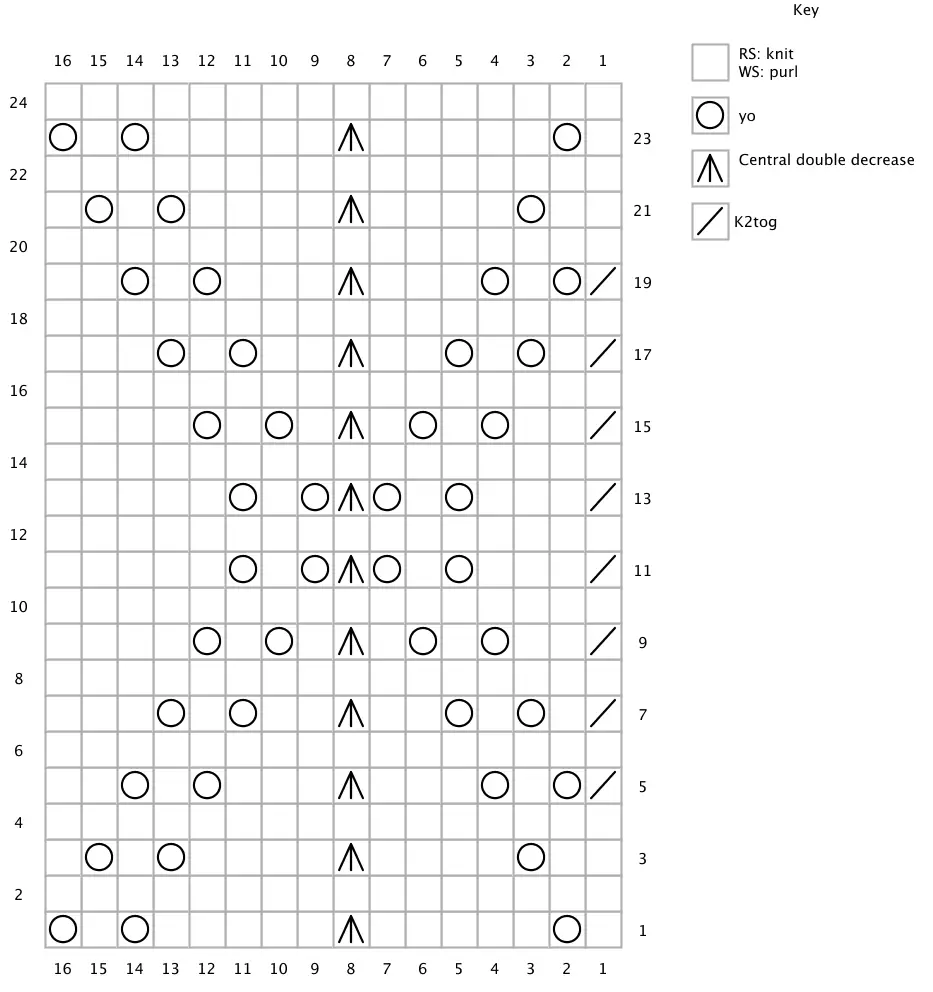
Chart B
Row 1: (RS) Cdd, yo, K1, yo, K5, cdd, K5, yo, K1, yo. (18 sts)
Row 2 and all WS rows: Purl.
Row 3: Cdd, (k, yo) twice, K4, cdd, K4, (yo, k) twice.
Row 5: Cdd, K2, yo, K1, yo, K3, cdd, K3, yo, K1, yo, K2.
Row 7: Cdd, K3, yo, K1, yo, K2, cdd, K2, yo, K1, yo, K3.
Row 9: Cdd, K4, (yo, K) twice, cdd, (K1, yo) twice, K4.
Row 11: Cdd, K5, yo, K1, yo, cdd, yo, K1, yo, K5.
Row 13: Repeat row 11.
Row 15: Repeat row 9.
Row 17: Repeat row 7.
Row 19: Repeat row 5.
Row 21: Repeat row 3.
Row 23: Repeat row 1.
Row 24: Purl.
Repeat rows 1-12
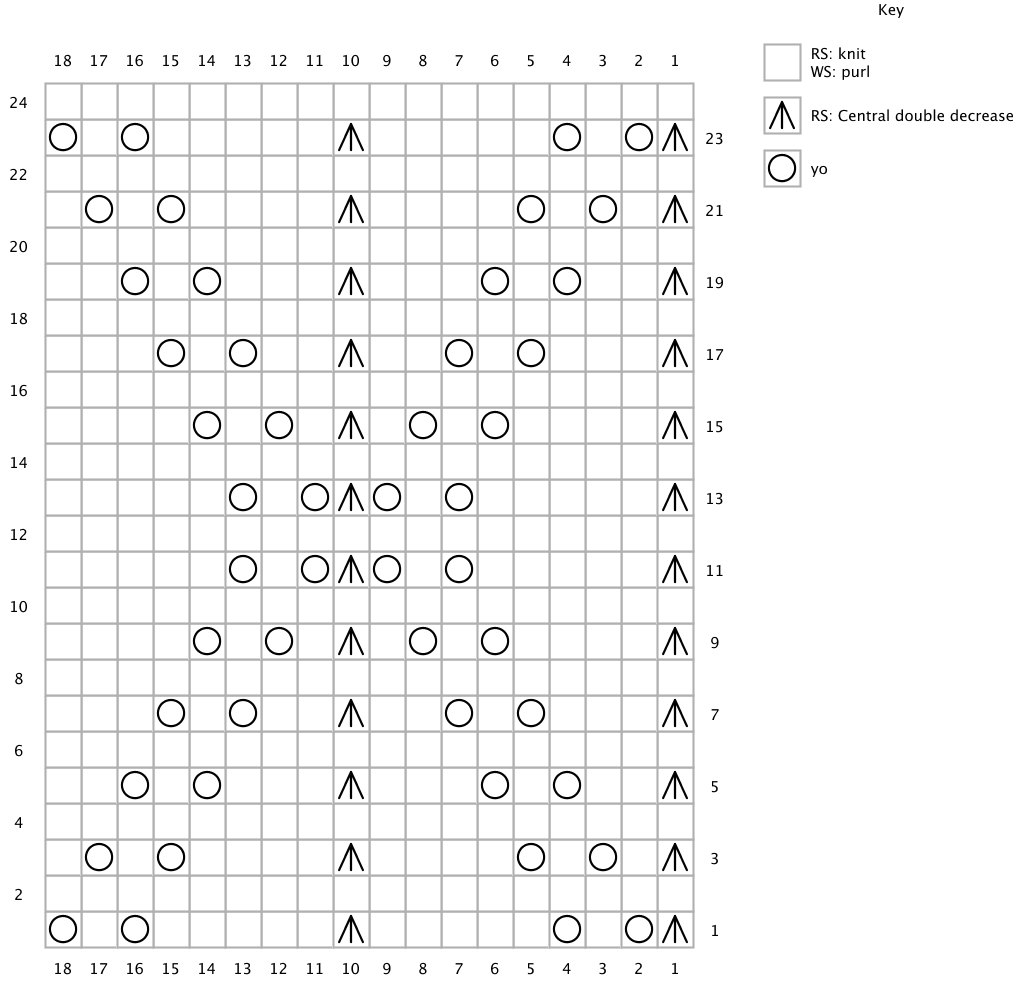
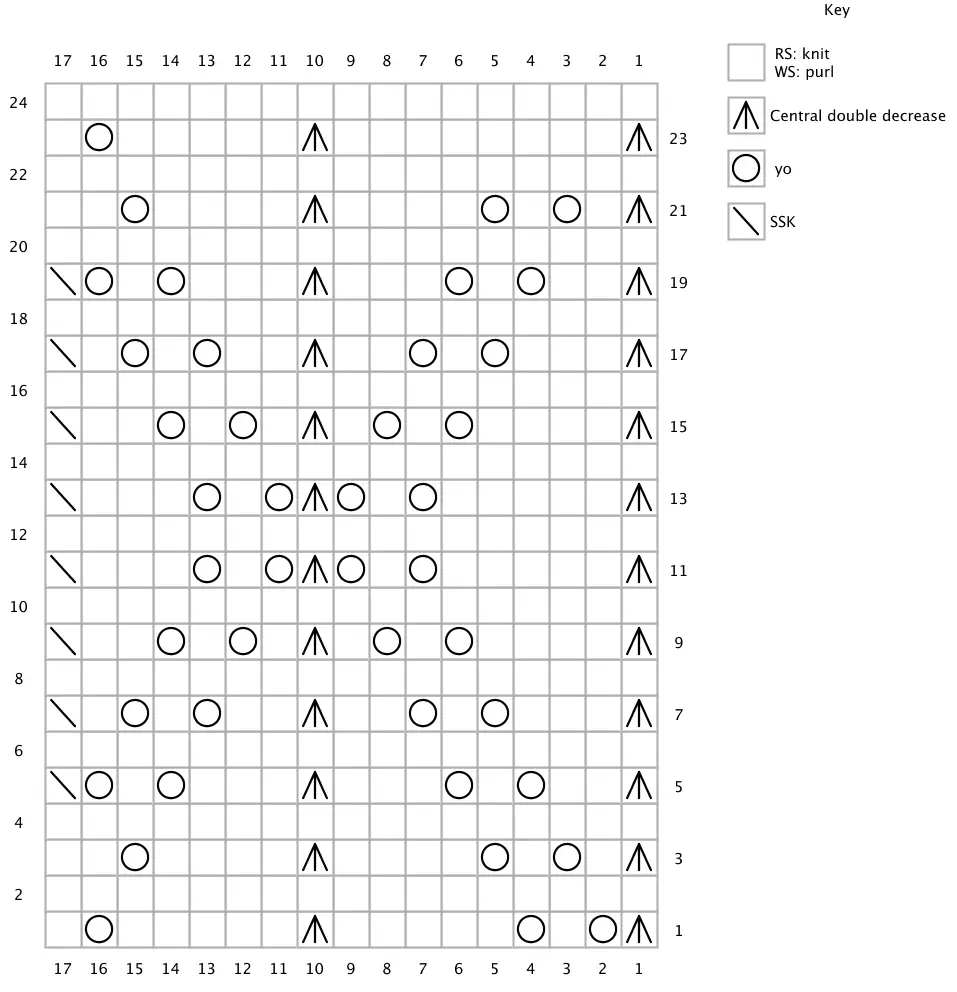
Chart C
Row 1: (RS) Cdd, yo, K1, yo, K5, cdd, K5, yo, K1. (17 sts)
Row 2 and all WS rows: Purl.
Row 3: Cdd, (K1, yo) twice, K4, cdd, K4, yo, K2.
Row 5: Cdd, K2, yo, K1, yo, K3, cdd, K3, yo, K1, yo, ssk.
Row 7: Cdd, K3, yo, K1, yo, K2, cdd, K2, (yo, K1) twice, ssk.
Row 9: Cdd, K4, (yo, K1) twice, cdd, (K1, yo) twice, K2, ssk.
Row 11: Cdd, K5, yo, K1, yo, cdd, yo, K1, yo, K3, ssk.
Row 13: Repeat row 11.
Row 15: Repeat row 9.
Row 17: Repeat row 7.
Row 19: Repeat row 5.
Row 21: Repeat row 3.
Row 23: Cdd, K8, cdd, K5, yo, K1.
Row 24: Purl.
Repeat rows 1-12
Transition: Next two rows – purl all stitches
Start short row shaping:
Row 1: K211, turn.
Row 2: K11, turn.
Row 3: K to stitch before turning point, SSK, K3, turn.
Row 4: K to stitch before turning point, K2tog, K3, turn.
Repeat rows 3 and 4 until all the stitches on your needle have been worked or until you run out of yarn. Don’t worry if this happens before you have worked all of the stitches – this is what happened with my yarn and you really can’t tell …
All you need to do is finish on a wrong side row, turn your work and use a no-yarn cast off as follows:
Slip remaining unworked stitches from the right hand needle onto the left hand needle so that your stitches are all together.
1 Slip the first two stitches from your left needle to your right …
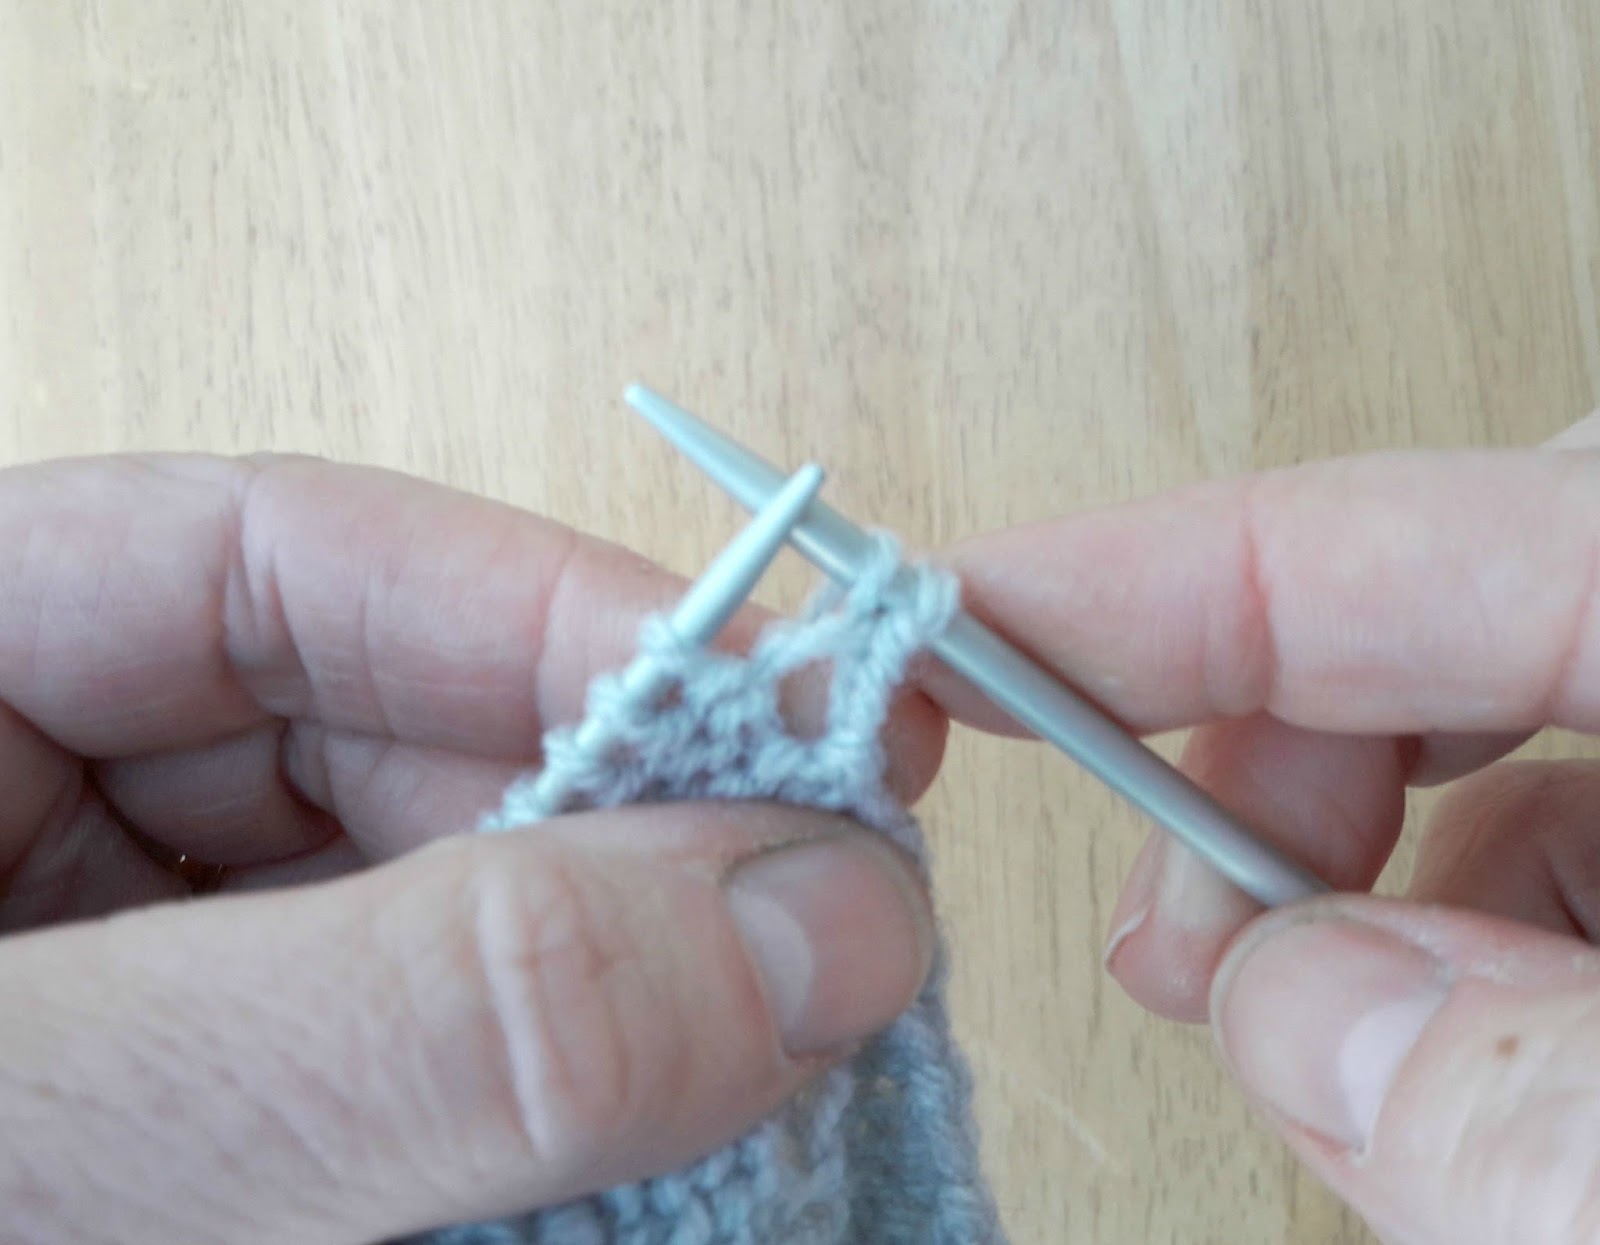
2 then pass the first stitch over the second on the right hand needle so that you have one stitch left.
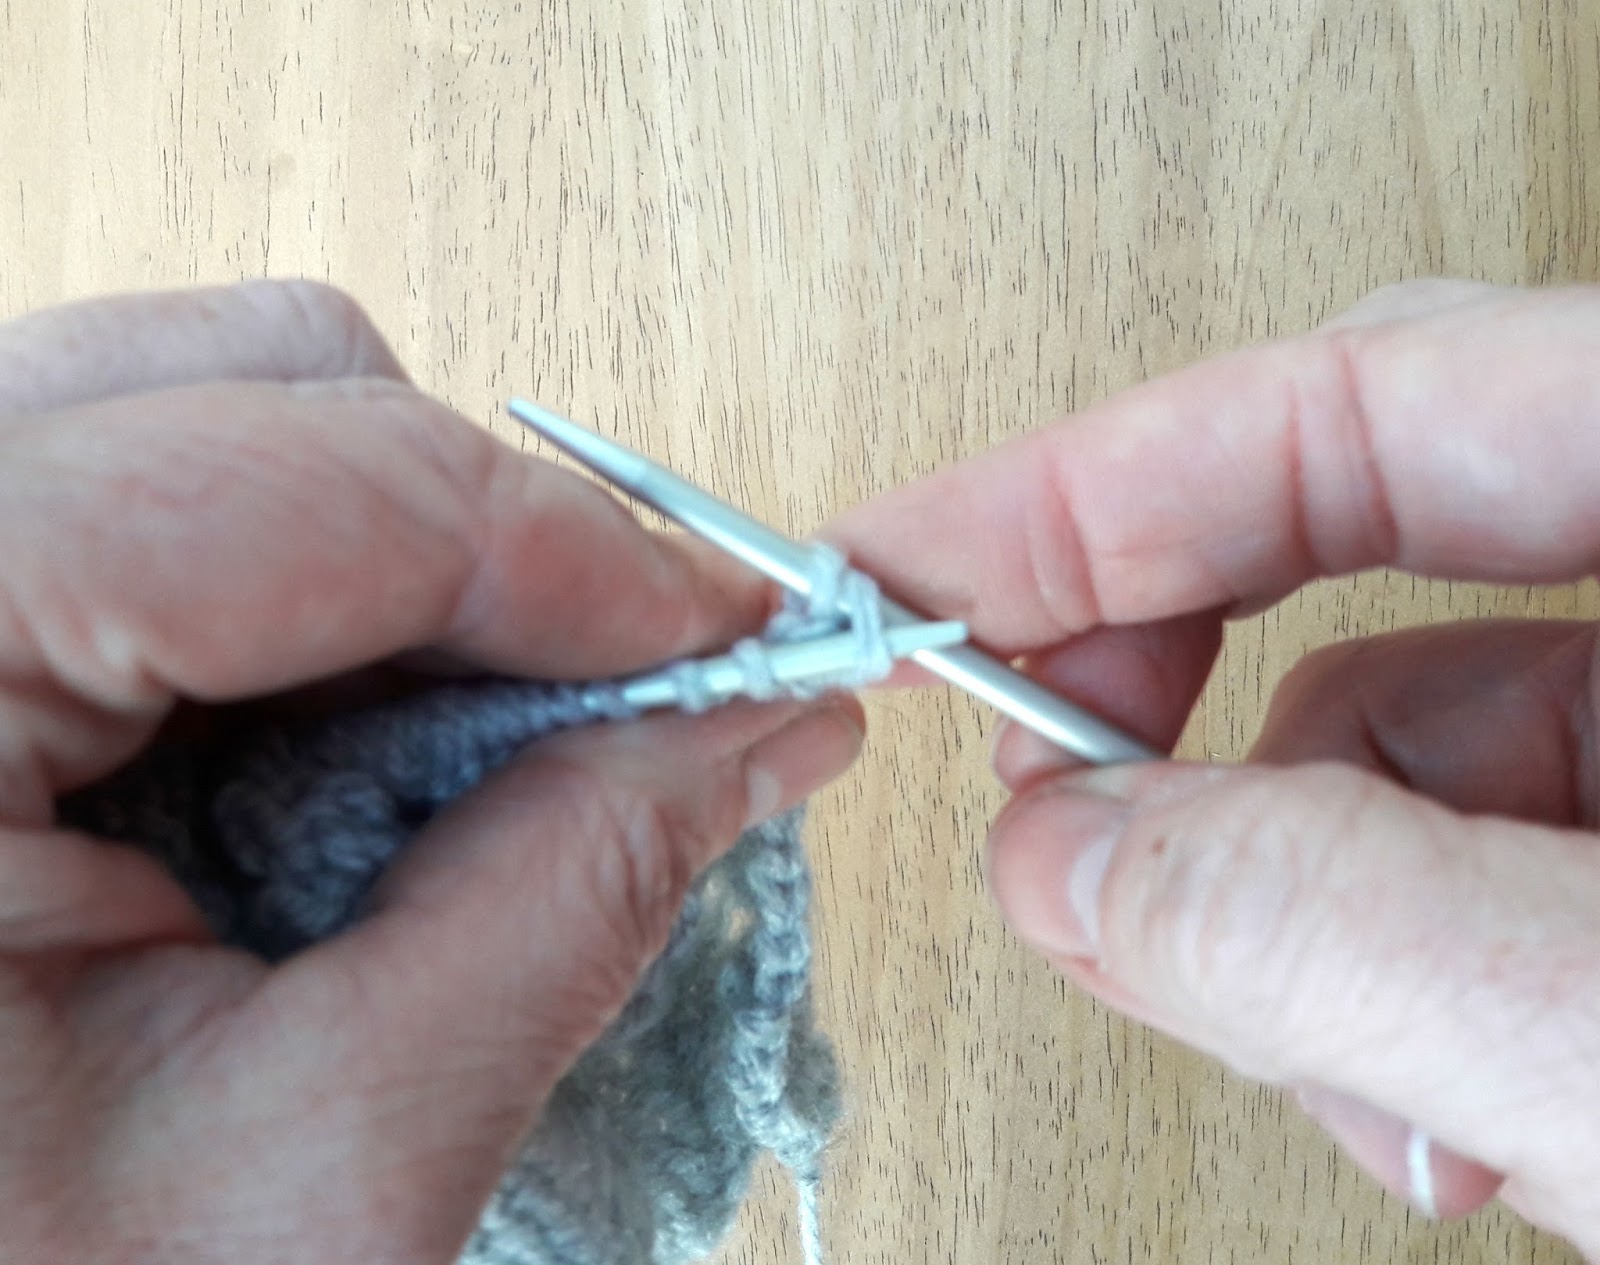
And that’s all there is to it!
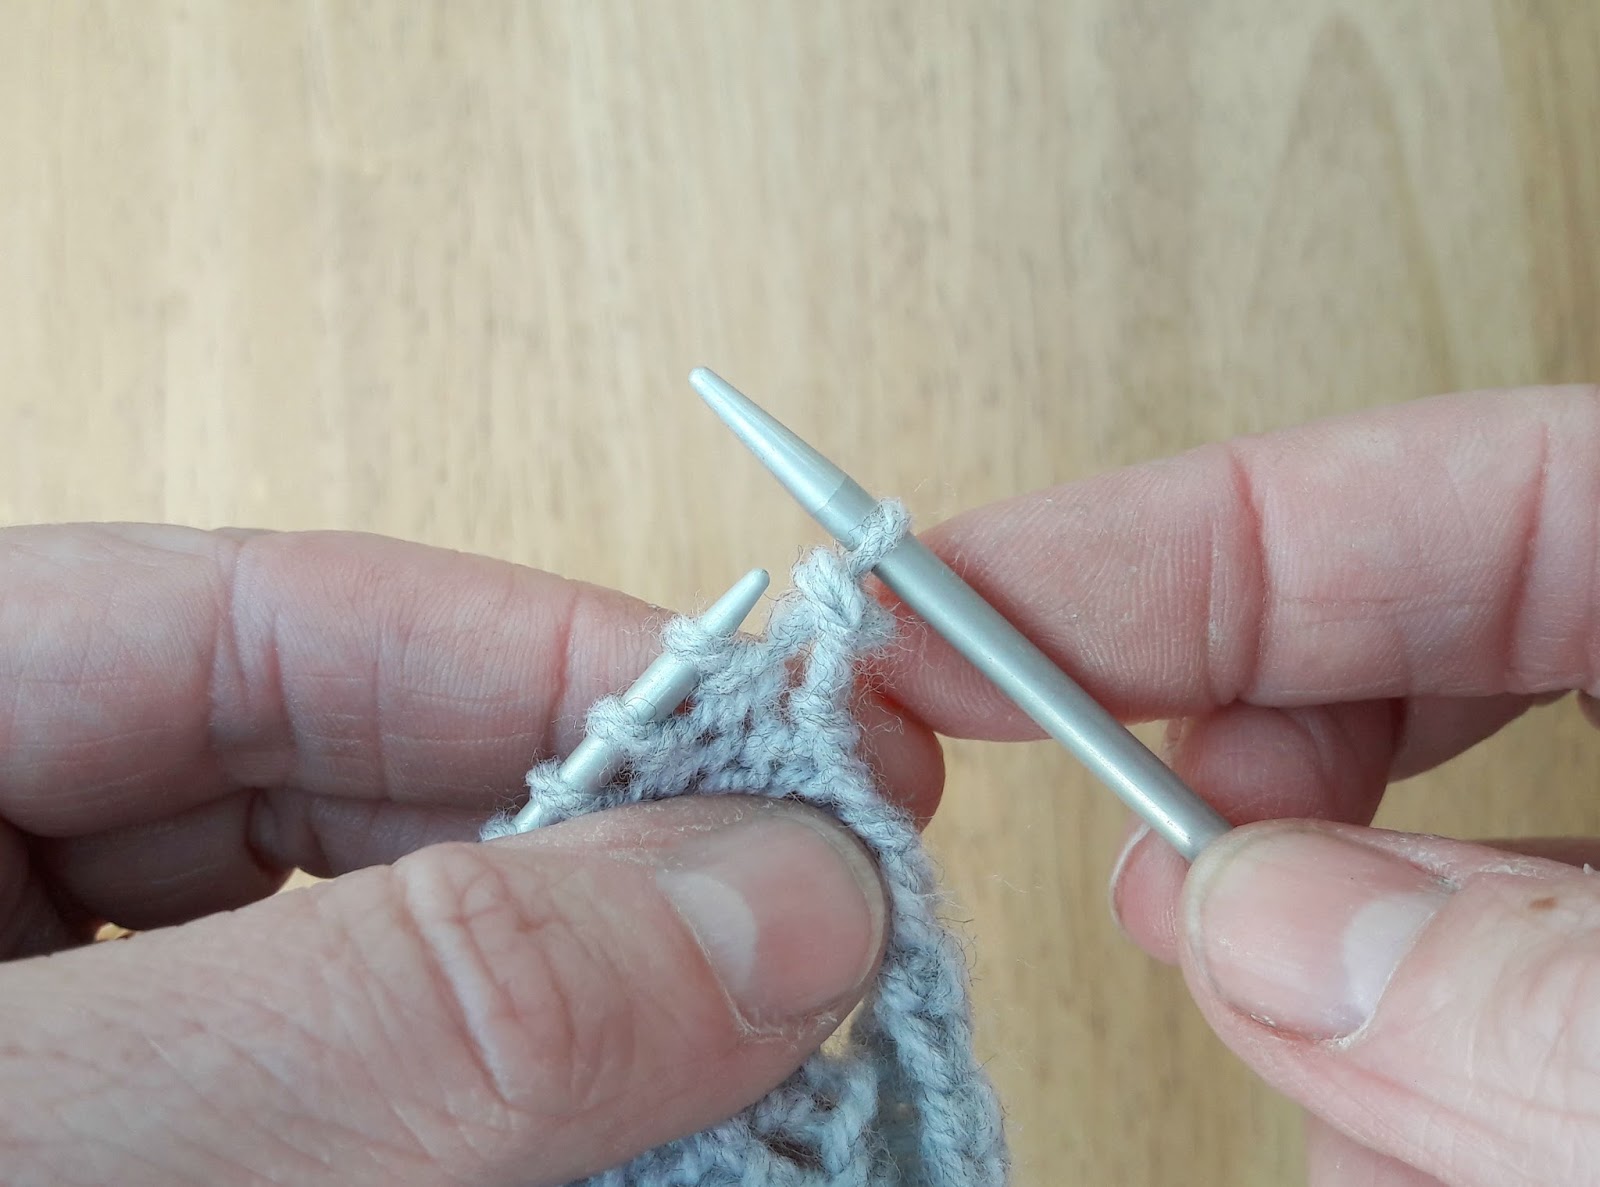
Slip the next stitch from the left needle to the right, slip the first stitch over the second and you can see how the stitches are forming a cast off edge without needing to use any more yarn. When you reach the point where you finished knitting, you can use any remaining yarn to cast off in the usual way (I like to use a Russian cast off for shawls for a stretchy edge) and then continue with the no-yarn bind off if you need to.
Once you’ve finished knitting, all that’s left to do is to block your shawl to stretch out the pattern as it will look pretty scrunched up at the moment. It’s always worth taking time to block lace knitting as it really shows off all your hard work. If you need help with how to block your shawl, have a look at the Couthie tutorial as there is more information there.
I hope you’ve enjoyed knitting your Aardvarkish – if you’re on Ravelry, please do take a minute to add your shawl to the pattern page so that I can see it as I always love to see how other people’s projects turn out!
This shawl pattern is free and will always remain so, but if you have enjoyed using it and would like to buy me a brew, it will be much appreciated! You can find the donation button on the sidebar on the left hand side. Thank you! xx
This pattern copyright © 2017 Winwick Mum All rights reserved.
Not to be included in any collection or used for profit without written consent of Winwick Mum.






Absolutely stunning, amazing how well that particular yarn suits the pattern. Aren't ya clever?! xxxxxxxxxxxxxxxxx
Thank you, it works really well doesn't it? It could have been made for this shawl! xxxx
It's gorgeous, and the pattern looks very clear and straightforward – thank you! This shall go on my (ever-lengthening) list 😍
I do my best to make things straightforward – glad you like it! xx
Beautiful!! thank you so very very much <3
You're very welcome xx
I shall give this a try. I've not had much success with lace knitting, even when I use a lifeline and stitch markers, I just somehow go wrong. But I can only try. Thank you Christine xx
There's not much to this pattern and it's quite easy to see where you're up to as the yarn overs go in diagonals so hopefully you'll do better this time xx
This is so pretty and such an interesting construction. I shall be making one soon!
Thank you! xx
What a gorgeous pattern.Thank you very much for sharing it:)
You're very welcome! xx
It is beautiful Christine, thank you so much for sharing the pattern. X
Thank you, I'm glad you like it! xx
Is this really made with one skein of wool? 100 grams. Or should I complement it with another colour?
There's no reason why you couldn't do that if you wanted to. It worked out that my yarn was dark at one end and light at the other but that was just that particular yarn. You could use any yarn you like! 🙂 xx
Wow! That is just so beautiful xx
Thank you! xx
that's beautiful. I've never had a great deal of success with lace knitting although I have been knitting for over 60 years.
The trick with lace knitting is to take your time, to use lifelines and to mark off exactly where you're up to on your chart. I've written more about it in my Easy Lace Socks tutorial so you can find more info there. I always make extra copies of charts and then colour them in as I'm going along so that I can see where I'm up to 🙂 xx
It is a beautiful shawl Christine! I doubt I'll cast on anytime soon but if someone would make it for me, that would be fab. x
Or find you some extra hours in the day … if only! 😉 xx
What a beautiful shawl Christine thank you for sharing the pattern. 🙂 x
Thank you, you're very welcome! xx
Hi Christine, just wondered what the approximate meterage used was in the 4ply? There seems quite a disparity from 350m right up to 425m depending on base etc and I want to make sure I buy enough. It's a lovely pattern, thank you for sharing it with us.
Sharon x x
I've checked with Vykky and my skein was 400m. I guess it depends on how you'd want to wear your shawl as to whether you minded the garter stitch section being deeper or not. Hope that helps! xx
Thank you yes. I'm assuming that the garter stitch section is adjustable which is good to know. X
Wow, Christine, thank you so much for sharing such a special pattern. And, your instructions are amazing! I do have one question, can I make the length of this shawl longer? Enjoy your day! Pat
Hi Pat, thanks for your comment, I'm glad you like it! Yes it's easy to make it longer – just add more Chart B sections in blocks of 18 stitches 🙂 xx
Great! Thank you so much. I have the perfect yarn in my stash 🙂
Pat – I hope you see this before you cast on – if you change the number of cast on stitches you'll need to recalculate the number of stitches in the short row section so this might be more trouble than it's worth. My shawl is actually much longer than I expected it to be, especially once it was blocked, so you might not need to adjust it at all xx
Thank you so much for sharing this pattern! We saw you wear it at Yarndale, and wondered if we had missed the pattern on your blog. So happy to see that you've posted it here! The shawl looked beautiful on you. – Ruth & Joanna
Thank you! I'm glad you like the pattern! xx
Thank you so much. You have already demonstrated to me you have significant skill as a knitter, but even more importantly that you can write clear pattern instructions. This pattern is a real (diamond) gem! Arlynn
That's really kind of you to say so, thank you! I'm hoping that everyone else who knits it finds it clear to read too – but I'm quite sure they'll tell me if it's not! 🙂 xx
A very pretty shawl, thank you. I only have one skein of yarn out here in Cambodia and I suspect it's not long enough for this so I'll save it till I come home and need a woolly scarf again!
The pattern will always be here, so you can knit it whenever you're home 🙂 xx
Thank you for this lovely pattern. I've got a cone of dusty blue 4 ply bought ages ago and just waiting for the right thing to come along. Here it is!
Brilliant! 🙂 xx
I hope you don't mind me pointing out that I think the stitches on charts A and C should be 15 and 18, not 16 and 17. I really struggled with the first row but once I adjusted my markers it all fell into place. Looking forward to seeing my shawl grow, and now the weather's turned cold, I'm going to need it! x
I don't mind you pointing it out at all! This is the first time I've tried writing a lace pattern quite like this before and it's one thing to knit it yourself, and another to write it so someone else can read it! I wrote the numbers as they are to get the cast on number, but you do have to move the markers to accommodate the decreases on the next row. I'm glad it's working out for you now and hope that it continues to do so! 🙂 xx
I am having the same doubt. I'm going to move the markers and try again. Thank you very much 🙂
After roving and re-starting this project three times I searched online to see what other crafters had said about this pattern – your fantastic helpful comment was the clue I needed!
I finally realised that once I saw a leftover stitch at the end of the first panel of Chart A stitches, I just m oved that last stitch past the marker into the first Chart B stitch group (effectively moving the marker one stitch to the right) on every pattern repeat across the row (on every right side row).
After that the whole pattern made sense and it was really enjoyable !
I’m glad you worked it out and you’ve enjoyed making the shawl! 🙂 xx
That is perfect for your yarn and I like the design. I haven't cast on from the outer edge before, but I can see why you'd do that. I haven't seen that cast off technique before either. I have a couple of remnants of Koigu that might make a very nice version. Thanks for the information.
Hi I love this pattern and have the perfect sparkly unicorn yarn for it, so I am going to cast on and do the lace section soon so I can do the garter stitch section while I am on a long train journey soon. However, I have read the pattern through and I just wanted to check; the pattern says the short rows are 211 stitches in one row and 11 on the next, is that correct? Thanks.
Yes, it's right! 🙂 The 211 stitches will get you to the centre of your shawl and then you're going to be working outwards from the 11 stitches in the middle, decreasing from each side as you go. It's as well to use lifelines throughout your knitting just in case you make a mistake (ask me how I know that! 🙂 ) but following the pattern as it's written does work and will pull the long ends of the shawl in to make a crescent shape. It'll be perfect for train knitting! xx
Thank you for replying. I didn't want to get through the lace bits and then not be able to work it out 😃 Yes, I discovered lifelines recently whilst knitting another shawl (after I ended up having to frog the whole thing 😢😢) thank you, I can play with my sparkly unicorn yarn now 😀 xx